Understanding GitHub Actions: Core Concepts and Fundamentals

Introduction
In Part 2a, you learned about pull requests - creating branches, proposing changes, reviewing code, and merging safely. You’ve built a complete workflow for managing code changes.
That same workflow unlocks something even more powerful - automation.
GitHub provides a built-in automation platform called GitHub Actions that lets you define tasks that run automatically each time you push code or open a pull request.
Imagine opening a pull request and seeing quality checks complete before you even start your review. Merging with the confidence that GitHub Actions has already verified everything works for you.
Here’s what you’ll accomplish in this article:
- Build your first GitHub Actions automation that runs every time you push code
- Understand how it works: workflows, jobs, steps, and runners
- Watch GitHub Actions execute your automation in real-time
- Learn to troubleshoot when things don’t work as expected
By the end, you’ll have GitHub Actions responding automatically to every code change you make. Let’s start by understanding what GitHub Actions actually is.
About This Series
This is Part 3 of a series on GitHub Actions. We’re taking a building-block approach - starting with Git fundamentals, then GitHub collaboration, now automation.
We’re introducing automation concepts gradually. First, understanding what GitHub Actions is and how it works. Then triggers and events. Then building increasingly sophisticated workflows.
In this series:
- Understanding Git: The Foundation for GitHub Actions - Version control fundamentals
- Setting Up Your First GitHub Repository - Moving code to the cloud
- GitHub Pull Requests: How to Propose, Review, and Merge Changes Safely - Safe integration workflow
- Understanding GitHub Actions: Core Concepts and Fundamentals ← You are here
- Understanding Push and Pull Request Triggers (Coming next)
- And more as we build toward production-ready automation…
Each article stands alone, but they build on each other. Start from the beginning if you’re new to Git and GitHub, or jump straight to automation if you’re ready.
What is GitHub Actions?
As we’ve seen in Part 2a, when you opened your pull request, GitHub automatically checked for merge conflicts. That green “No conflicts with base branch” message appeared without you doing anything. GitHub was working for you behind the scenes.
GitHub Actions extends that concept. You define the checks, GitHub runs them every time you push code.
The platform that verified merge conflicts can now:
- Run tests on every code push
- Check your code conforms to your style
- Scan for accidentally committed API keys or secrets
- Build application containers in preparation for deployment
You write the automation once. GitHub executes it consistently.
But how does this actually work? Let’s trace the journey from pushing code to seeing results.
How GitHub Actions Works
You push code to GitHub.
In GitHub’s world, that push is an event - something that happened that GitHub can detect and react to. This is one of many events (we’ll explore others later in the series), but it’s the most common starting point.
When this event happens, GitHub asks: “Should I do something about this?”
This is where you come in. You can tell GitHub exactly what to do when code is pushed to your repository.
You write a set of instructions: “When someone pushes code to this repo, run these commands.” GitHub will look for those instructions in a specific location in your repository.
That set of instructions is called a workflow - a YAML file stored in .github/workflows/.
So here’s what happens when you push code:
- GitHub detects the push event
- It checks
.github/workflows/for instructions - If it finds a workflow configured for push events, it executes your instructions
- You see the results on GitHub
That’s it. The workflow is your recipe: when X happens, do Y.
In the next section, you’ll write your first workflow - a simple one that prints a message when you push code.
Ready? Let’s build your first GitHub Actions workflow.
Your First GitHub Actions Workflow
The best way to understand GitHub Actions is to build something yourself. Let’s create a simple workflow that prints a message every time you push code.
What We’re Building
You’re about to create your first automation. When you push code to GitHub, your workflow will:
- Print “Hello, GitHub Actions!”
- Show the current date and time
Simple, but it demonstrates the complete flow we just learned about.
Setting Up
You’ll need:
- A GitHub repository (if you’ve been following the series, use
my-first-projectfrom Part 2) - VS Code installed
- About 5 minutes
If you’re using the repository from Part 2, clone it and open it in VS Code:
git clone https://github.com/YOUR-USERNAME/my-first-project.git
cd my-first-project
Then in VS Code: File → Open Folder → select my-first-project
Creating the Workflow File
GitHub looks for workflows in a specific location. Let’s create that structure:
1. Create the .github folder:
- Right-click in VS Code’s Explorer panel (left sidebar)
- Select “New Folder”
- Name it
.github- the dot at the start is crucial!
2. Create the workflows folder inside .github:
- Right-click on
.github - Select “New Folder”
- Name it
workflows- plural! Not “workflow”
3. Create your workflow file:
- Right-click on
workflows - Select “New File”
- Name it
main.yml- the.ymlextension is required
Your structure should be: .github/workflows/main.yml
This exact path tells GitHub: “Here’s where my automation lives.”
Writing Your Workflow (Line by Line)
Now let’s build your workflow step by step. Open main.yml and start typing:
1. Name your workflow:
name: Hello WorldThis is just a label - it’s what you’ll see on GitHub. Call it whatever makes sense.
2. Tell GitHub when to run this workflow:
name: Hello World
on: [push]
This is the event we talked about! on: [push] means: “Run this workflow every time someone pushes code to this repository.”
3. Define the work to do:
name: Hello World
on: [push]

jobs:
jobs: is where you describe what GitHub should actually DO when the event triggers. Think of it as: “Okay, a push happened - here’s the work I need you to perform.”
4. Name your job:
name: Hello World
on: [push]

jobs:
  say-hello:
Notice the indentation - 2 spaces. say-hello is the name of your job. You can call it anything (no spaces, use hyphens).
5. Tell GitHub where to run this:
name: Hello World
on: [push]

jobs:
  say-hello:
    runs-on: ubuntu-latest
4 spaces of indentation now. This runs-on: ubuntu-latest line is important - it tells GitHub: “Give me a fresh Ubuntu Linux computer to run this job.” We’ll explain exactly what this means after you see it work.
6. Define the actual commands:
name: Hello World
on: [push]

jobs:
  say-hello:
    runs-on: ubuntu-latest

    steps:
steps: is where your actual commands go. These run one after another on that Ubuntu computer GitHub just created for you.
7. Your first step:
name: Hello World
on: [push]

jobs:
  say-hello:
    runs-on: ubuntu-latest

    steps:
      - name: Say hello
        run: echo "Hello, GitHub Actions!"
Notice: 6 spaces before - name:, then 8 spaces before run:.
name: Say hello- labels this steprun: echo "Hello, GitHub Actions!"- the actual command to execute
8. Your second step:
name: Hello World
on: [push]

jobs:
  say-hello:
    runs-on: ubuntu-latest

    steps:
      - name: Say hello
        run: echo "Hello, GitHub Actions!"

      - name: Tell us the time
        run: date
Same pattern: name the step, then run: with the command.
Your complete workflow:
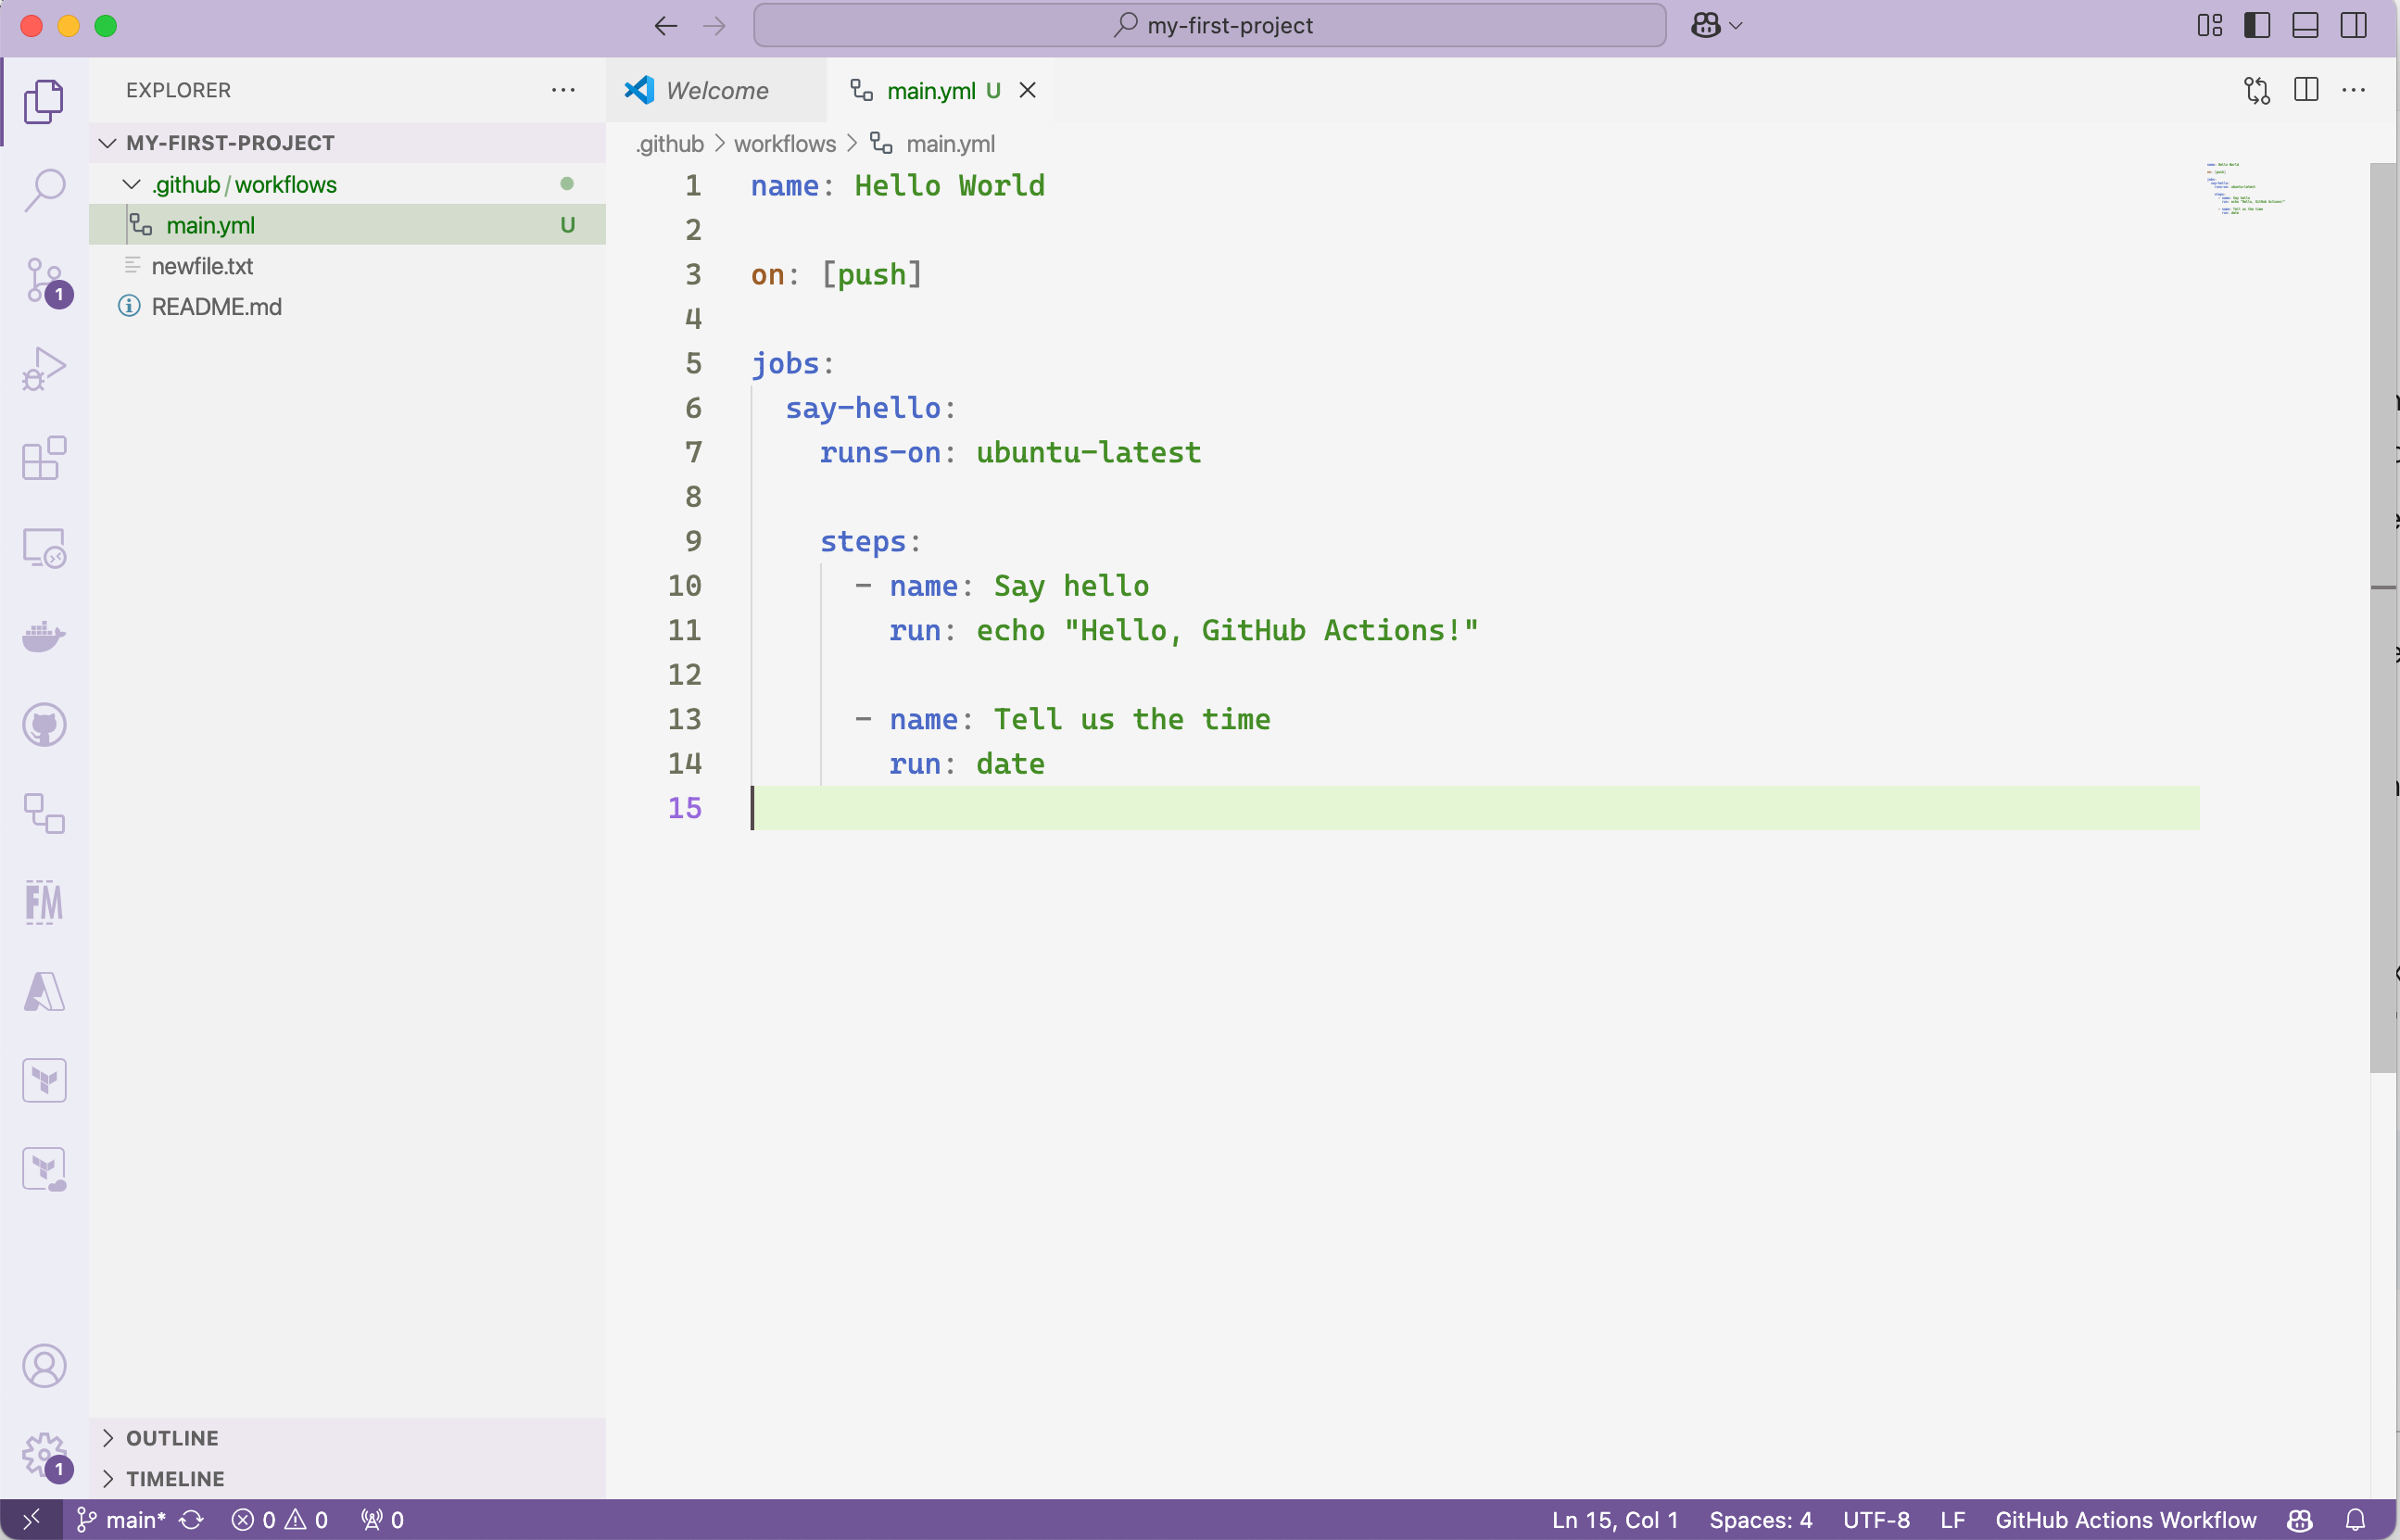
That’s it! You’ve written your first automation. Let’s make it live.
💡 VS Code Tip: If your indentation looks wrong, select all the YAML (Ctrl+A / Cmd+A) and press Shift+Alt+F to auto-format.
Pushing Your Workflow to GitHub
Time to send this to GitHub so it can run.
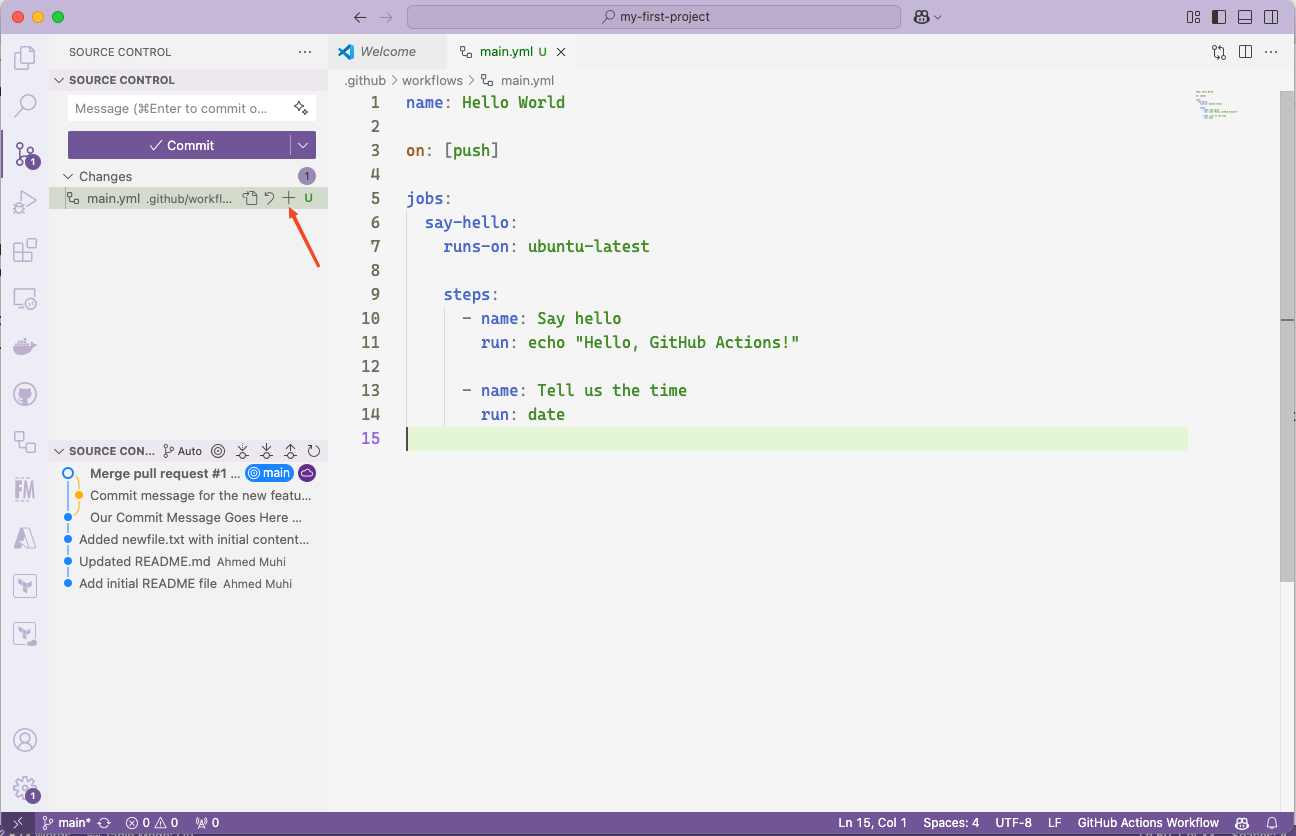
1. Stage your file:
- Click the Source Control icon in VS Code’s sidebar (looks like a branching tree)
- You’ll see
main.ymlunder “Changes” - Click the + icon next to it to stage
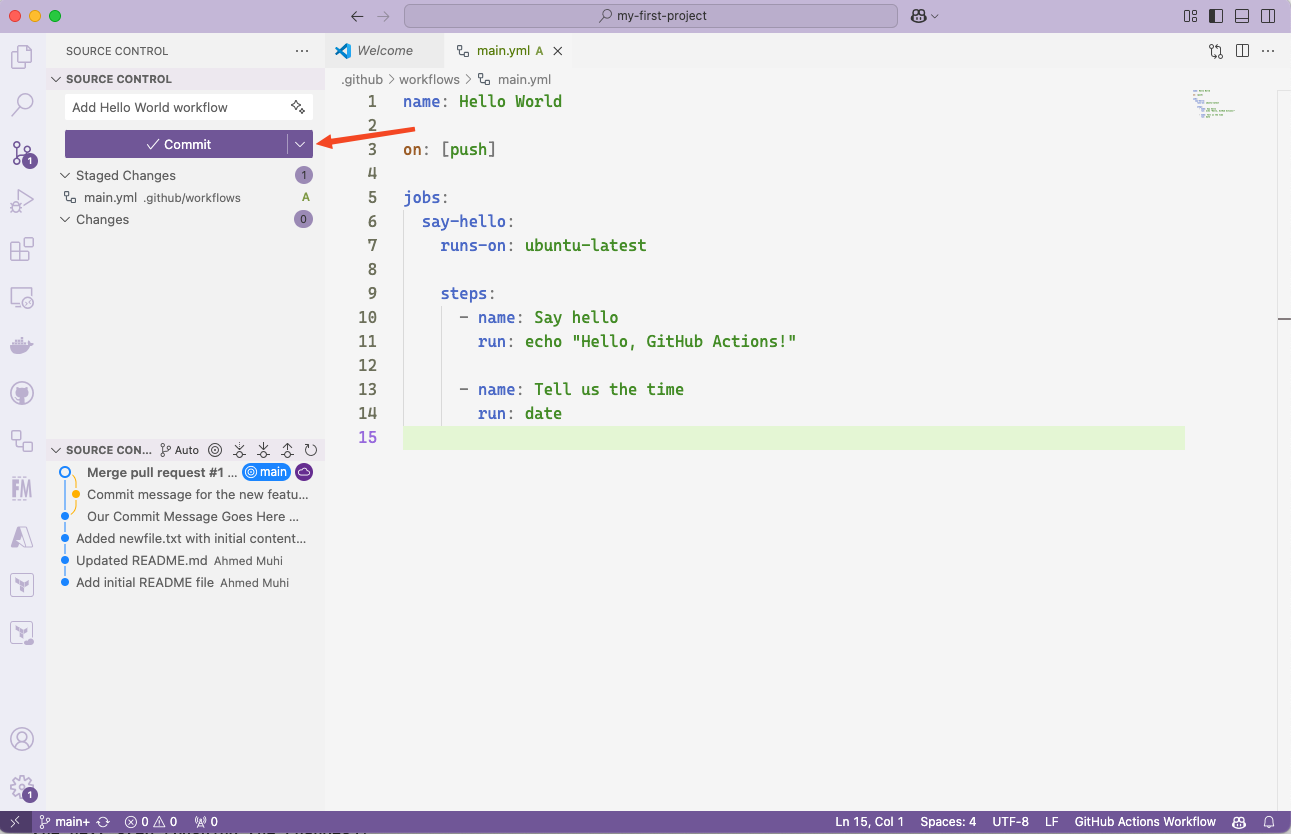
2. Commit with a message:
- Type “Add Hello World workflow” in the message box
- Click the checkmark icon to commit
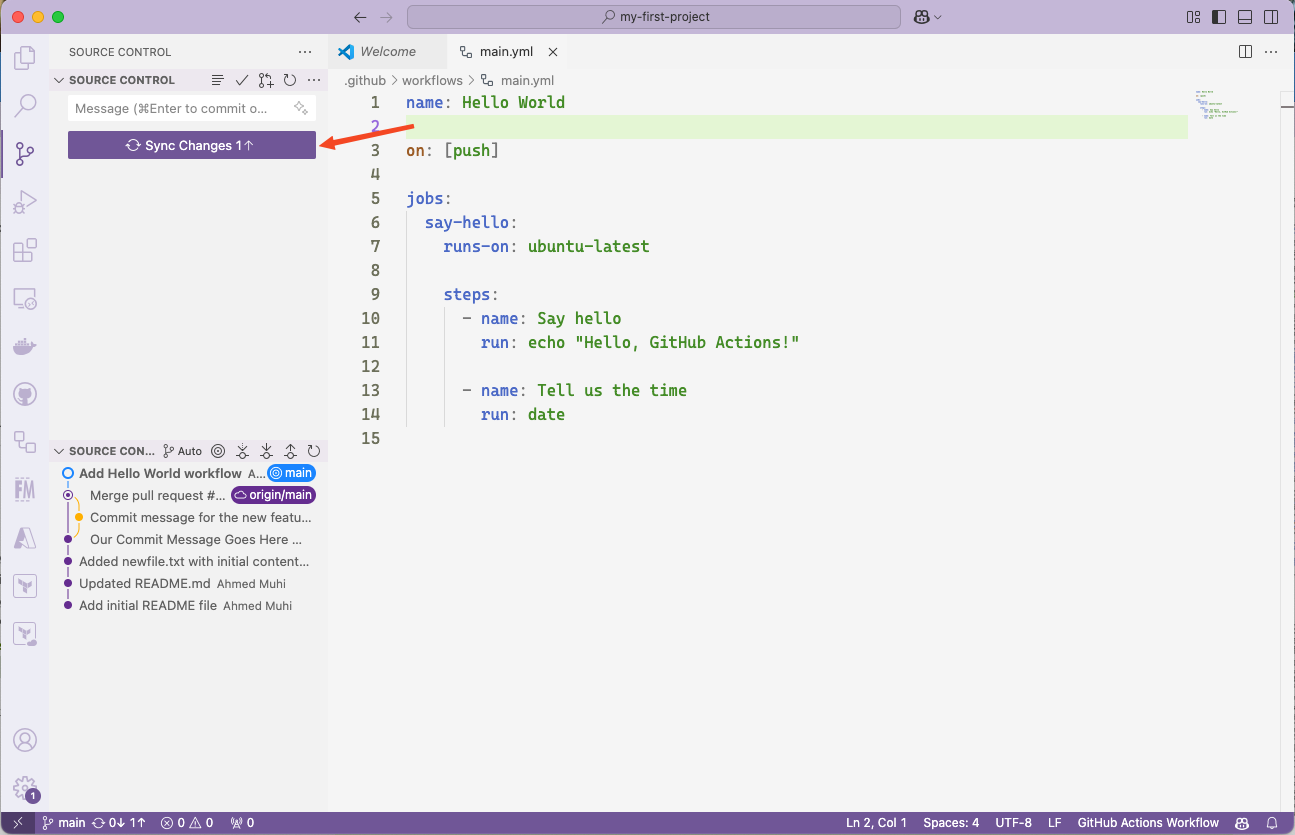
3. Push to GitHub:
- Click “Sync Changes”
- Click “OK” to confirm
The Moment of Truth
Now the magic happens. Head to your GitHub repository and click the Actions tab.
You should see your workflow running (or already finished):
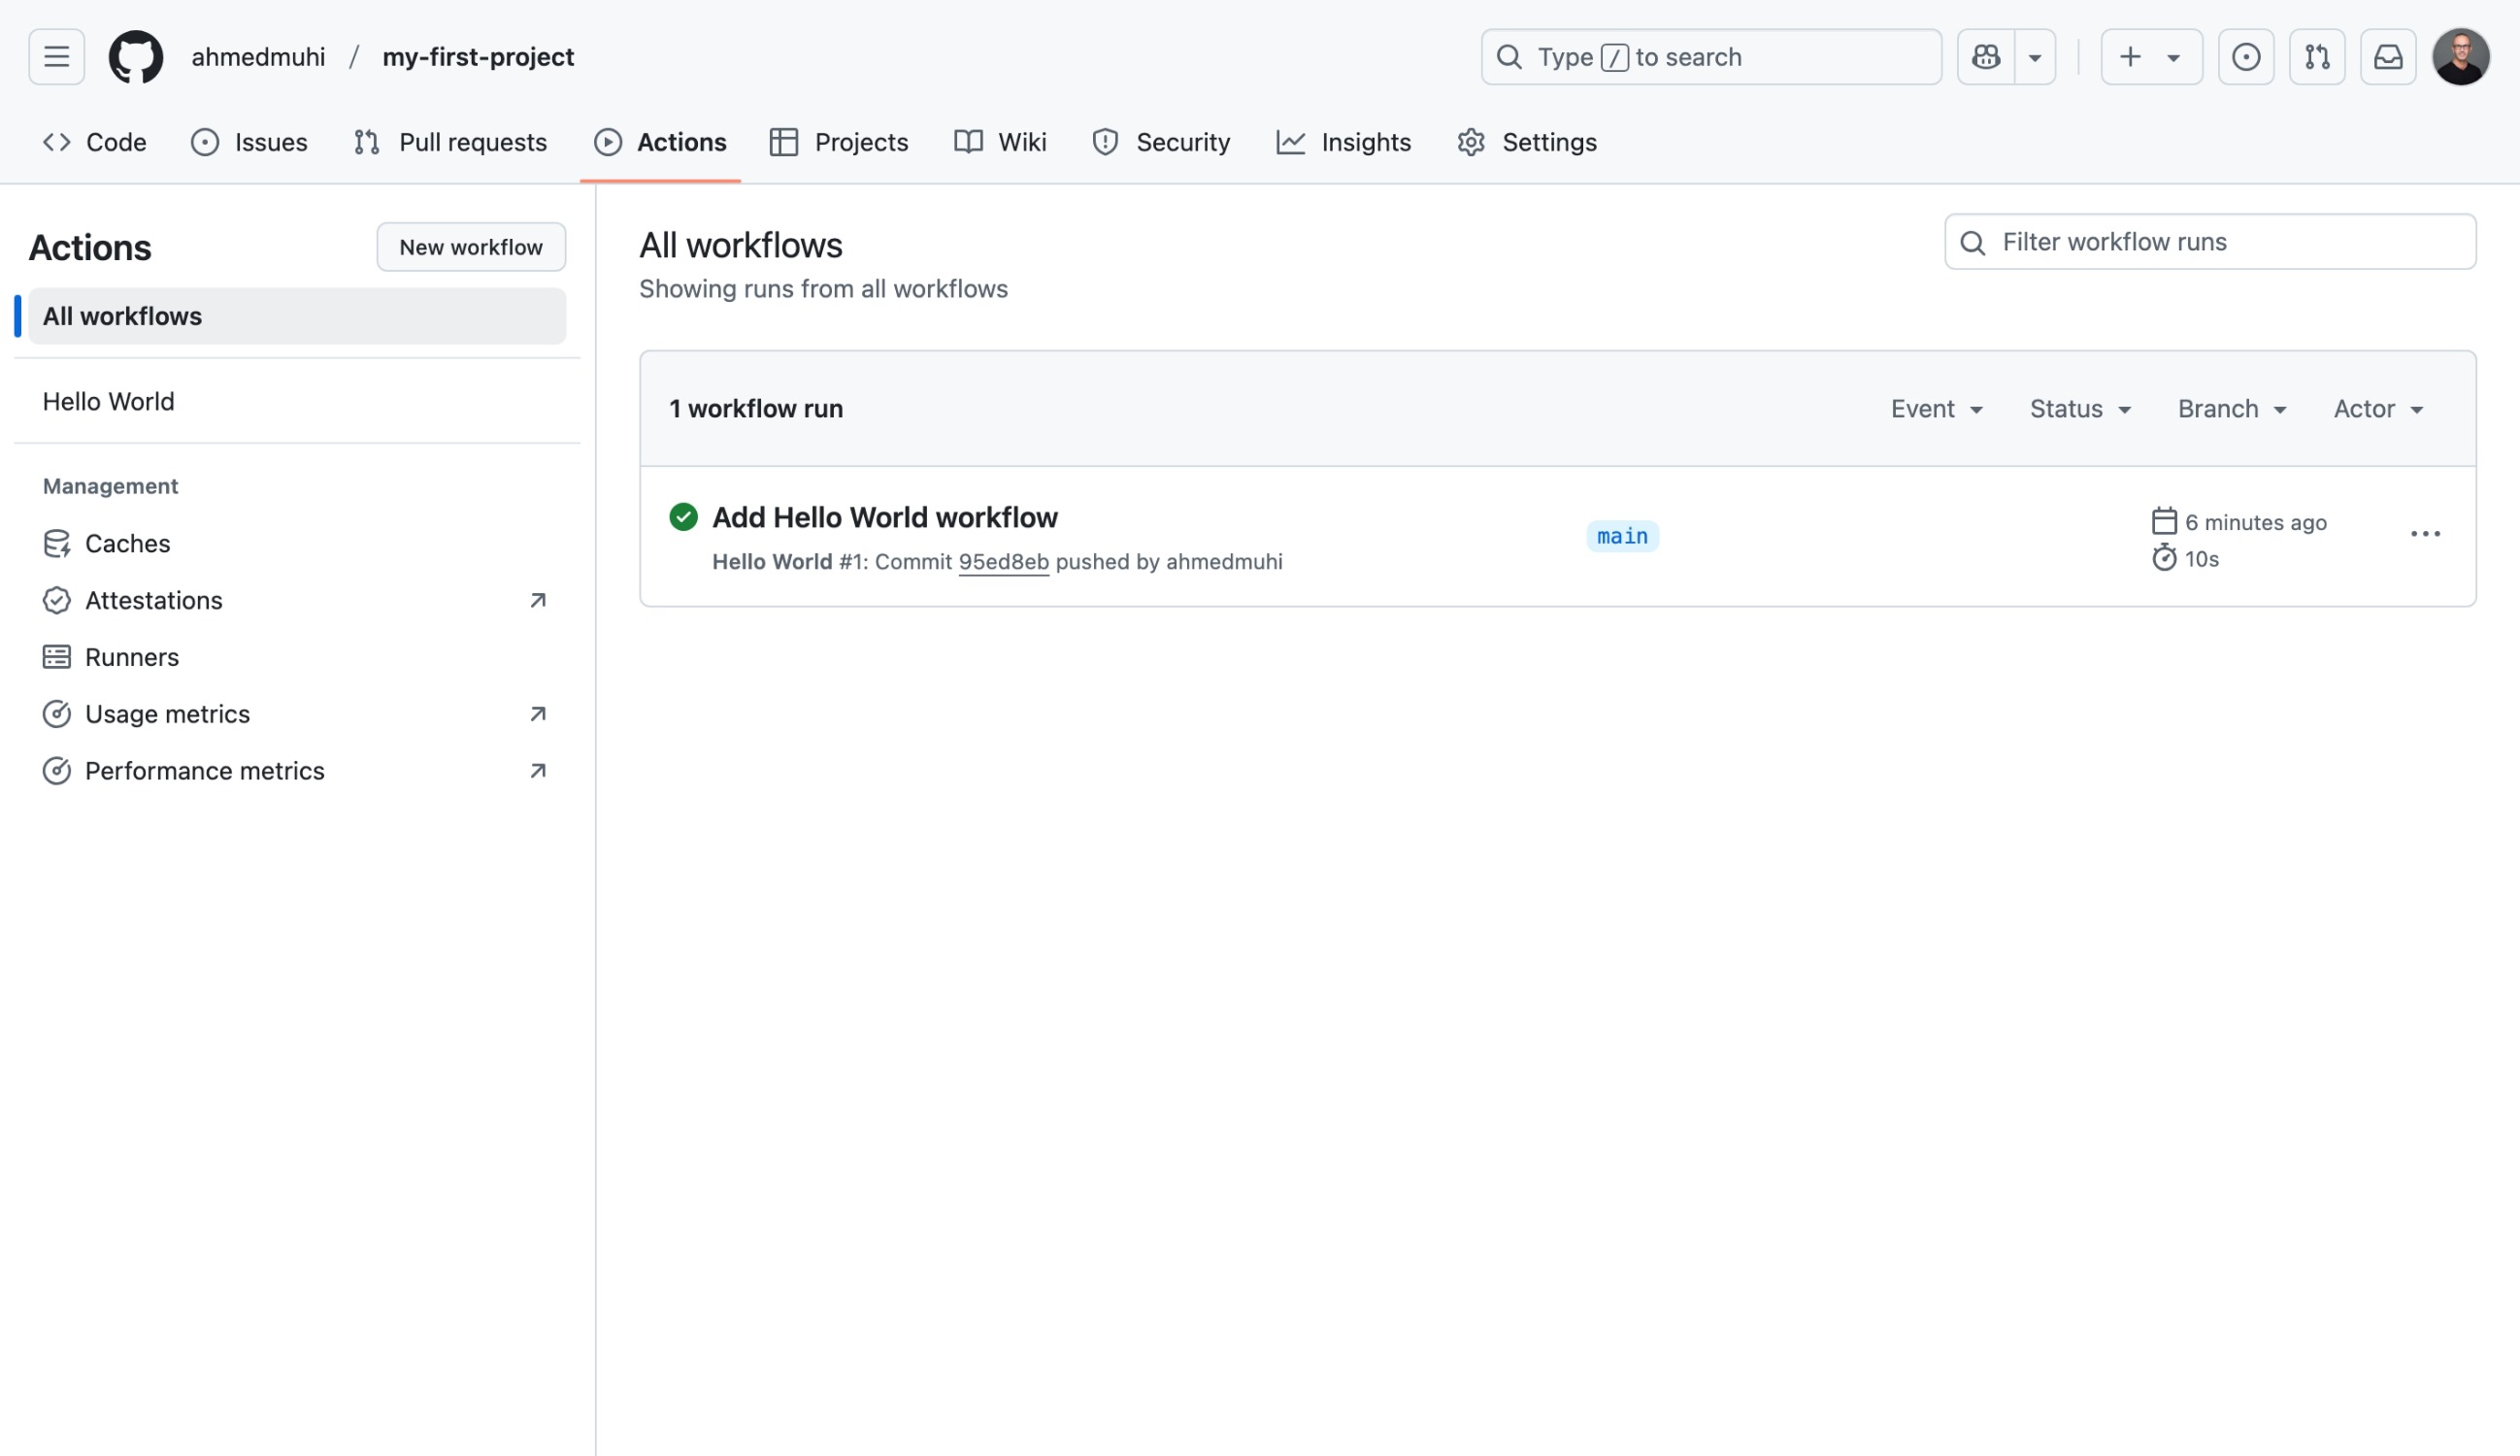
🎉 See that green checkmark? Your automation just worked!
Click on “Add Hello World workflow” to see what happened:
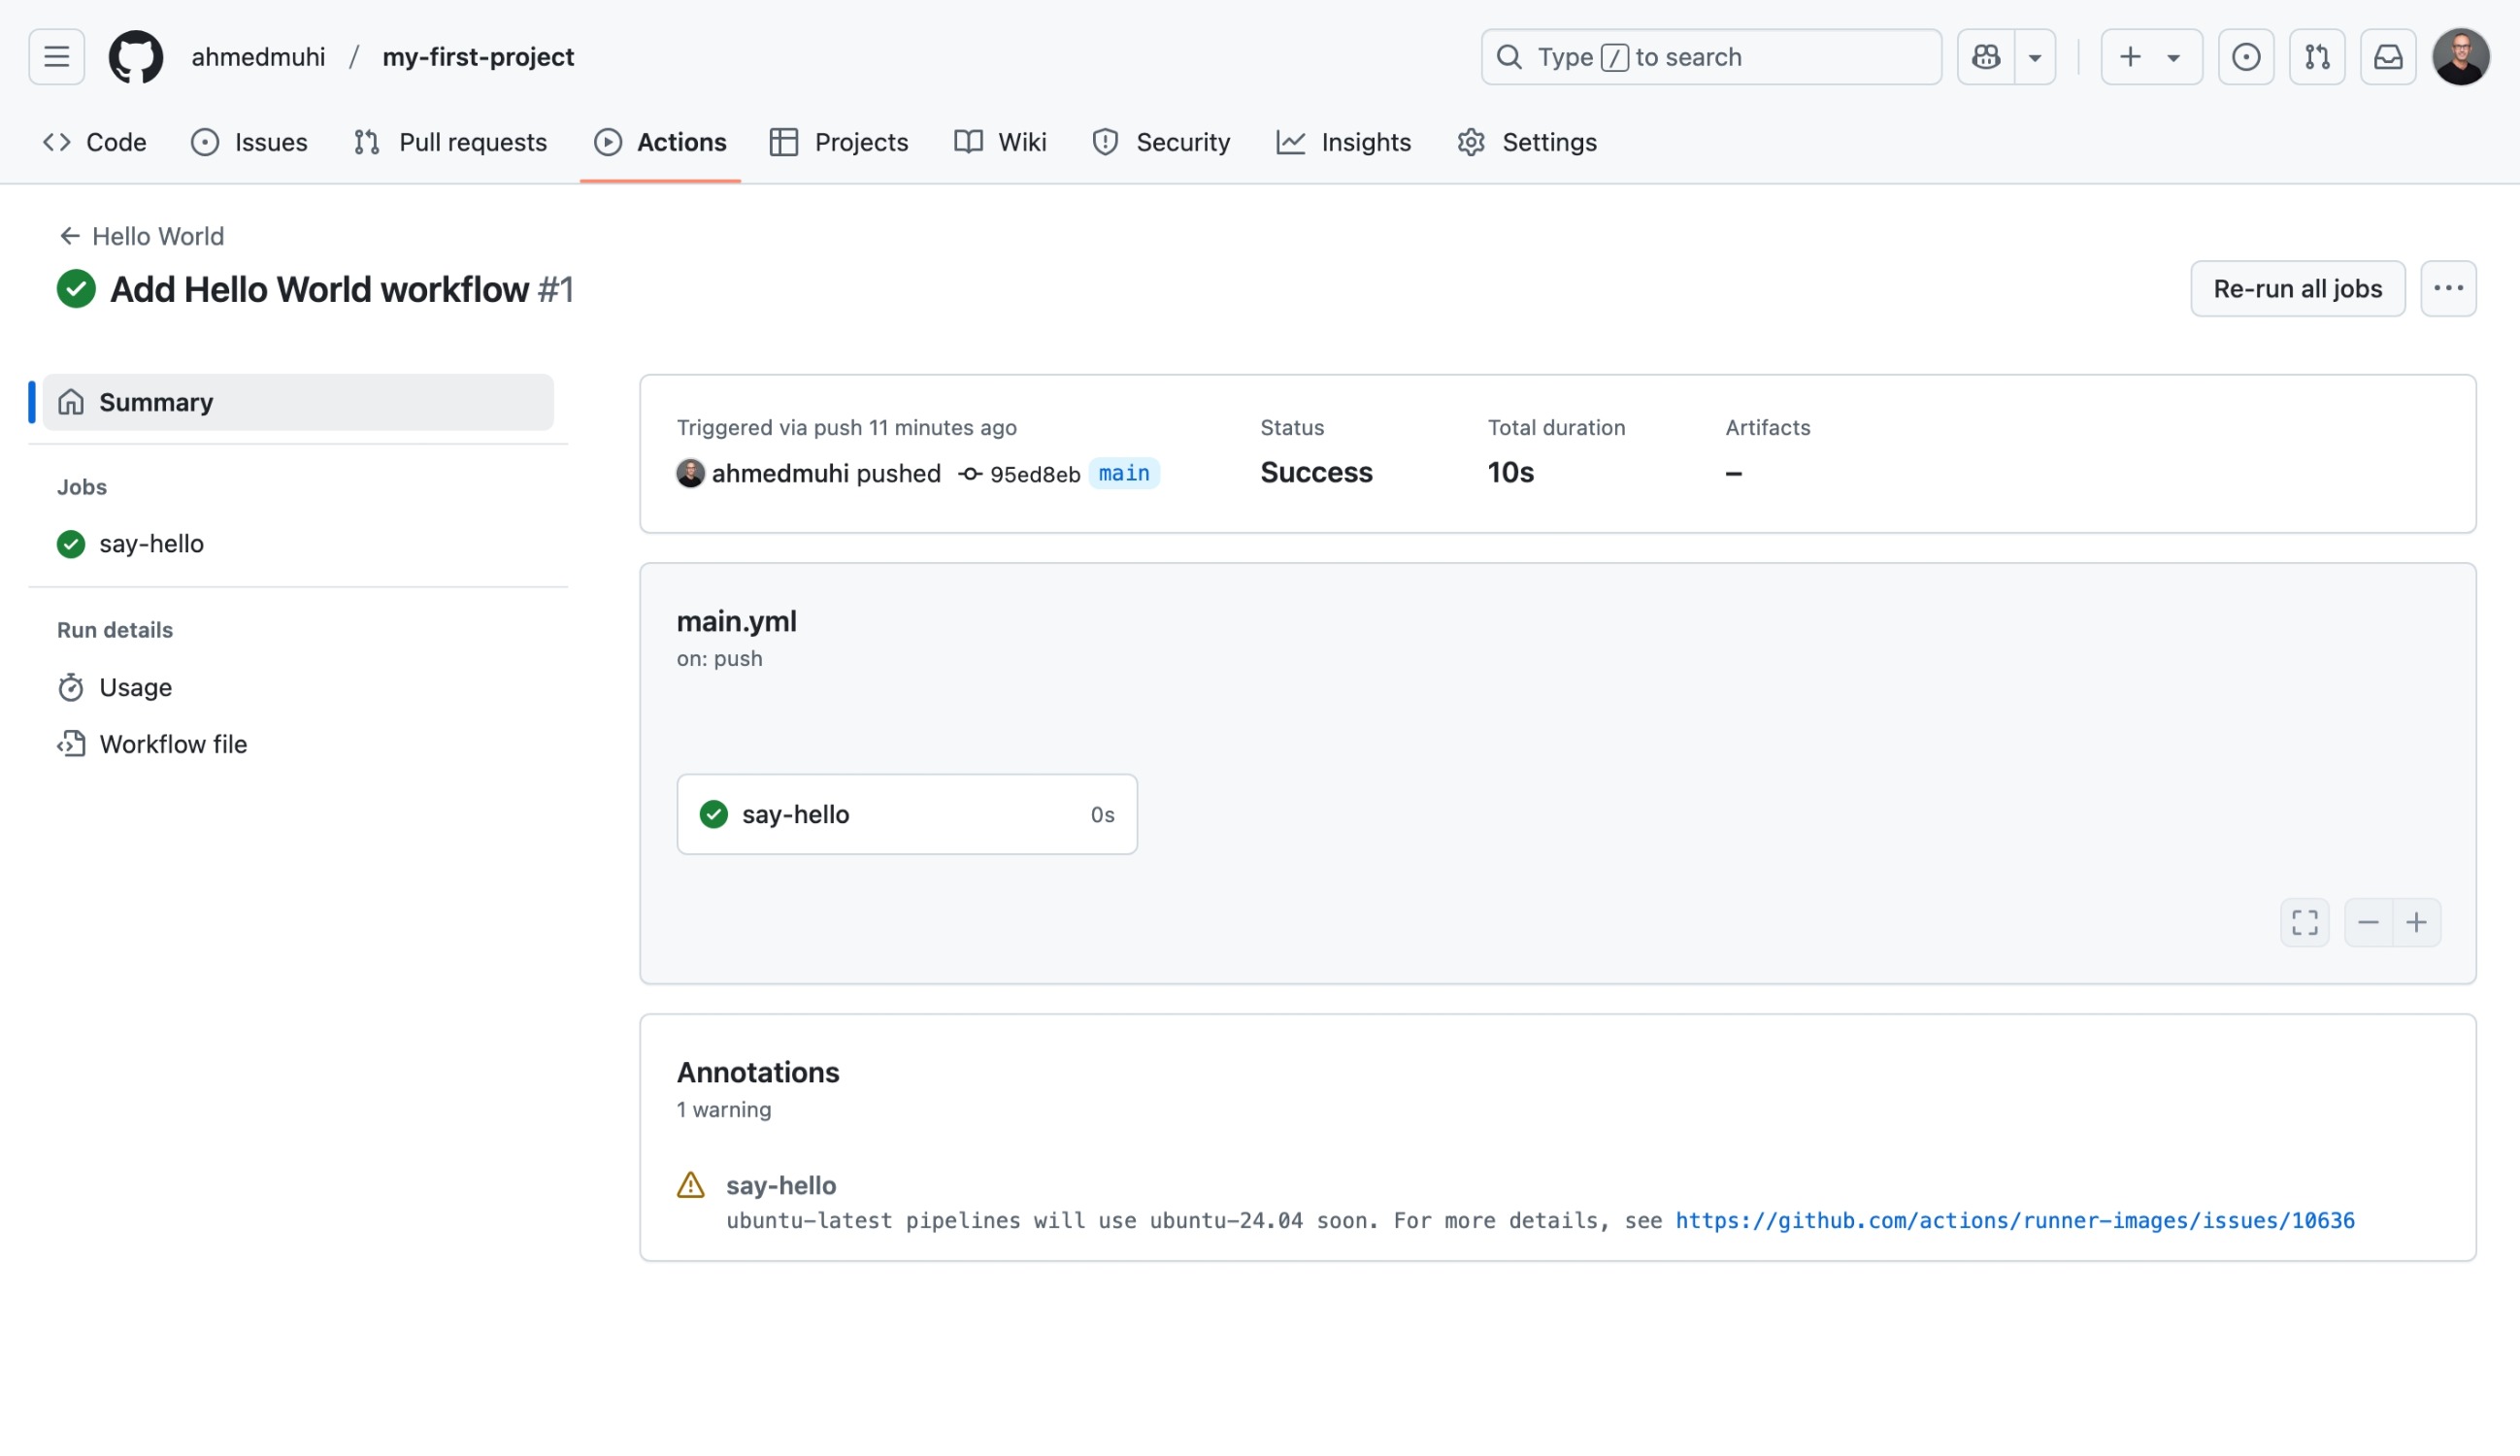
You’re looking at:
- The event that triggered it (your push)
- The job that ran (
say-hello) - How long it took
- The result (success!)
Click on the say-hello job to see the details:
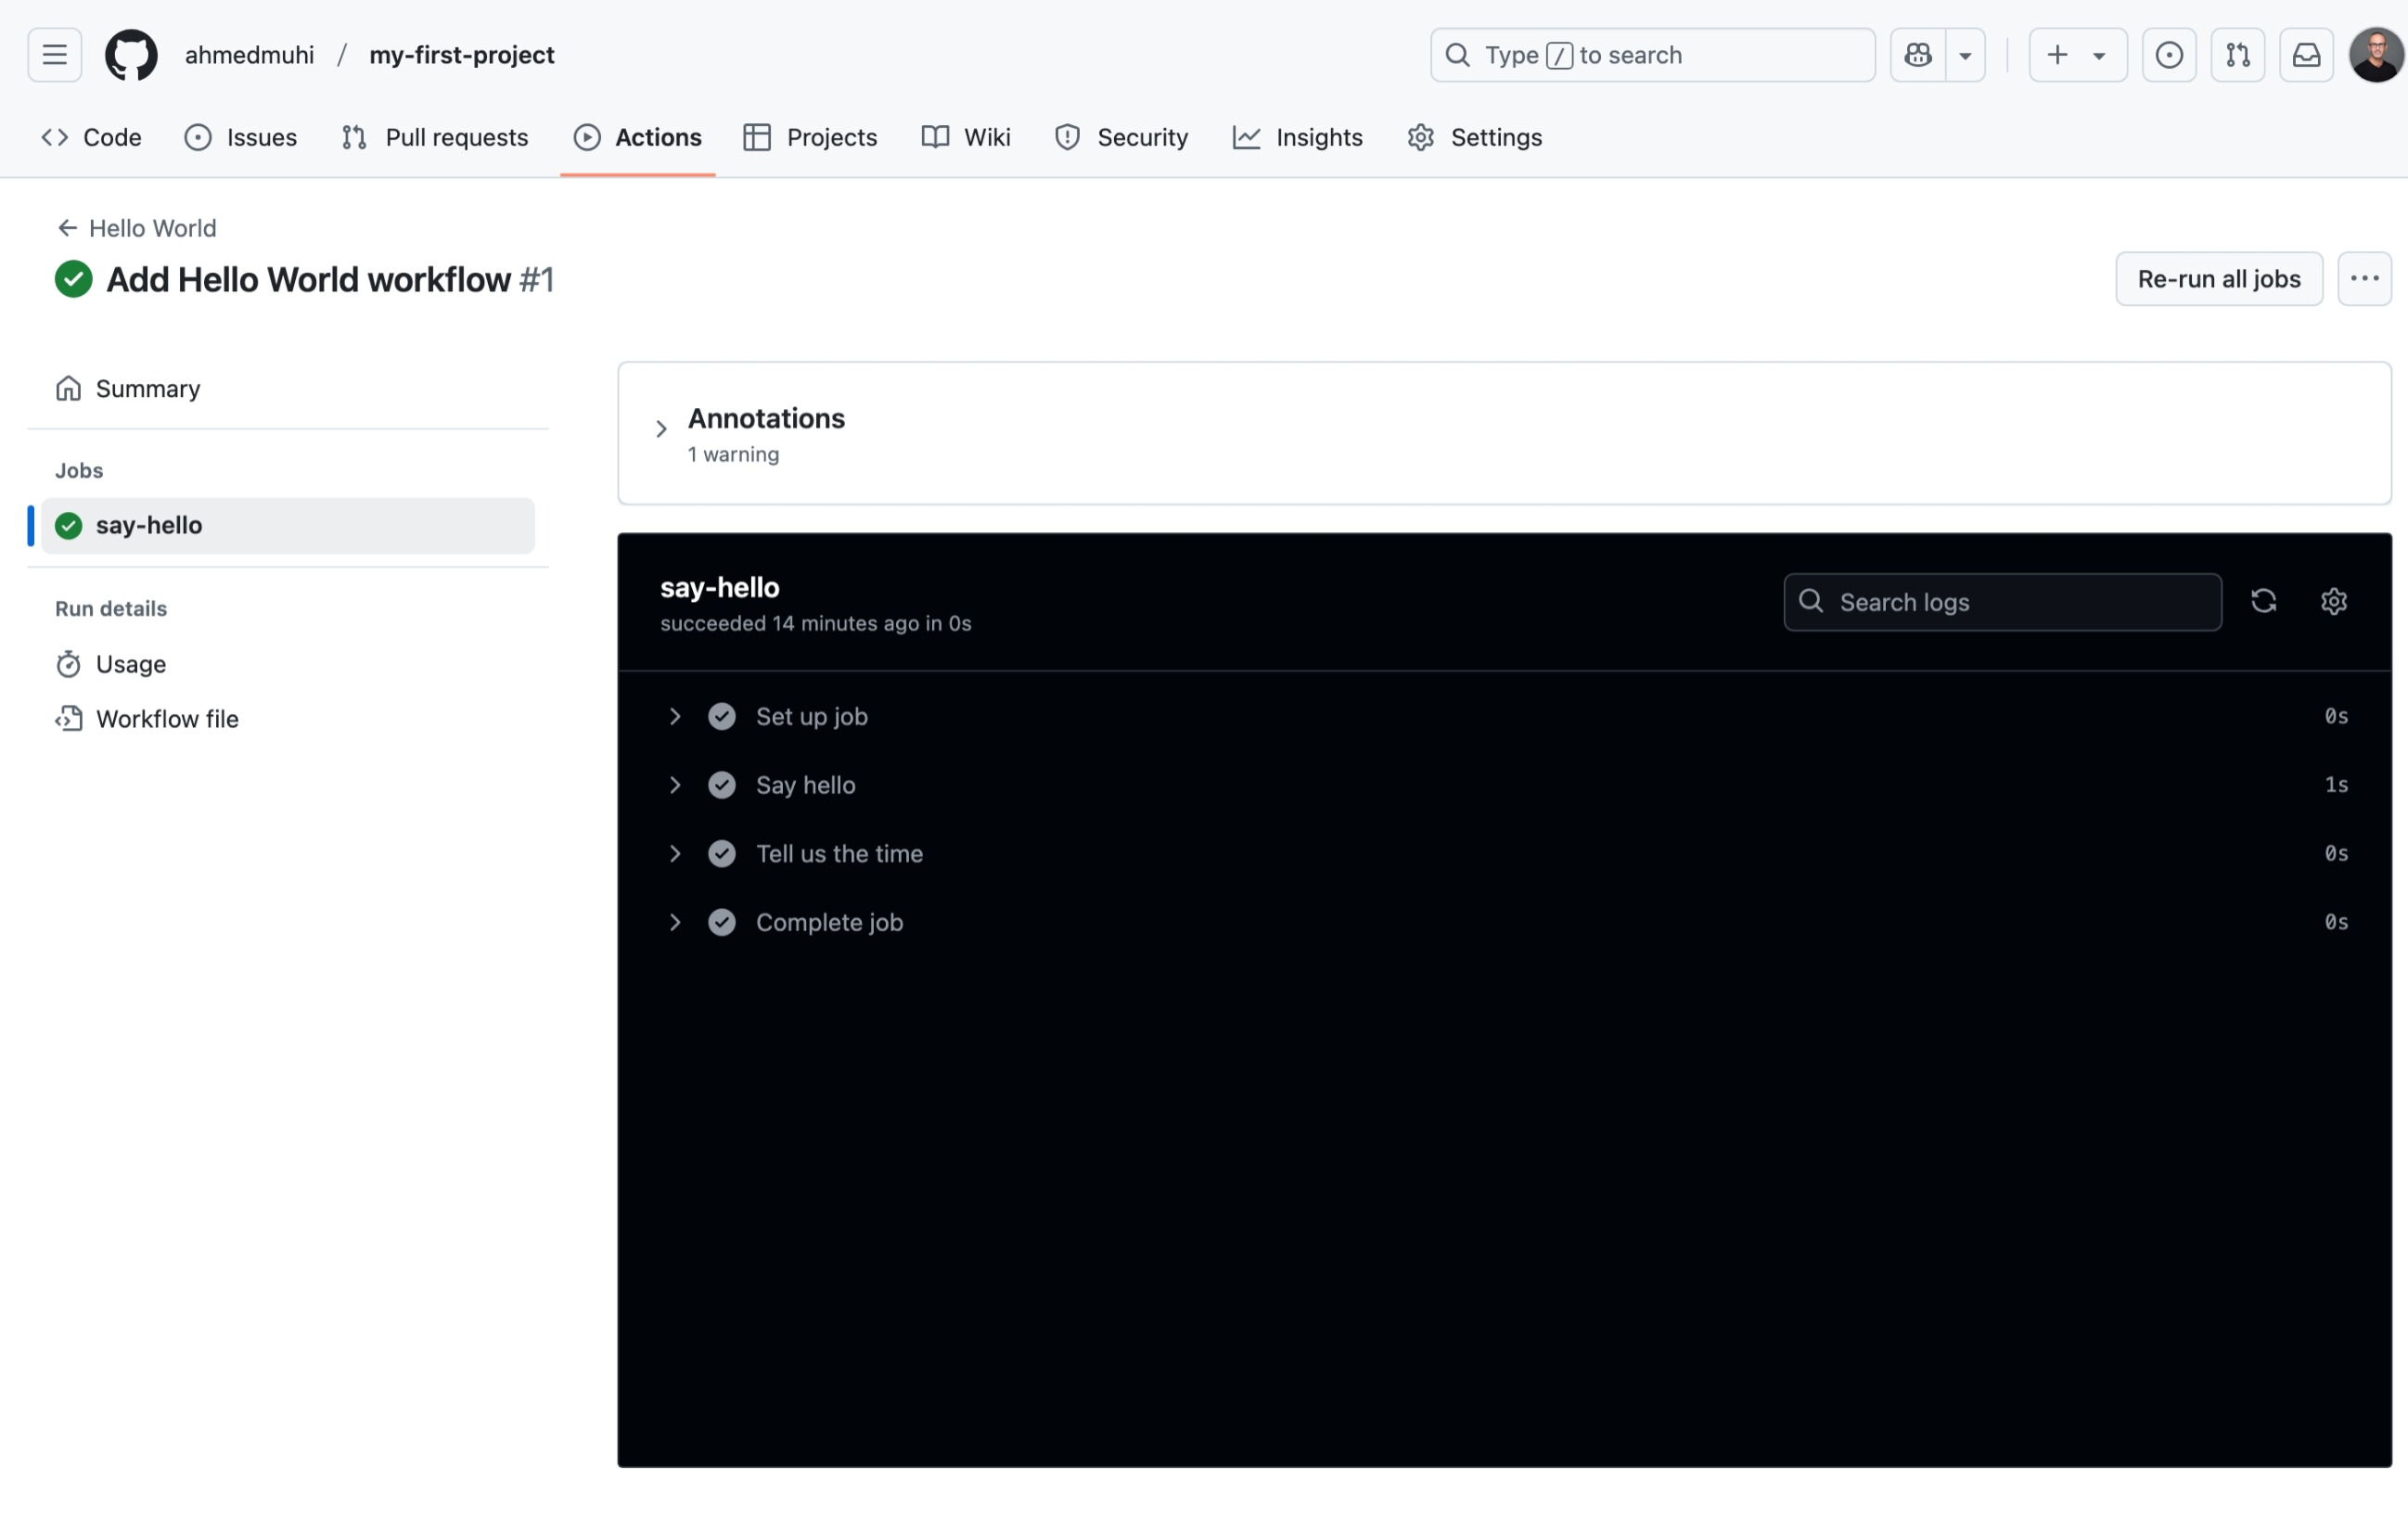
Wait - four steps? You only wrote two!
Click to expand them:
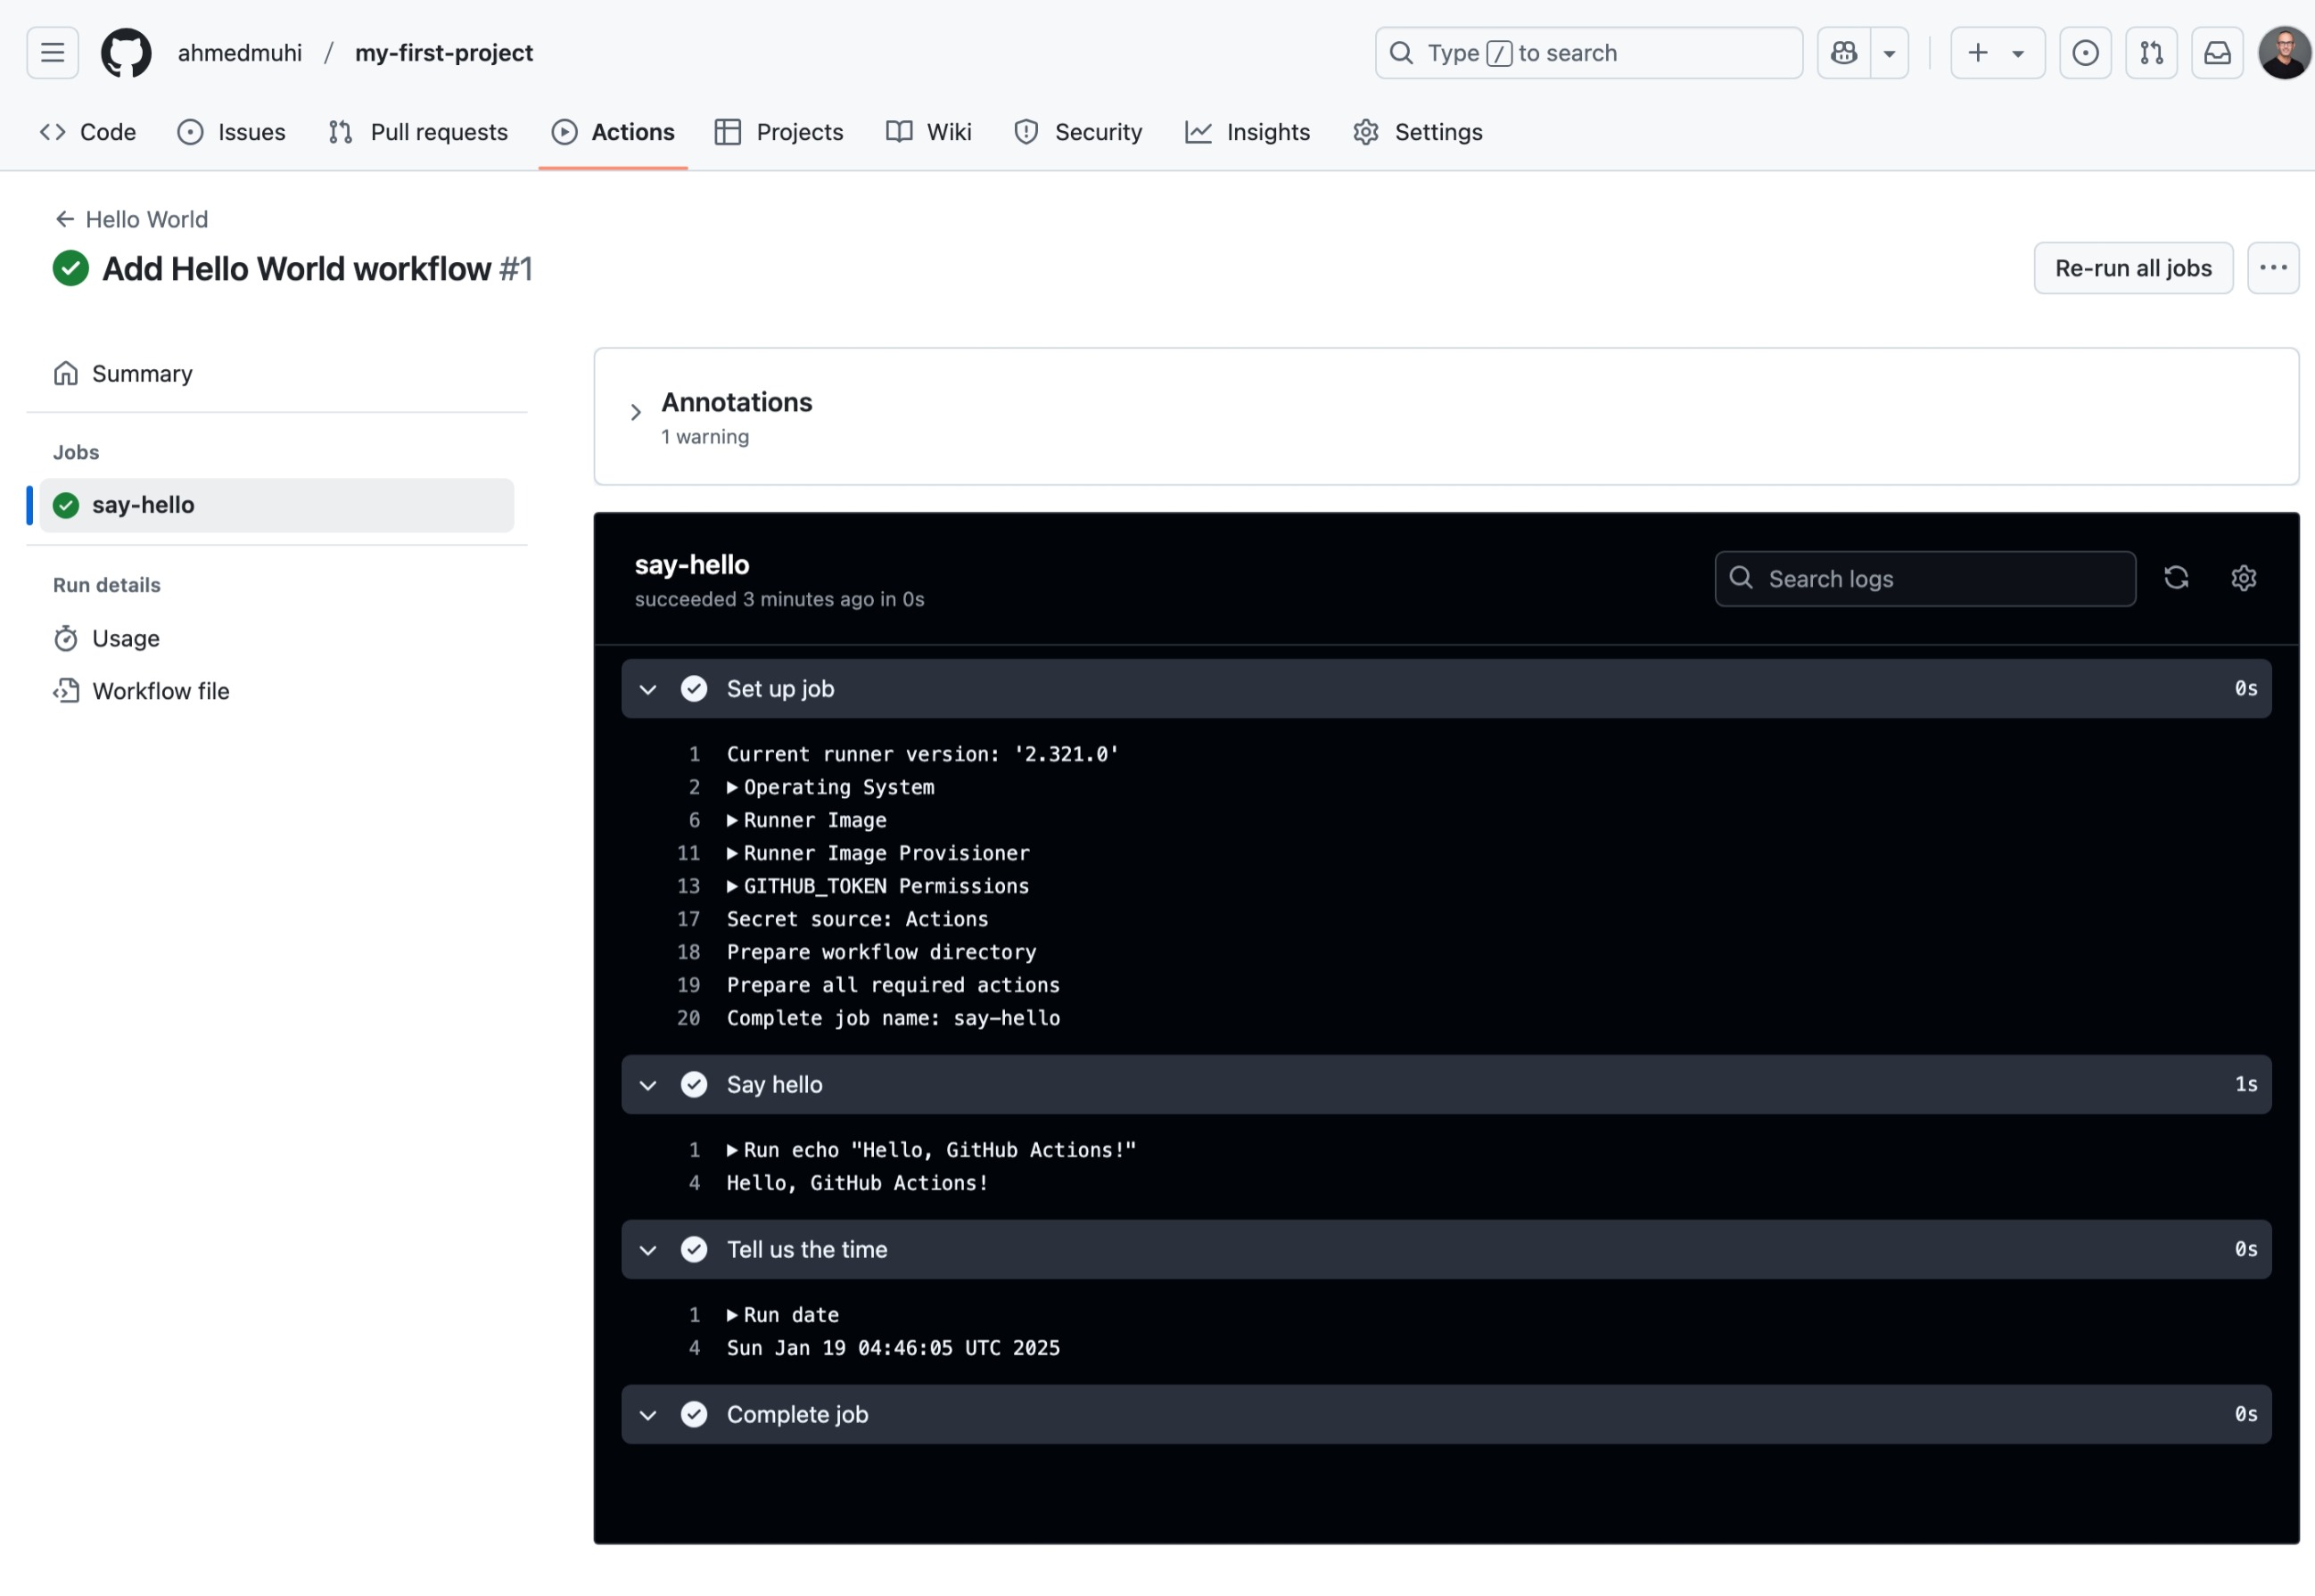
Look at your two steps:
- Say hello - see the echo command and “Hello, GitHub Actions!” output
- Tell us the time - see the exact timestamp
Success! 🎉
You just:
- Wrote automation code in YAML
- Pushed it to GitHub
- Watched GitHub execute it automatically
- Saw real-time results
That green checkmark proves it: automation is now working for you.
But what actually happened behind the scenes? What was that ubuntu-latest runner? Why were there extra steps? Let’s find out.
Understanding What Just Happened
Seeing that green checkmark is great, but let’s dig deeper. That runs-on: ubuntu-latest line? It orchestrated something remarkable.
The Runner: Your Temporary Computer
When you specified runs-on: ubuntu-latest, GitHub did something clever: it created a brand new Ubuntu Linux virtual machine just for your workflow.
Think about what happened:
- GitHub saw your workflow trigger
- It spun up a fresh Ubuntu computer in seconds
- That computer ran your commands
- GitHub destroyed the entire machine when finished
Every single workflow run gets a completely clean environment. No leftover files from previous runs. No conflicting software versions. No “but it worked last time” mysteries.
This isn’t just convenient - it’s essential for reliability. Your workflow runs the same way every time, on every machine, for every developer.
Why “ubuntu-latest”?
Let’s decode what you’re actually requesting:
Ubuntu = A popular Linux distribution that most web servers run latest = The most recent stable version GitHub supports
When GitHub spins up this Ubuntu runner, it comes pre-loaded with development tools:
- Git (obviously!)
- Programming languages: Node.js, Python, Ruby, Java
- Package managers: npm, pip, apt-get
- Build tools: make, gcc, maven
- Utilities: curl, wget, zip
It’s like ordering a computer that arrives with everything a developer needs already installed. No setup required.
Those Extra Steps Explained
Remember seeing four steps when you only wrote two? GitHub automatically added bookends around your work:
Set up job - Prepares the runner environment:
- Downloads your repository code
- Sets up the tools you’ll need
- Configures environment variables
- Gets everything ready
Complete job - Cleans up afterward:
- Uploads logs you’re reading now
- Reports success or failure
- Tears down the virtual machine
These automatic steps ensure your workflow runs smoothly from start to finish. You focus on your logic; GitHub handles the infrastructure.
GitHub-Hosted vs Self-Hosted Runners
What we just used is called a GitHub-hosted runner. GitHub provides the computer, maintains it, runs your workflow, and cleans up. It’s free for public repositories with generous limits for private ones.
The alternative? Self-hosted runners - where you provide your own computer. Teams use these when they need:
- Specific hardware (like GPUs for machine learning)
- Access to internal systems behind a firewall
- Operating systems GitHub doesn’t offer
- To avoid usage limits
But for learning and most projects, GitHub-hosted runners are perfect. That’s what we’ll use throughout this series.
What You Actually Built
Here’s something important to understand: what you just created isn’t just a simple script. It’s actually a CI/CD pipeline - the same pattern professional teams use to automate their entire software delivery process.
Let’s zoom out and see the bigger picture.
The Bigger Picture: CI/CD Pipelines
Your “Hello World” workflow might seem simple, but you’ve actually built something that scales. Let me show you what I mean.
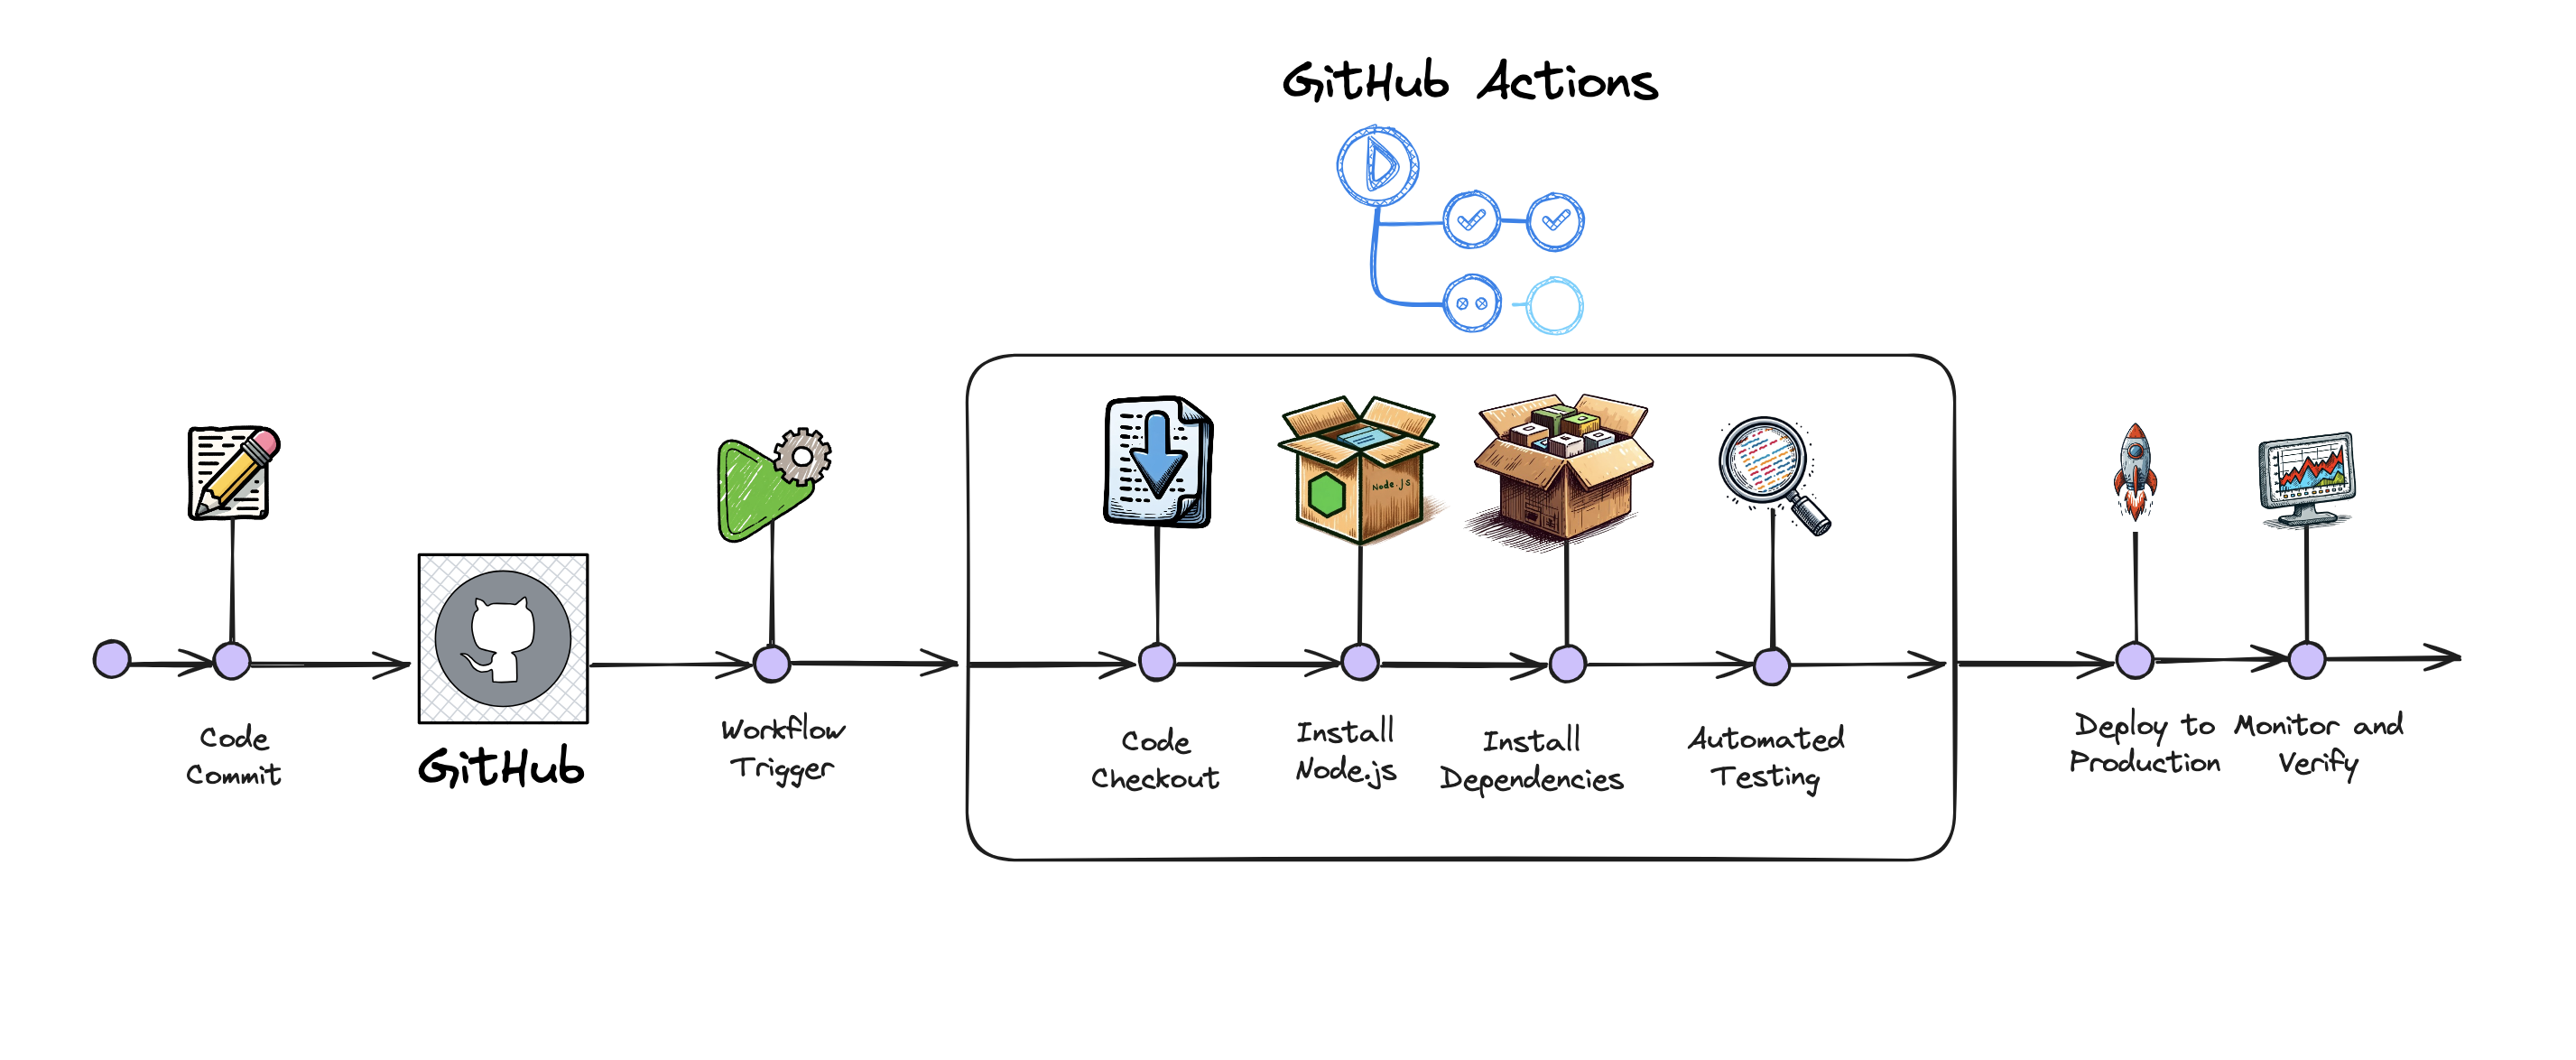 Figure 1: A complete CI/CD pipeline - from code commit to production deployment.
Look at this diagram. This is what a full production pipeline looks like. Notice anything familiar?
Your workflow has the same structure:
- Code Commit → You pushed code (the trigger)
- GitHub → Received your push event
- Workflow Trigger → Found your workflow file
- The boxed steps → Where your commands ran
The only difference? Production pipelines have more steps in that box:
- Checking out code
- Installing dependencies (Node.js packages, Python libraries)
- Running automated tests (hundreds or thousands of them)
- Building the application
- Deploying to servers
- Monitoring the results
But the fundamentals? Identical to what you just built.
Same triggers responding to events. Same runners executing on fresh machines. Same step-by-step execution. Same logs showing what happened.
This is what automation is all about: Write the instructions once in that YAML file, and GitHub executes them consistently every single time. No human clicking through steps. Instant feedback on every change. The same quality checks applied to every commit, automatically.
You’ve learned the core concepts that power continuous integration and continuous deployment at every company using modern DevOps practices. That simple workflow scales from your personal projects to enterprises deploying hundreds of times per day.
Debugging Workflows
Eventually, you’ll see a red X (❌) instead of that green checkmark. This is normal - it’s part of the learning process. The good news? GitHub Actions makes debugging straightforward.
Reading the Logs
When something doesn’t work, click through to see what happened:
Actions tab → Your workflow → The job that failed → The step that failed
GitHub shows you exactly what went wrong. The error message tells you what to fix.
Common Starting Points
Here are the most frequent issues when you’re getting started:
Issue: Workflow doesn’t trigger
Check your file location - it must be exactly .github/workflows/main.yml (including the dot and the ‘s’ in workflows). If your file is in the wrong place, GitHub won’t see it.
Issue: YAML syntax error
YAML is particular about spacing. Use exactly 2 spaces per indentation level (never tabs). In VS Code, select your workflow file and press Shift+Alt+F to auto-format.
Issue: Command not found
If a command works on your computer but fails in GitHub Actions, the runner might not have that tool installed. Check what’s available on GitHub-hosted runners.
Your Debugging Approach
When you hit an issue:
- Read the error message carefully - It usually tells you exactly what’s wrong
- Try the command locally first - Does it work on your machine?
- Search the error message - You’re probably not the first person to encounter it
- Check the documentation - GitHub’s docs are comprehensive and well-written
Remember: those runners are isolated and temporary. You can experiment freely - there’s nothing permanent to break. That’s one of the beautiful things about GitHub Actions.
What’s Next
You just built your first automated workflow. Code pushed, workflow triggered, commands executed, results delivered - all without touching a button. That’s the power you now have.
What You’ve Learned
The foundations:
- Events trigger workflows - Your push started everything
- Runners execute jobs - Fresh Ubuntu machines ran your commands
- Steps run sequentially - Each command builds on the last
- Logs show everything - Complete transparency into what happened
These same concepts power every GitHub Actions workflow, from your “Hello World” to production deployments at scale.
What’s Coming: Precision Control with Triggers
Right now, your workflow runs on every push. But what if you only want it to run when JavaScript files change? Or only on pull requests to main? That’s triggers - and they transform automation from powerful to precise.
In Part 4, you’ll learn to:
- Run workflows only when specific files change
- Trigger different checks for different branches
- Use pull requests as automation gates
- Combine multiple triggers for sophisticated control
Imagine: tests run only when code changes, deploys only when main is updated, checks only when pull requests target production. That’s what’s next.
Keep Experimenting
Those runners are isolated and temporary - you can’t break anything permanent. So try these:
- Change the echo message to something fun
- Add more steps (
pwd,ls,echo $HOME) - Create a second workflow file and watch both run
- Deliberately break something to see the error messages
The best way to learn is by doing. And GitHub Actions is the perfect playground.
See you in Part 4: Understanding Push and Pull Request Triggers 🚀