GitHub Pull Requests: How to Propose, Review, and Merge Changes Safely

Introduction
In Part 1: Understanding Git, you learned to track changes and travel through your code’s history. In Part 2: Setting Up Your First GitHub Repository, you pushed that repository to GitHub. You have a workflow: make changes, commit locally, push to GitHub, repeat.
Working on Separate Copies
Here’s something powerful Git lets you do: create separate copies of your project to work on independently. These copies (called “branches”) let you experiment, build features, and try new ideas without touching your main code.
Imagine working on a dark mode feature. With branches, you can spend a week making commits to your dark-mode copy while your main code stays stable and unchanged. Your live site, your working code - untouched while you experiment.
That’s the foundation. Now here’s where it gets interesting.
The Challenge: Bringing Work Back Together
You’ve spent a week working on your dark-mode branch. The feature works. You’re happy with it. Your commits are ready.
Now what?
You need to bring these changes back into your main code. You could merge them directly - Git has commands for that. But GitHub invented something better: pull requests.
A pull request is GitHub’s way of saying: “I have changes ready. Let’s review them before merging.”
Instead of immediately integrating your week of work, you can:
- Show exactly what changed
- Explain why you made these choices
- Let others review and comment
- Discuss specific lines of code
- Make improvements based on feedback
- Only merge when everyone’s satisfied
Think of it like submitting a draft: “Here’s my work. Take a look. Let’s make sure it’s ready. Then we’ll add it to the official version.”
This changed how developers work - whether on teams or solo projects. It’s the foundation of code review, quality control, and (as you’ll see in our next article) automation.
What You’ll Learn
This article focuses on pull requests - how to propose changes, review them, and merge them safely.
To get there, we’ll first quickly set up the foundation:
- Create a branch and make some changes
- See how branches isolate your work
- Push your branch to GitHub
Then the main event:
- Open your first pull request
- Review the changes in GitHub’s interface
- Merge your work back to main
- Clean up afterward
By the end, you’ll understand the workflow that powers professional development: stable code on main, experiments on branches, thoughtful integration through pull requests.
Ready? Let’s create your first branch so we have something to work with.
Creating Your First Branch
You understand the concept: branches let you work on separate copies. Now let’s make it real.
We’re going to create a branch called add-description, make a small change to your README, and see the isolation in action. Then you’ll understand exactly what you’re proposing when you open a pull request in the next section.
Making Your First Branch
Open your terminal and navigate to your project from Part 2:
cd path/to/my-first-projectCreate a new branch:
git branch add-descriptionThis creates the branch, but you’re still on main. To switch to your new branch:
git checkout add-descriptionYou’ll see:
Switched to branch 'add-description'Quick tip: You can create and switch in one command:
git checkout -b add-descriptionThat’s it. You’ve just created your first separate workspace.
Making Changes on Your Branch
Let’s add a description section to your README. We’ll do this directly from the terminal:
echo '' >> README.md
echo '## Description' >> README.md
echo 'This is my first GitHub repository, learning version control step by step!' >> README.md
These commands append text to the end of your README file. Now commit this change:
git add README.md
git commit -m "Add description section to README"
Perfect. Your commit exists on the add-description branch. Let’s see what happens when you switch branches.
The Magic of Isolation
Here’s where it gets interesting. Let’s see what branch you’re on:
git branchYou’ll see:
* add-description
  main
The asterisk shows you’re on add-description. Now switch back to main:
git checkout mainOpen your README file and look at it:
cat README.mdNotice something? Your description section is gone. It only exists on the add-description branch.
Now switch back:
git checkout add-description
cat README.md
The description reappears. You’re literally moving between two versions of your project - one with your new work, one without.
This is the isolation we talked about. Your main branch stays stable while you experiment. Your new work lives on its own branch until you’re ready to bring it back.
What You’ve Built
Right now on your computer, you have:
- main branch - Your stable code, unchanged
- add-description branch - Your new work, ready to propose
Think of it like having two copies of a document. You’ve been working on your copy, making notes and additions. Your official document hasn’t changed.
Now comes the question: How do you show your work and propose adding it to the official version?
That’s where pull requests come in. Let’s push your branch to GitHub and see how GitHub helps you bring these changes back together.
Pushing Your Branch to GitHub
You’ve created a branch and made changes locally. But remember: GitHub doesn’t know about any of this yet. Your add-description branch exists only on your computer.
Before you can open a pull request, you need to push your branch to GitHub - just like you pushed main in Part 2.
Same Command, Different Branch
In Part 2, you used this command to push your main branch:
git push -u origin mainThis told Git: “Push the main branch to GitHub (origin) and remember this connection (-u).”
Now you’ll use the exact same pattern, just with a different branch name:
git push -u origin add-descriptionThis says: “Push the add-description branch to GitHub and set up tracking.”
Go ahead and run it. You’ll see output similar to what you saw in Part 2:
Enumerating objects: 5, done.
Counting objects: 100% (5/5), done.
Delta compression using up to 8 threads
Compressing objects: 100% (3/3), done.
Writing objects: 100% (3/3), 412 bytes | 412.00 KiB/s, done.
Total 3 (delta 0), reused 0 (delta 0)
remote:
remote: Create a pull request for 'add-description' on GitHub by visiting:
remote:      https://github.com/YOUR-USERNAME/my-first-project/pull/new/add-description
remote:
To https://github.com/YOUR-USERNAME/my-first-project.git
 * [new branch]      add-description -> add-description
Branch 'add-description' set up to track remote branch 'add-description' from 'origin'.
GitHub’s Response
Look at that output carefully. GitHub isn’t just receiving your branch - it’s already helping you.
See this part?
remote: Create a pull request for 'add-description' on GitHub by visiting:
remote:      https://github.com/YOUR-USERNAME/my-first-project/pull/new/add-description
GitHub detected you pushed a new branch and is suggesting: “Want to create a pull request?” It knows what you’re probably trying to do.
What Just Happened
Your GitHub repository now has two branches:
main- your stable codeadd-description- your new work
GitHub can see both versions. It can compare them. It can show you exactly what’s different.
Head to your repository on GitHub and you’ll see something at the top of the page:
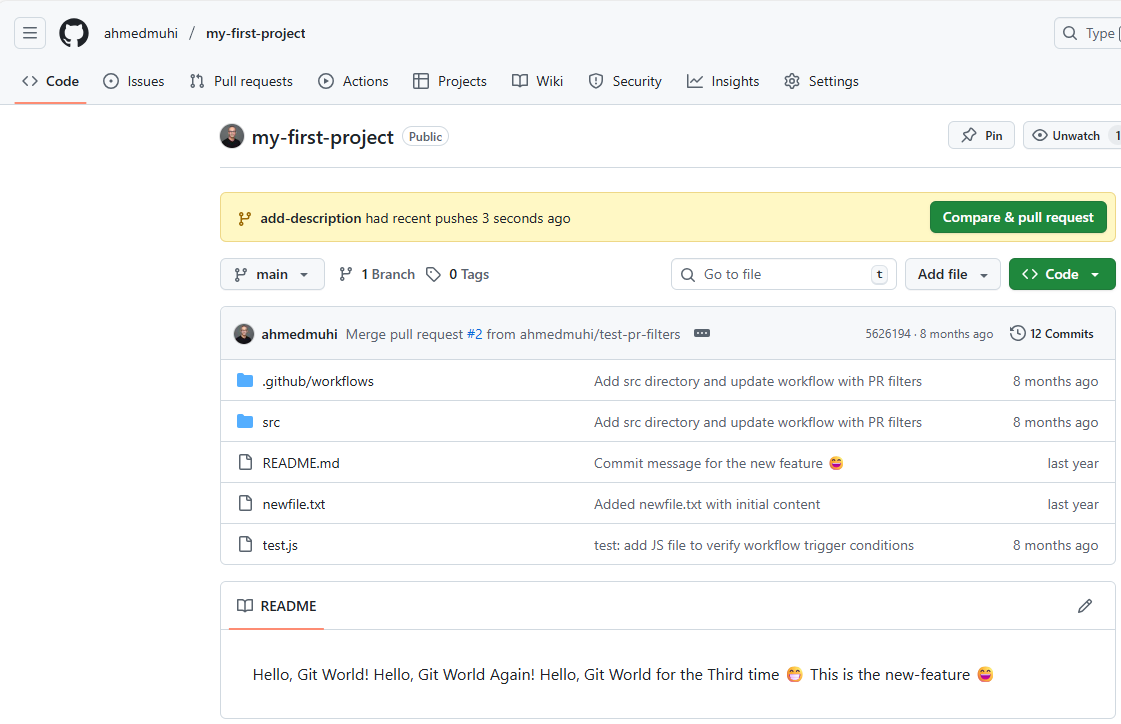
That green button is GitHub’s invitation. It’s saying: “I see you pushed a new branch with changes. Want to propose merging it?”
This is the moment where Git (local version control) hands off to GitHub (collaboration platform). Your branch exists in both places now. You’ve set the stage.
Ready to open your first pull request? Let’s click that green button.
Opening Your First Pull Request
Click that green “Compare & pull request” button. GitHub takes you to a new page - the pull request creation form. This is where you make your case.
Let’s walk through what you’re seeing.
Understanding the Comparison
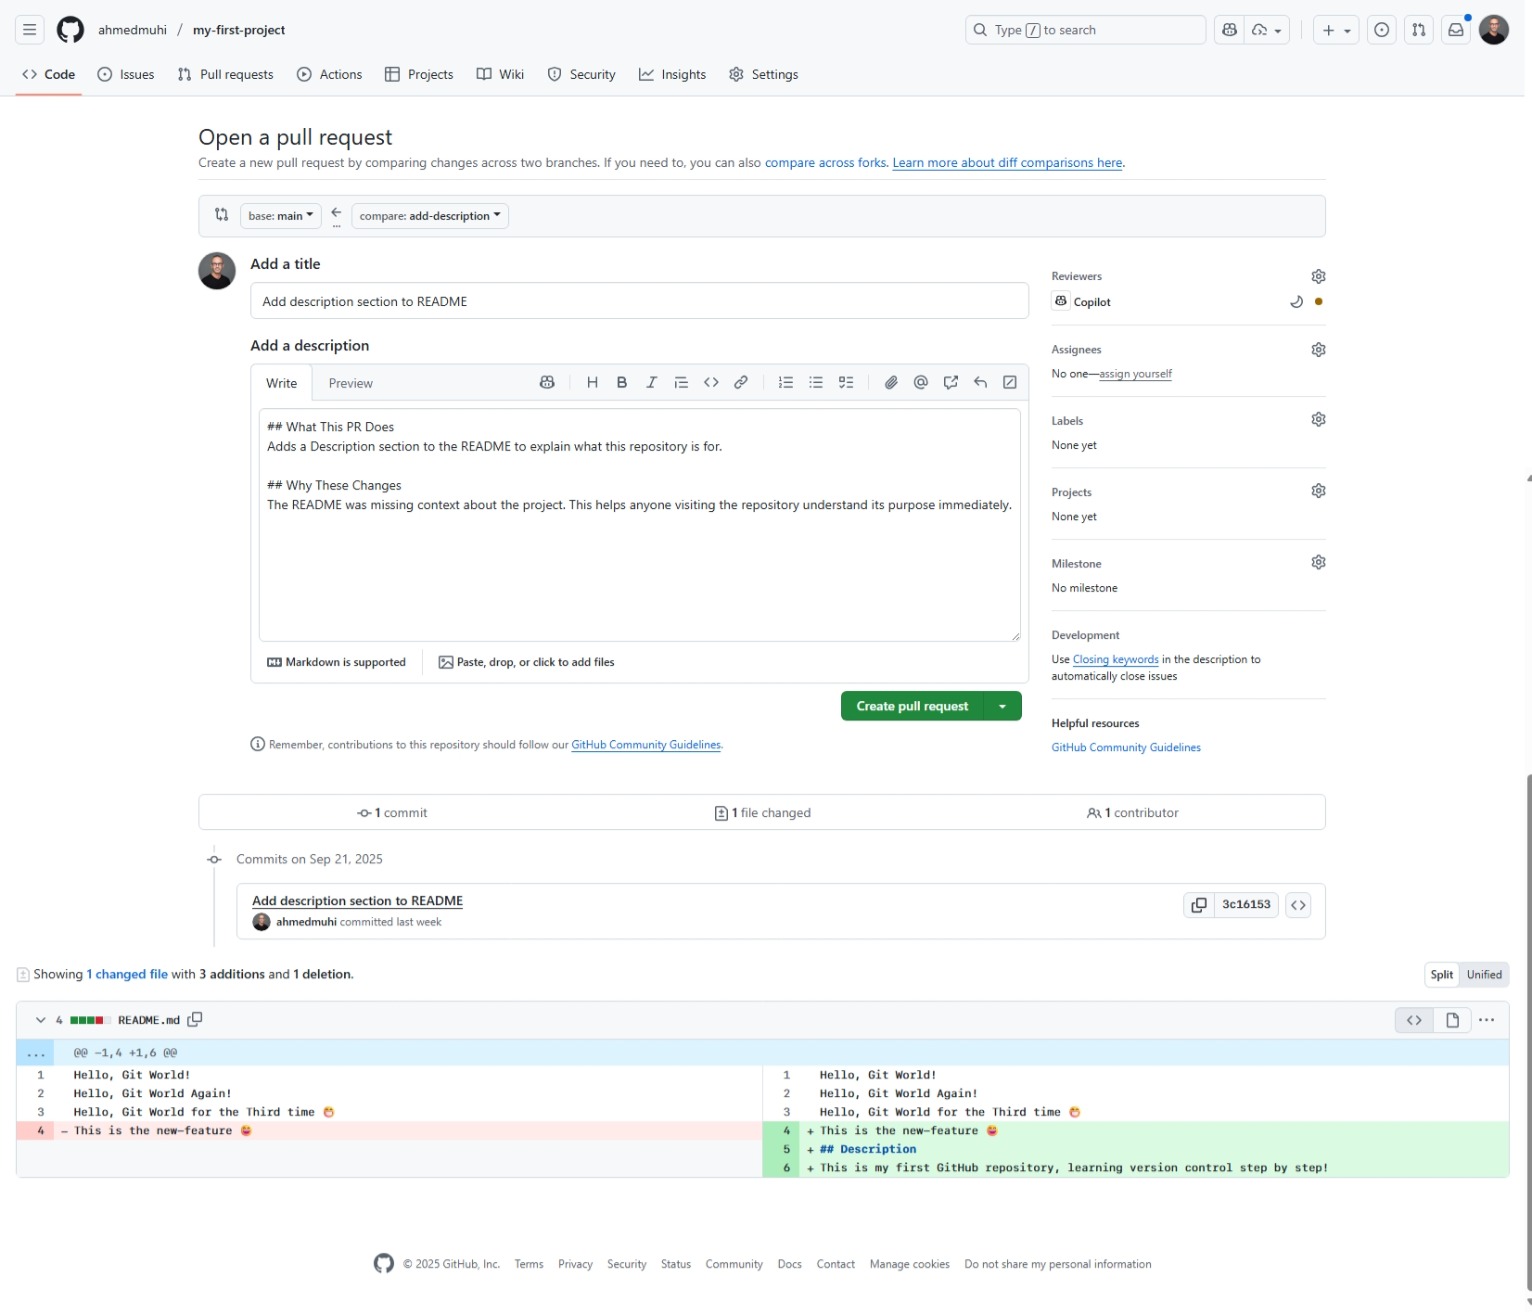
At the top, GitHub shows you what’s being compared:
base: main ← compare: add-descriptionTranslation: “Take the changes from add-description and propose adding them to main.”
This is the direction of the merge. Your new work (add-description) wants to join your stable code (main). GitHub is asking: “Should we allow this?”
Writing Your Pull Request
Title: GitHub suggests “Add description section to README” based on your commit message. That’s perfect - it clearly describes what this PR does. You can edit this if needed, but for now, it works.
Description: This is where you explain the “why” behind your changes. You’ll see a text area with some template suggestions:
## What This PR Does
Adds a Description section to the README to explain what this repository is for.

## Why These Changes
The README was missing context about the project. This helps anyone visiting
the repository understand its purpose immediately.
Good PR descriptions answer:
- What changed?
- Why did you make this change?
- Is there anything reviewers should pay attention to?
The Magic: Seeing Your Changes
Scroll down. Below the description, GitHub shows you exactly what changed:
This is called a “diff” (difference). You’ll see:
- Red lines with minus signs (-): What was removed
- Green lines with plus signs (+): What was added
In your case, you’ll see your three new lines in green:
  # My First Git Project

+ ## Description
+ This is my first GitHub repository, learning version control step by step!
This visual makes it crystal clear what you’re proposing. No ambiguity. No “what exactly changed?” Just the facts, line by line.
Additional Information
On the right sidebar, you’ll see options for:
- Reviewers: Who should review this? (For personal projects, you’re the reviewer)
- Assignees: Who’s responsible? (That’s you)
- Labels: Tags like “enhancement” or “documentation”
- Projects: Link to project boards
- Milestone: Group related PRs
For now, you can ignore these. They’re powerful for teams, but optional for your learning project.
Creating the Pull Request
See that green “Create pull request” button at the bottom? Click it.
That’s it. You’ve just created your first pull request.
What Just Happened
You’ve done something remarkable. Instead of directly merging your changes, you’ve:
- Proposed them for review
- Documented why they matter
- Shown exactly what changed
- Created a permanent record of this change
Even though you’re working solo, this pattern scales. Whether you’re collaborating with a team of 100 or maintaining a personal project, the workflow is identical: branch, commit, push, pull request.
This is how modern software development works. This is the innovation GitHub brought to the world.
Now let’s see what your pull request looks like.
Your Pull Request is Live
After clicking “Create pull request,” GitHub takes you to your new PR’s page. This is the hub for everything about this proposed change.
Let’s explore what you’re seeing.
The Pull Request Header
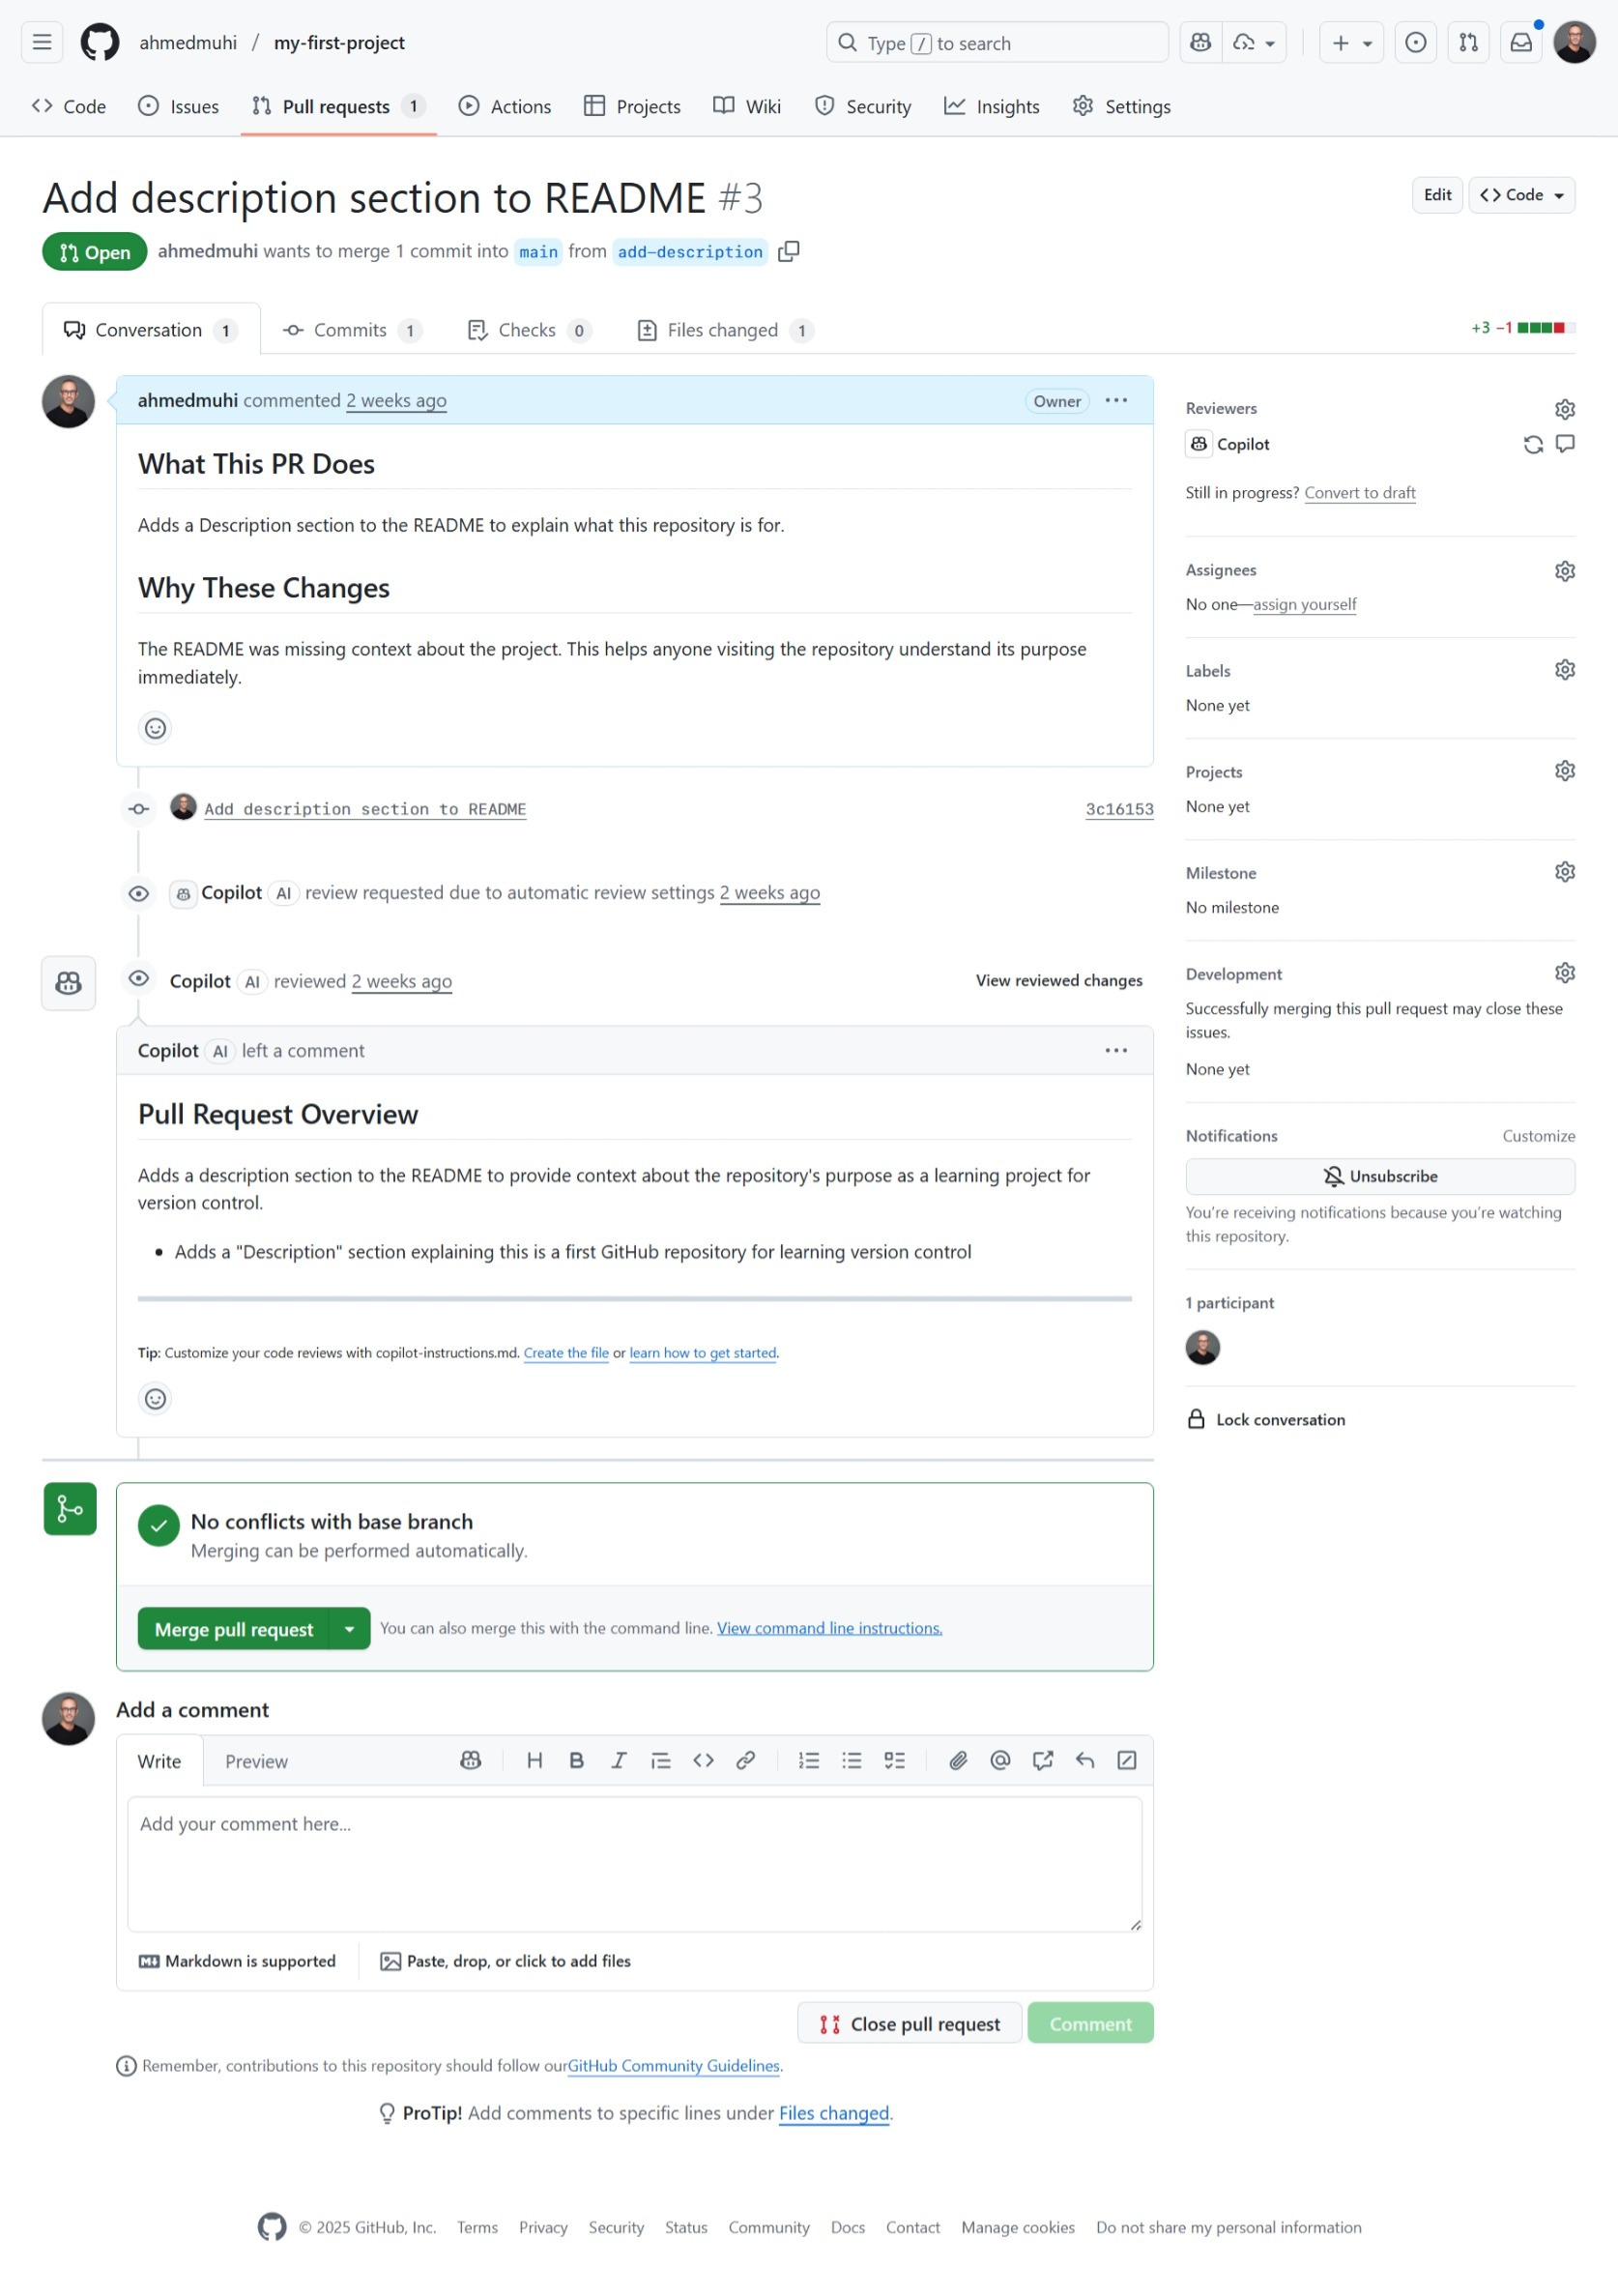
At the very top, you’ll see:
Add description section to README #3That’s your PR title, and the #3 is GitHub’s unique identifier. Every pull request gets a number - useful for referencing in discussions or commits.
Below that, the green “Open” badge tells you this PR’s status. It could also be:
- Merged (purple): The changes were accepted and integrated
- Closed (red): The PR was closed without merging
And the key information:
ahmedmuhi wants to merge 1 commit into main from add-descriptionTranslation: “You want to take 1 commit from your add-description branch and merge it into main.” GitHub is showing everyone exactly what’s being proposed.
The Conversation Tab
You’re currently on the “Conversation” tab - this is the discussion space. Here you’ll see:
Your Description The “What This PR Does” and “Why These Changes” you wrote. This context helps reviewers (or future you) understand your thinking.
Activity Timeline Below that, GitHub shows everything that happens to this PR:
- When you created it
- Commits added
- Comments from reviewers
- Status checks (if you had automated tests)
Right now it’s simple - just your PR creation and your commit.
The Other Tabs
Notice the tabs at the top of the conversation area:
- Commits: Shows all commits in this PR (you have 1)
- Checks: Automated tests or workflows (we’ll explore this in our GitHub Actions articles!)
- Files changed: The diff view we saw earlier - what actually changed
Click “Files changed” to see where the real power of pull requests shines.
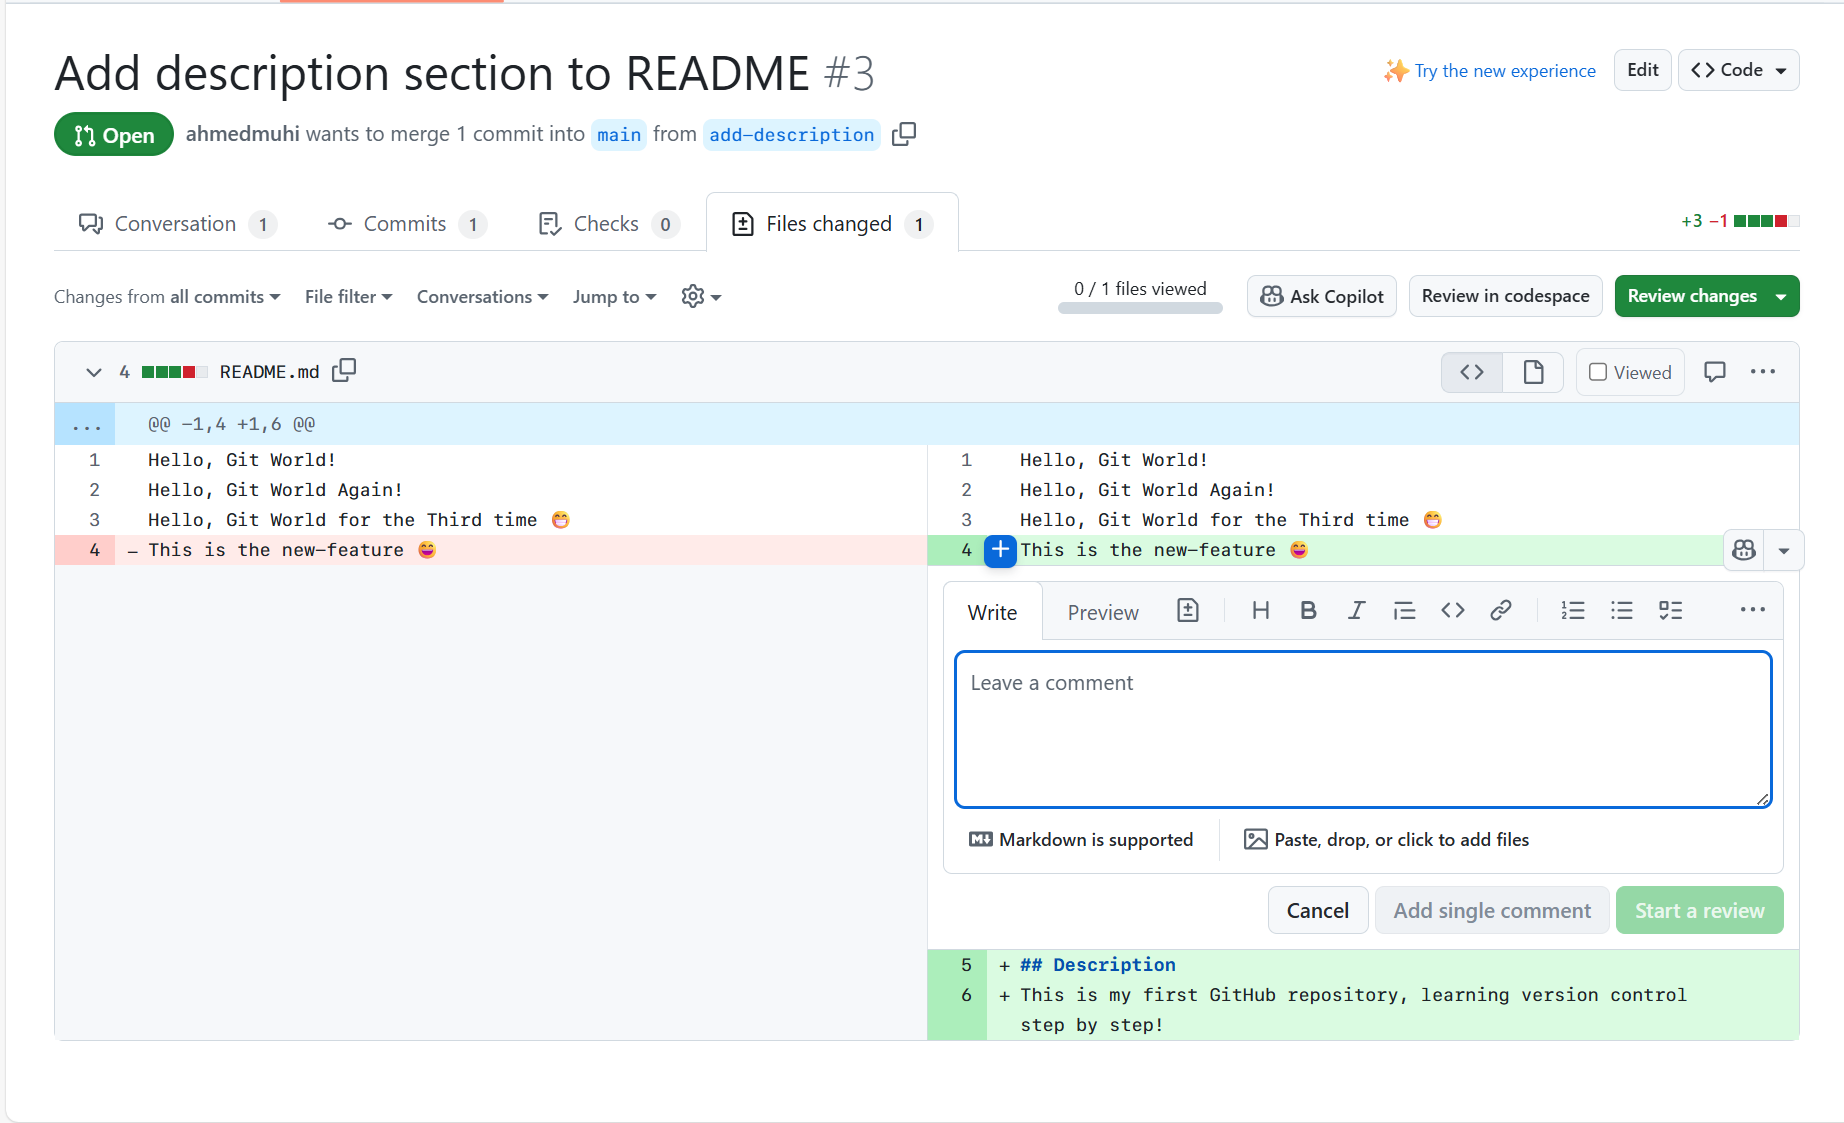
This is where code review happens.
See that blue plus icon next to line 4? Click any line in the diff, and you can leave a comment on that specific line.
Imagine you’re reviewing a teammate’s code and you see something that could be improved. You don’t just say “this needs work” - you click line 247 and say: “Consider using a more descriptive variable name here.” That’s precise feedback.
Or maybe you’re reviewing your own PR before merging (always a good practice!) and you notice something. You can leave yourself a note: “Remember to update the tests for this change.”
You can:
- Comment on specific lines - Pin discussions to exact code locations
- Add general comments - Scroll to the bottom to comment on the whole PR
- Start a review - Bundle multiple comments together
- Approve or request changes - Give formal feedback
And if you change your mind about the whole PR? There’s a “Close pull request” button. Maybe the approach wasn’t right. Maybe requirements changed. No problem - close it without merging. Your main branch stays untouched.
This is why pull requests are powerful: they’re not just about merging code. They’re about having focused conversations about specific changes before they become permanent.
Click back to the “Conversation” tab when you’re ready.
The Merge Status
Scroll down a bit. You’ll see a green box with:
✓ No conflicts with base branch
Merging can be performed automatically.
This is GitHub checking: “Can these changes merge cleanly into main?”
Since you’re the only one working on this repository, there are no conflicts. Your changes don’t overlap with any other changes to main. GitHub is giving you the green light.
If you see conflicts instead, it means main has changes that clash with yours. Don’t worry - GitHub will help you resolve them. But for now, you have a clean merge.
The Moment of Decision
See that green “Merge pull request” button?
This is the moment. Once you click that button, your changes leave the add-description branch and join main. Your proposed changes become permanent.
But before we click it, let’s talk about what merging actually means and what happens next.
Understanding the Merge
Before you click that green button, let’s talk about what’s actually about to happen.
Right now, you have two timelines:
- main: Your stable code, unchanged since you started
- add-description: Your new work with the Description section
When you merge, Git takes the commits from add-description and adds them to main’s history. Your two timelines become one again.
Think of it like this: You’ve been working on a copy of a document. You’re happy with your edits. Merging is saying: “Take my changes and add them to the official version.”
After the merge:
- Your Description section will be in main
- The commit history will show your work
- Anyone who clones or pulls from main will get your changes
- Your
add-descriptionbranch will still exist, but its work is done
This is different from just copy-pasting code. Git merges the histories, creating a permanent record of what changed, when, and why.
Clicking Merge
Ready? Click that green “Merge pull request” button.
GitHub will ask you to confirm. You’ll see a text box with a suggested commit message:
Merge pull request #3 from ahmedmuhi/add-description

Add description section to README
This commit message explains what you’re merging and why. You can edit it if you want, but GitHub’s suggestion is usually perfect.

Click “Confirm merge.”
Success!
GitHub shows you a purple “Merged” badge. Your pull request is no longer open - it’s completed its job.
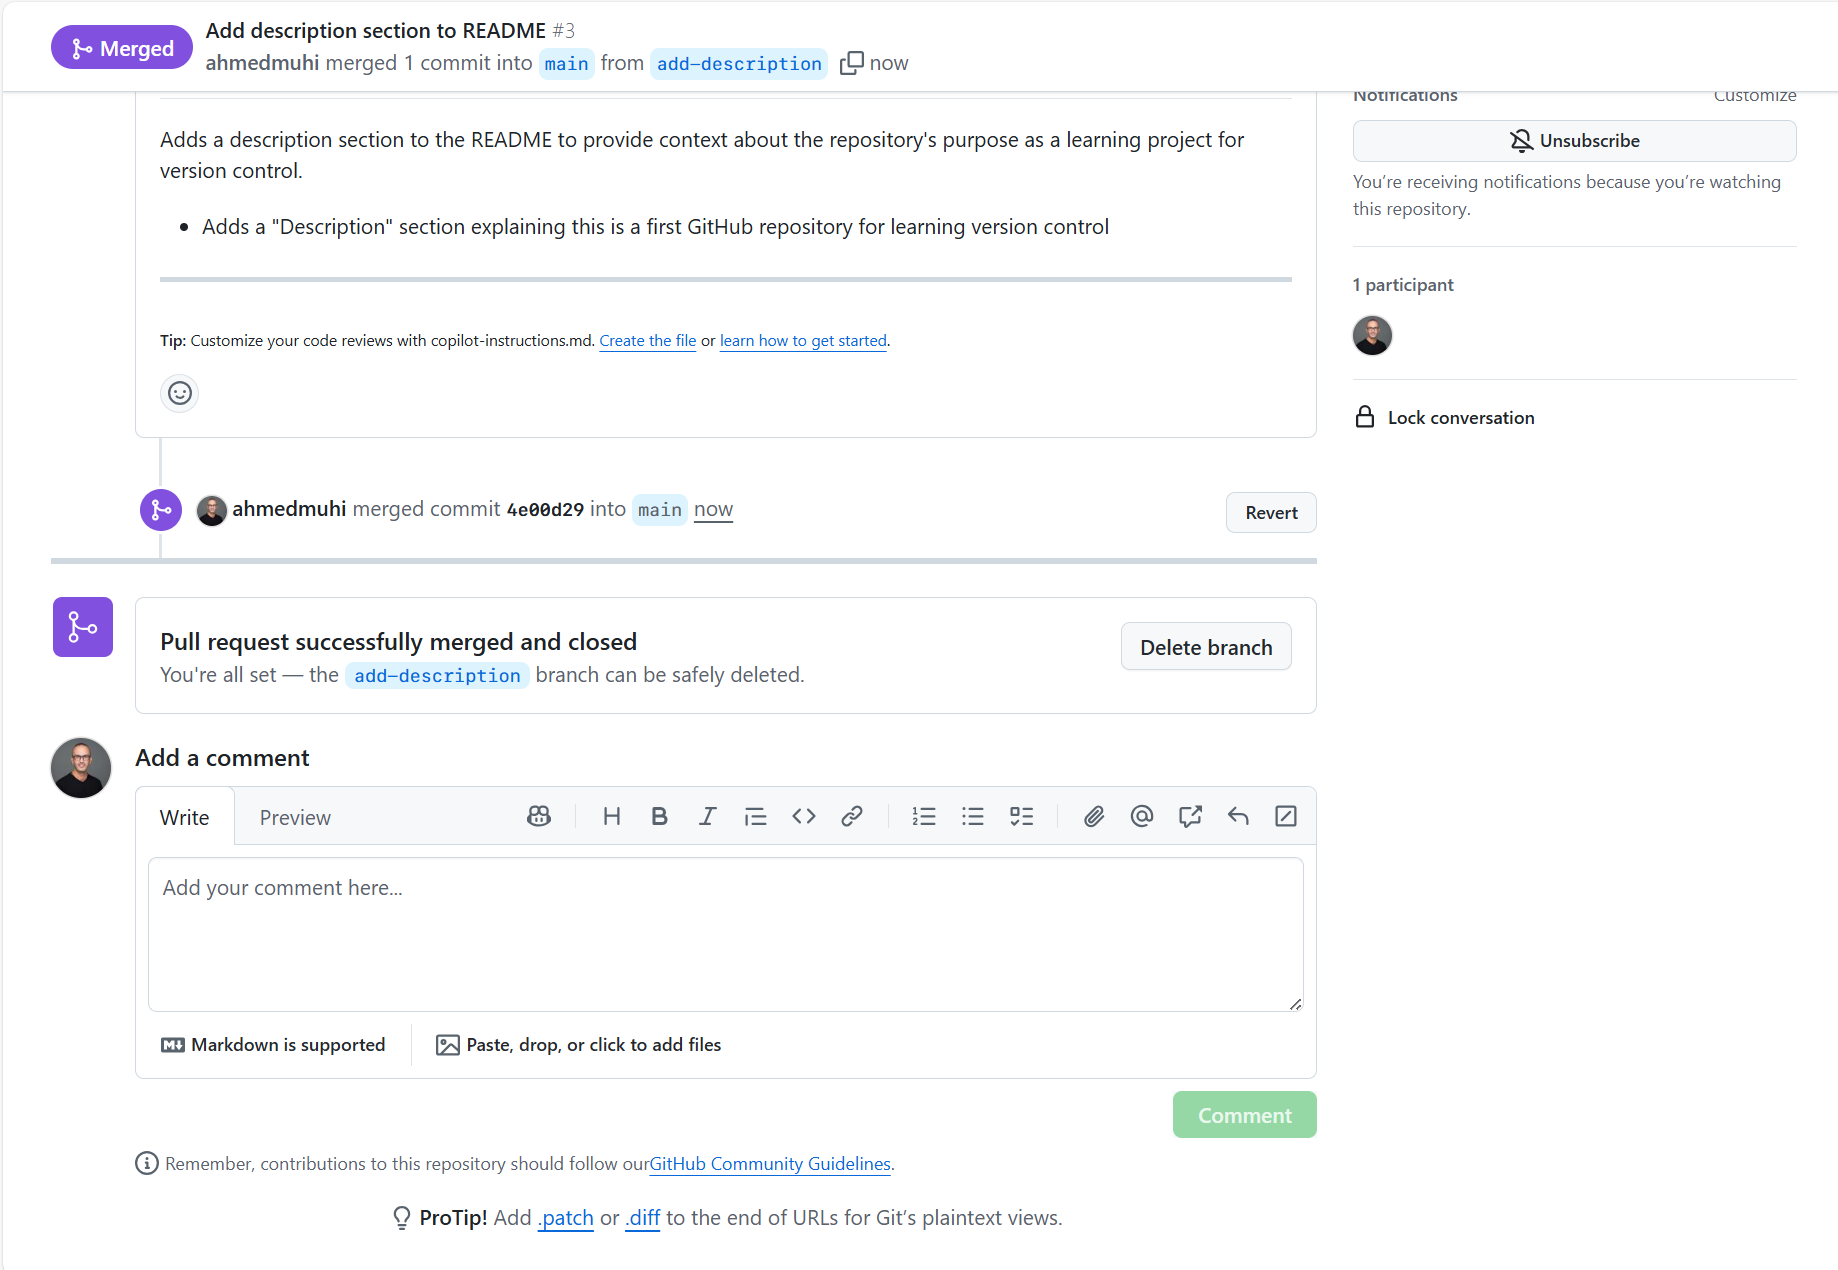
Scroll down and you’ll see:
✓ Pull request successfully merged and closedAnd GitHub offers: “Delete branch” with a button.
Should you delete it? Yes! Here’s why:
The add-description branch served its purpose. Its commits are now in main. Keeping it around just clutters your repository with old branches. Deleting it doesn’t delete the commits or the work - that’s all safely in main now.
Click “Delete branch.”
Your README now has a Description section. Your main branch has a new commit. GitHub has a permanent record of this change in PR #3.
Most importantly: you just experienced the workflow that powers professional development. Whether you’re on a team of 1 or 100, this is how changes get made safely.
Seeing Your Work
Head back to your repository’s main page (click “Code” at the top).
You’re back on the main branch. Open your README.
There it is - your Description section, now officially part of your project.
Check your commit history:
git log --onelineYou’ll see your merge commit at the top, showing this change is now part of main’s official history.
You’ve just completed the full GitHub workflow - from branches to pull requests to merges. This same pattern scales from personal projects to teams of hundreds, and it’s about to become the foundation for something even more powerful 🎉.
What’s Next: Automation
You’ve mastered the workflow: branches, pull requests, merges. You understand how to propose changes and integrate them safely.
Remember when GitHub checked “No conflicts with base branch” before letting you merge? That was automatic validation - GitHub helping you avoid problems.
But what if GitHub could run even more checks every time you push code? Making sure your code follows your standards, checking for common mistakes, running tests - all automatically before any merge happens.
That’s GitHub Actions. Every push becomes a trigger for automated quality checks, giving you confidence before you hit that merge button.
In Part 3, we’ll build your first automated workflow and watch it run on GitHub’s servers.