Setting Up Your First GitHub Repository: A Step-by-Step Guide

Introduction
In Part 1 - Understanding Git, you learned to use Git as a time machine for your code. Every commit became a save point. Every mistake became recoverable. On your computer, your code is protected.
That’s a huge win! But here’s a natural next question: what if you want to work on a different computer? Or what if you need a backup in case something happens to your machine? Or what if you want to collaborate with teammates on a project?
That’s where GitHub comes in.
Think of it this way: Git protects your code locally; GitHub extends that protection to the cloud. Your commits, your history, your save points - now accessible from anywhere.
Here’s what GitHub adds to what you’ve already built:
- Cloud backup – Your repository lives on GitHub’s servers, not just your laptop
- Work from anywhere – Access your code from your desktop, laptop, even your phone
- Collaborate with others – Soon you’ll be able to work on projects with teammates
Today, you’ll:
- Create your GitHub account and first repository
- Push your local repository to GitHub
- Learn how to sync changes between your computer and the cloud
- See your commit history living in both places
In 45-60 minutes, your repository will exist in two places: locally on your machine and online at GitHub. Same commits, same history, now synchronized.
Ready? Let’s start by creating your GitHub account.
Creating a GitHub Account
Head to github.com and let’s get you set up. The signup process is straightforward, but there are a couple of decisions worth thinking through.
Your Username (Pick Carefully!)
Here’s something most people don’t realize: your GitHub username becomes part of your developer identity. It shows up in your profile URL (github.com/YOUR-USERNAME), in every repository you create, and it’s often the first thing employers see when they look you up.
Most developers go with either their real name (jane-smith or johnchen) or a professional handle they use consistently across platforms. Pick something that represents you well.
One heads up: you can change your username later, but it breaks all existing links to your repositories. Not the end of the world, but easier to choose well now than fix links later.
Username already taken? No worries - try adding your middle initial (john-m-smith), a number like your birth year (jsmith1995), or a suffix like -dev. You’ll find something that works.
Your Email Address
GitHub needs an email for account notifications and recovery. They’ll send a verification code here in a minute (check your spam folder if it doesn’t show up right away).
Quick note on privacy: your email can be kept private on GitHub. We’ll set that up later after you’ve pushed your first commit and it’ll make more sense in context.
Creating Your Account
Now for the easy part:
- Enter your username, email, and a password
- GitHub might ask if you want product updates - totally your choice
- Complete the quick verification puzzle (just proving you’re human)
- Check your email for the verification code and enter it
Once you verify, GitHub might ask about your interests and experience level. You can answer these or skip them - either way works. They’re just trying to personalize your experience.
You’re In!
Nice work! Your GitHub account is set up. You’ve just joined over 100 million developers on the world’s largest code hosting platform. This same account will follow you throughout your development career - from learning projects like this one to professional work.
Now let’s create a home for your repository. Ready to give that code from Part 1 a place in the cloud?
Creating Your First GitHub Repository
Remember that repository from Part 1? The one with all your commits and history? Let’s put it on GitHub.
Since you already have a working repository with commits, we’ll create an empty repository on GitHub and then connect your local one to it. This is different from starting a brand new project directly on GitHub - we’re bringing your existing work to the cloud.
Finding Your Way to Repository Creation
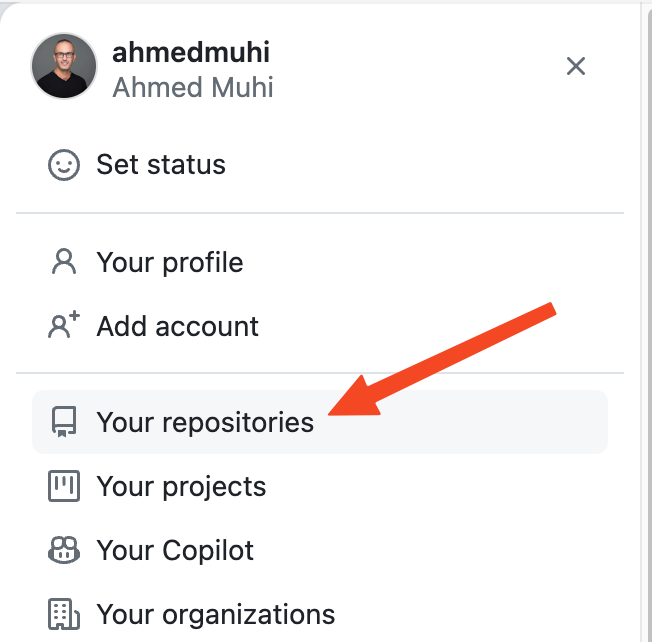
Once you’re logged into GitHub, look for your avatar in the top-right corner. Click it and select “Your repositories” from the dropdown.
You’ll see a green “New” button. Click it - that’s where we’ll set up your repository.
Naming and Configuring Your Repository
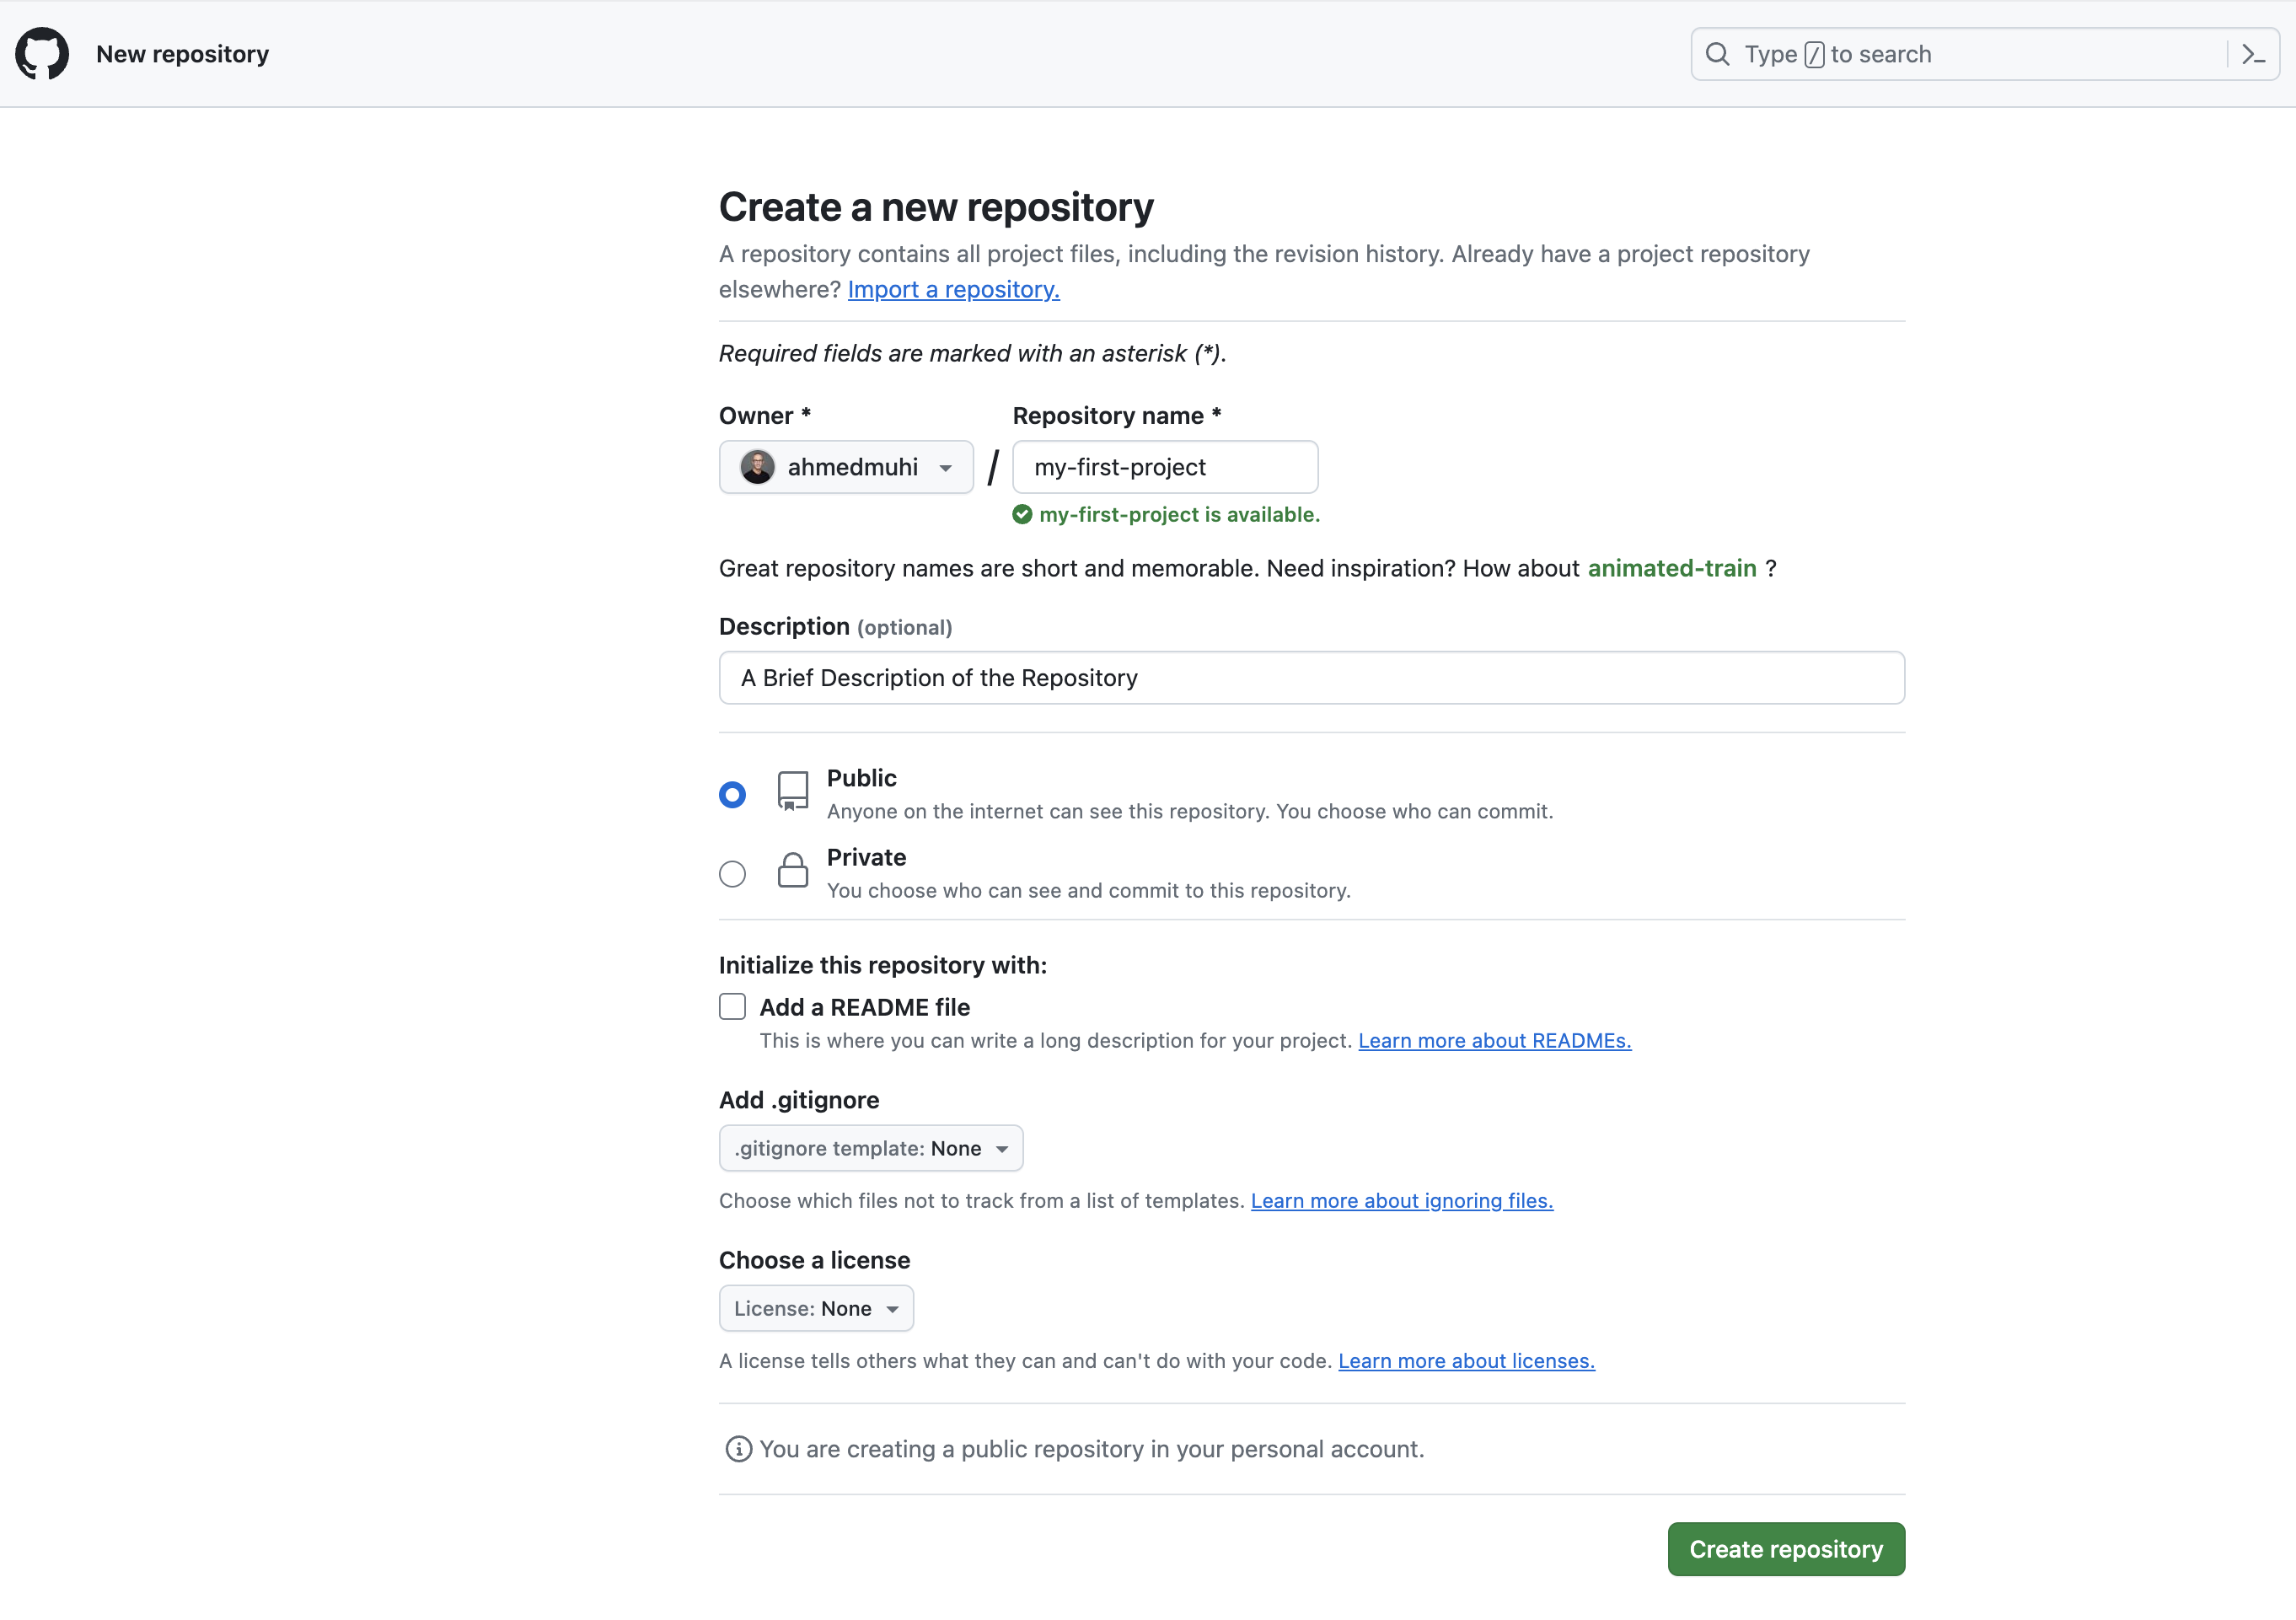
Now you’re looking at the repository creation form. Let’s walk through each decision:
Repository Name
Let’s call it my-first-project to match what we created in Part 1. GitHub will show you a green checkmark when the name is available.
[!TIP] Repository names become part of the URL. Keep them lowercase with hyphens instead of spaces. Good:
my-awesome-project. Avoid:My Awesome Project!
Description (Optional but Recommended)
Add something like: “Learning Git and GitHub fundamentals - my first repository!”
This helps you remember what this project was about when you look back in six months. Trust me, you’ll thank yourself later.
Public or Private - An Important Choice
Here’s where you decide who can see your code.
Choose Public if:
- You want to build your portfolio - employers love seeing active GitHub profiles
- You’re learning and want to share your progress with others
- You might want feedback or contributions from the community
Choose Private if:
- This is experimental work you’re not ready to share
- It contains any sensitive information
- It’s client work under NDA
[!WARNING] Public means truly public. Anyone on the internet can see and download your code. Never commit passwords, API keys, or sensitive data to public repositories.
For our learning project, I recommend Public - it’s a great way to start building your developer portfolio. You can always change this to Private later in settings.
Initialize This Repository - CRITICAL
Here’s where many beginners make a mistake. You’ll see checkboxes for:
- Add a README file
- Add .gitignore
- Choose a license
[!WARNING] Leave ALL of these unchecked!
You already have a repository with commits from Part 1. If GitHub creates files here, you’ll have two different histories that will conflict. We want a completely empty repository ready to receive your existing work.
Creating Your Repository
Let’s review what you’ve set up:
- Name:
my-first-project - Description: Added
- Visibility: Your choice (I suggest Public)
- Initialization options: All UNCHECKED
Everything look good? Click the green “Create repository” button.
You Just Created Your GitHub Repository!
Nice! GitHub just created a home for your code in the cloud. You’ll see a page with setup instructions - GitHub is smart enough to know this repository is empty and shows you exactly what to do next.
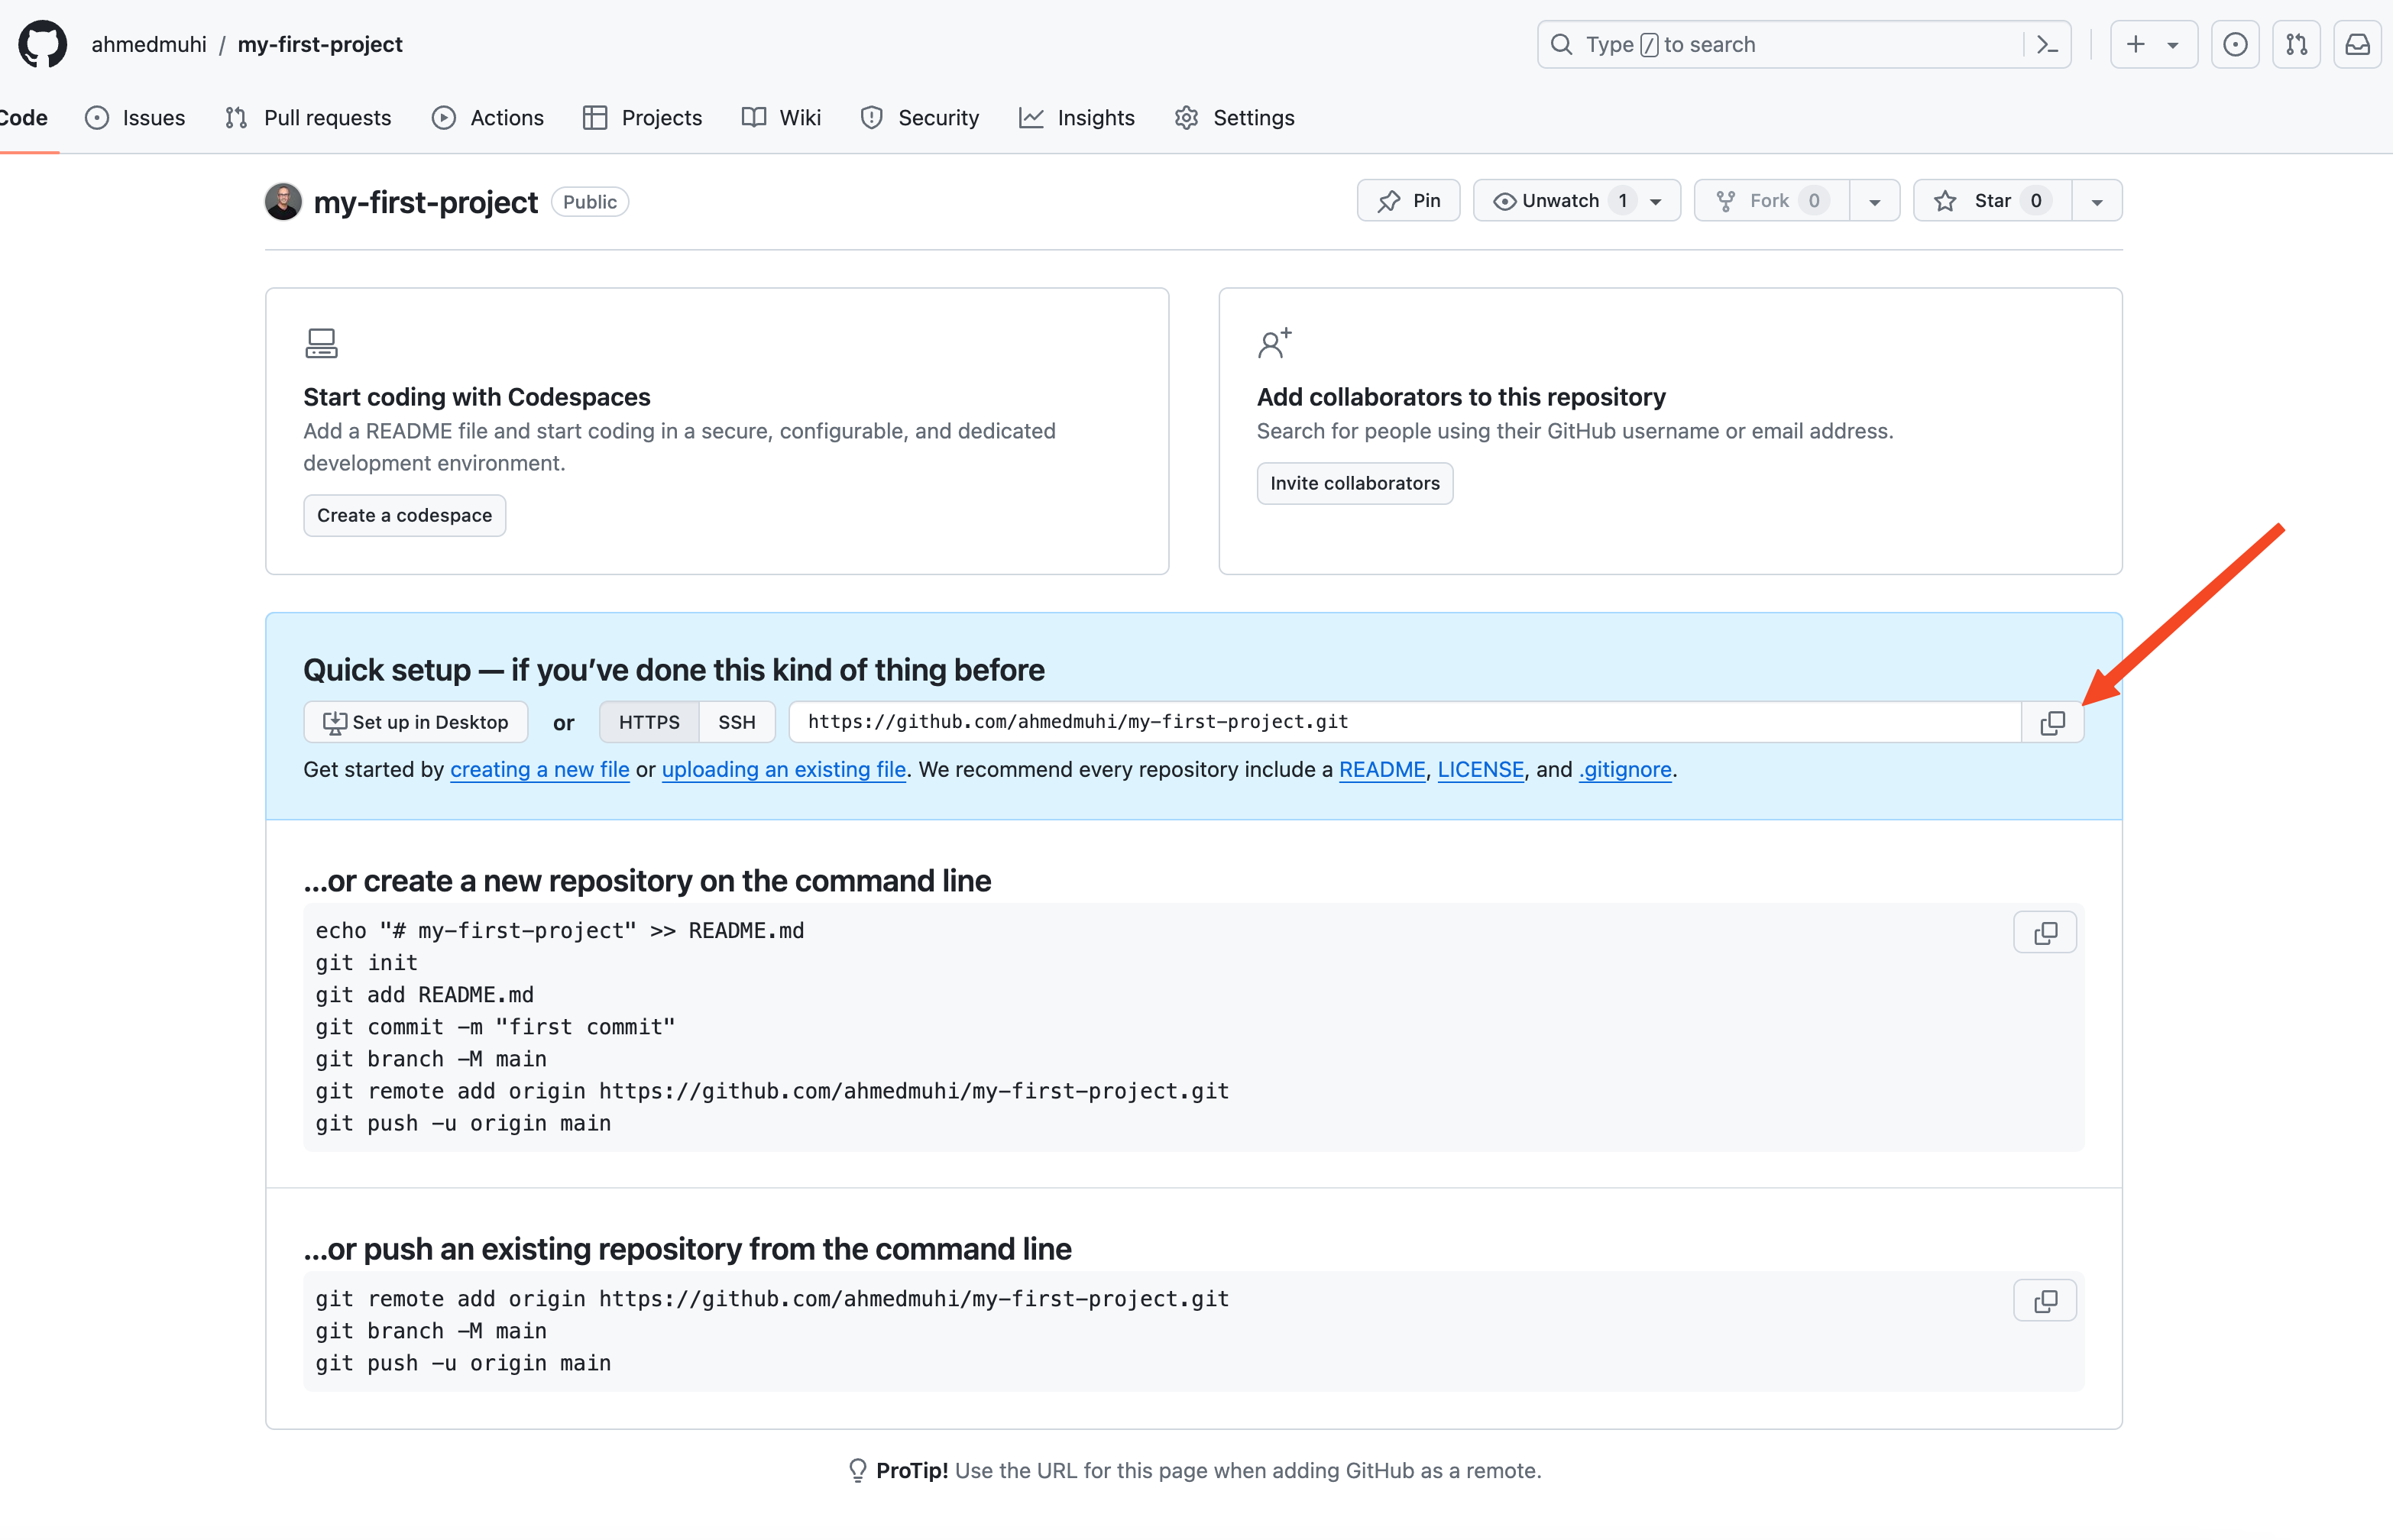
Notice it says “…or push an existing repository from the command line” - that’s us! We have an existing repository from Part 1.
The page shows you these commands:
git remote add origin https://github.com/YOUR-USERNAME/my-first-project.git
git branch -M main
git push -u origin main
[!IMPORTANT] Don’t run these commands yet! We’ll explain what each line does in the next section, then execute them together step by step.
Your GitHub repository is ready and waiting. Now let’s connect your local repository to it.
Connecting Your Local Repository to GitHub
Your GitHub repository is ready and waiting. Now let’s connect your local repository from Part 1 to it.
Understanding What We’re About to Do
Right now, you have a repository on your computer and an empty repository on GitHub. They don’t know about each other yet. We need to tell your local repository: “Hey, there’s a copy of you living on GitHub at this address.”
In Git terms, this GitHub location is called a “remote” - basically a link to where your repository lives online. We’ll nickname this remote “origin” (that’s just the standard name everyone uses for their main GitHub connection).
Making the Connection
Open your terminal and navigate to your Part 1 repository:
cd path/to/my-first-projectLet’s verify you’re in the right place:
git statusYou should see something like “On branch main” and your files listed. Perfect - you’re in the right spot.
Now, remember those commands GitHub showed you? Let’s use the first one:
git remote add origin https://github.com/YOUR-USERNAME/my-first-project.gitReplace YOUR-USERNAME with your actual GitHub username. This command tells Git: “Add a remote connection called ‘origin’ that points to my GitHub repository at this URL.”
Verifying the Connection
Let’s make sure it worked:
git remote -vYou should see:
origin  https://github.com/YOUR-USERNAME/my-first-project.git (fetch)
origin  https://github.com/YOUR-USERNAME/my-first-project.git (push)
Excellent! You just connected your local repository to GitHub. Now they can communicate with each other. The (fetch) means you can download updates from GitHub, and (push) means you can upload your commits to GitHub.
Quick Check: Branch Names
Before we push, let’s verify your branch name. Run:
git branchIf it shows * main, perfect - you’re all set! Skip to the next section.
If it shows * master, let’s quickly rename it to match GitHub’s standard:
git branch -M mainThis renames your branch from “master” to “main”. Now when you run git branch, you’ll see * main.
[!NOTE] Git used to default to “master” as the branch name, but the community shifted to “main” in 2020. GitHub creates new repositories with “main” by default, so we’re staying consistent with that.
Ready to Push
Here’s where we are:
- ✅ Your local repository has all your commits
- ✅ Your GitHub repository exists (empty, waiting for your code)
- ✅ They’re connected - they know about each other
- ❌ Your code isn’t on GitHub yet
That’s our next step. Ready to send your commits to the cloud?
Pushing Your Code to GitHub
This is the moment we’ve been building toward - let’s send your local repository to GitHub.
Understanding Your First Push
Right now, your local Git repository and your GitHub repository are connected, but GitHub is still empty. We need to upload all your commits and history from Part 1.
The command GitHub showed you is:
git push -u origin mainLet me break this one down:
git push- Sends your commits to a remote repository-u- Sets up tracking (so future pushes know where to go automatically)origin- Where to send it (that GitHub connection we just created)main- Which branch to push
The -u flag is helpful - after this first push, you can simply type git push without specifying where. Git will remember.
Setting Up Authentication First
Before we push, let’s set up authentication so GitHub knows it’s really you. The easiest way to handle this is with GitHub CLI - a command-line tool that makes working with GitHub simple.
Installing GitHub CLI
Head to cli.github.com and download the installer for your system:
Windows:
- Download and run the installer from the website, or
- If you have winget:
winget install --id GitHub.cli
macOS:
- If you have Homebrew:
brew install gh - Otherwise, download the installer from the website
Linux:
- Ubuntu/Debian: Follow the instructions at cli.github.com
Once installed, verify it worked:
gh --versionYou should see something like gh version 2.x.x.
Authenticating with GitHub CLI
Now let’s connect GitHub CLI to your account:
gh auth loginYou’ll see a series of prompts:
- What account do you want to log into? Choose
GitHub.com - What is your preferred protocol? Choose
HTTPS - Authenticate Git with your GitHub credentials? Choose
Yes - How would you like to authenticate? Choose
Login with a web browser
GitHub CLI will show you a code and open your browser. Paste the code, click “Authorize,” and you’re done! GitHub CLI handles all authentication automatically from now on.
Pushing Your Code
Time to push. Run:
git push -u origin mainWatching the Upload
You’ll see output like this:
Enumerating objects: 10, done.
Counting objects: 100% (10/10), done.
Delta compression using up to 8 threads
Compressing objects: 100% (6/6), done.
Writing objects: 100% (10/10), 1.23 KiB | 1.23 MiB/s, done.
Total 10 (delta 0), reused 0 (delta 0)
To https://github.com/YOUR-USERNAME/my-first-project.git
 * [new branch]      main -> main
Branch 'main' set up to track remote branch 'main' from 'origin'.
That’s Git copying your entire history to GitHub - every commit, every change, everything.
Your Code is on GitHub!
Go back to your browser and refresh your GitHub repository page.

Look at that - your code, your commits, your history, all on GitHub! 🎉
You should see:
- All your files
- Your commit history
- That README you created in Part 1
- A green “Code” button (anyone can download your project if it’s public)
Try this: Open GitHub on your phone and navigate to your repository. There it is - accessible from anywhere in the world.
What This Means
Think about what you just accomplished:
- Your code exists in two places - your computer and the cloud
- You can access your repository from any device
- Others can see your work (if public) and learn from it
- Every future commit backs up with a simple
git push - Your work is protected beyond your local machine
Testing It Out
Let’s prove this works. Make a small change locally:
echo "This line was added after pushing to GitHub" >> README.md
git add README.md
git commit -m "Test commit after initial push"
Now push again - notice how simple it is this time:
git pushThat’s it! No -u origin main needed. Git remembers where to push. Refresh GitHub and your new change appears instantly.
Try This
Want to see something cool? Here’s a quick experiment:
- Create a new folder somewhere else on your computer
- Clone your repository:
git clone https://github.com/YOUR-USERNAME/my-first-project.git - Watch your entire project appear
You just proved you can recover your work from anywhere. Your repository lives in the cloud now, accessible whenever you need it.
Pretty cool, right? Let’s look at what you’ve built.
What You’ve Accomplished
Look at how far you’ve come! In Part 1, you learned Git and protected your code locally. Now? Your repository lives in two places:
- ✅ Your local machine - where you develop and commit
- ✅ GitHub’s cloud - accessible from anywhere, protected from hardware disasters
You can now:
- Push your commits to GitHub with a single command
- Access your code from any computer in the world
- Share your work with others (if you chose public)
- Clone your repository anywhere you need it
More importantly, you understand the connection between local and remote. When you commit locally, Git saves your work. When you push to GitHub, the world can see it. That’s powerful.
What’s Next: Collaboration
Right now, you’re working solo on a single branch. That’s perfect for personal projects, but what happens when you want to:
- Try an experimental feature without breaking your working code?
- Collaborate with teammates without overwriting each other’s work?
- Propose changes to someone else’s project?
That’s where branches and pull requests come in - and they’re game-changers.
In Part 3, you’ll learn to:
- Create branches to work on features independently
- Switch between different versions of your code instantly
- Merge your work back together without conflicts
- Use pull requests - the foundation of how teams collaborate on GitHub
Branches transform your repository from a single timeline into a tree of possibilities. You’ll be able to experiment fearlessly, knowing your main code is safe.
Ready to unlock GitHub’s collaboration superpowers? Continue to Part 3: Branches and Pull Requests →