Kubernetes Network Policies Explained: A Practical Guide to Kubernetes Network Policies

Introduction
In the previous article, we walked through how Kubernetes networking works: pods get their own IPs, communicate directly through a flat network model, and rely on CNI plugins and overlay networks to make it all happen transparently.
That model gives you seamless connectivity. Every pod can reach every other pod in the cluster, across any node, without NAT or port mapping. For development, that’s convenient. For production, it’s a problem.
If every pod can talk to every other pod, there’s nothing stopping a compromised workload from reaching your database. There’s no boundary between your frontend and a sensitive internal service. There’s no control over what talks to what, on which ports, or in which direction.
This is where Network Policies come in. They let you define rules about which pods can communicate with which other pod, under what conditions, and on what ports. Instead of an open network where everything is allowed, you build a controlled one where only explicitly permitted traffic flows.
In this article, we’ll cover how Kubernetes Network Policies work (selectors, traffic direction, and rules), build and test a real policy in a local Kind cluster with Calico, and walk through the best practices that matter for production. By the end, you’ll have a working understanding of how to turn Kubernetes’ open-by-default networking into something intentional and secure.
How Network Policies Work
Before we restrict anything, let’s look at where we’re starting.
The diagram below shows a typical Kubernetes cluster with a frontend pod and a backend pod. External traffic can reach the frontend, and the frontend can freely communicate with the backend. The red layer labeled “Network Policy” sits between them, but right now it’s not doing anything. Traffic flows in every direction, unrestricted.
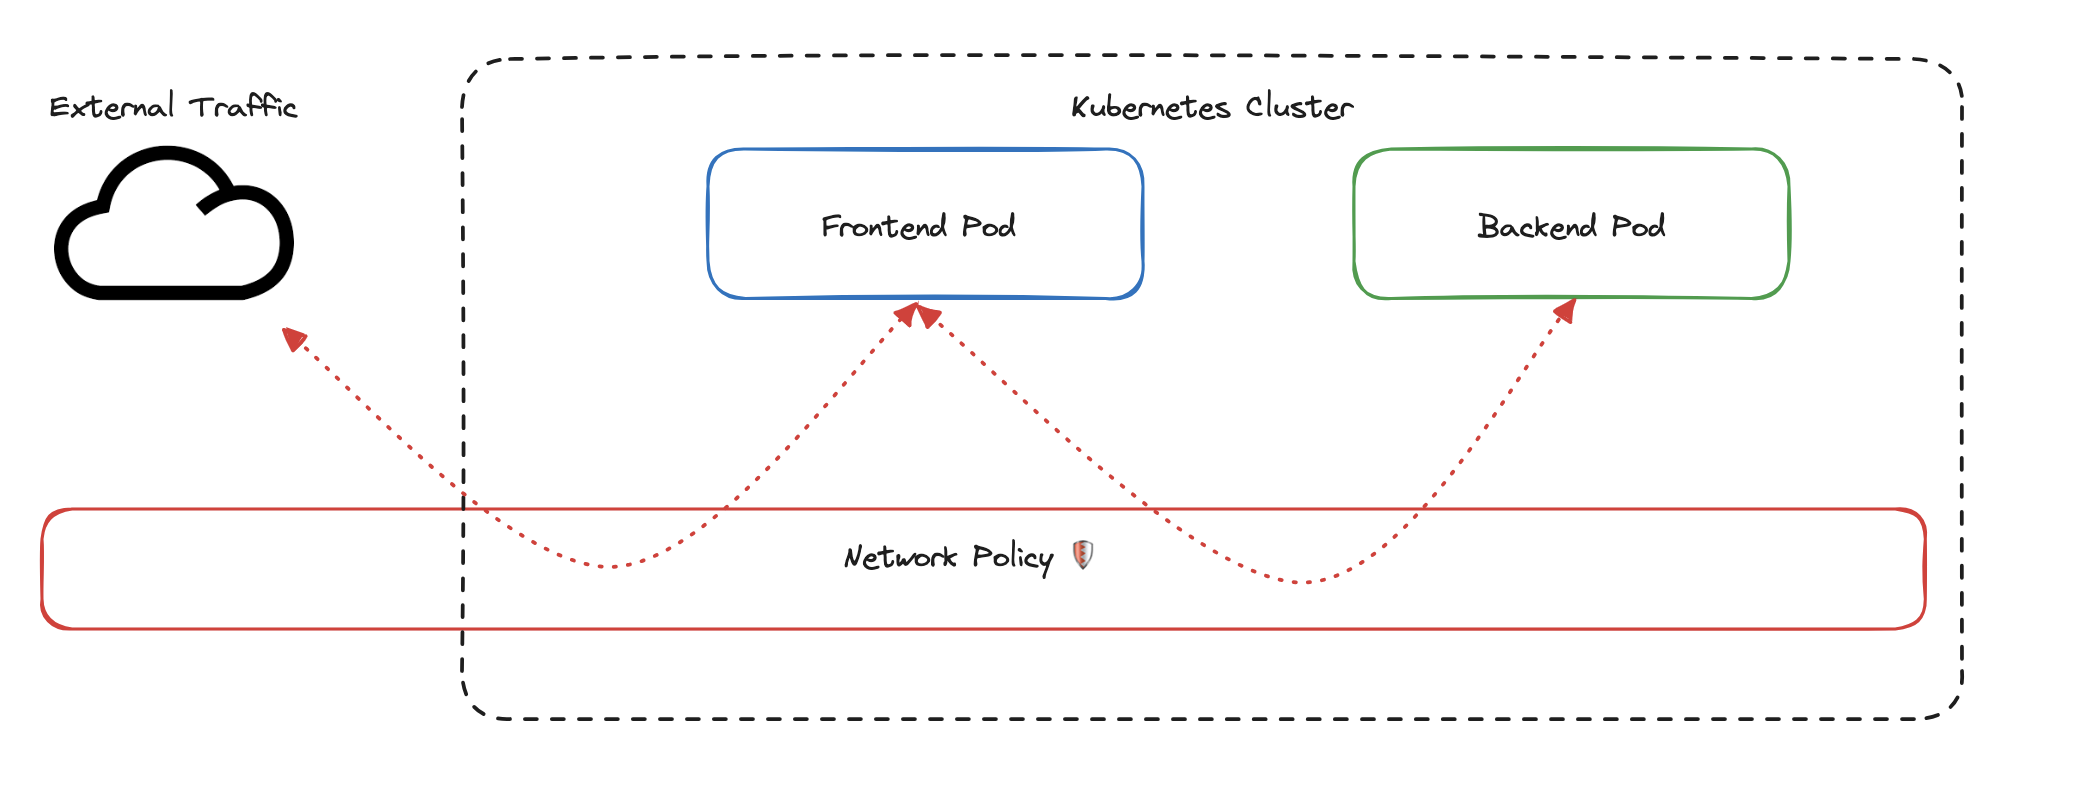
That’s the default. Kubernetes allows all pod-to-pod communication unless you explicitly say otherwise. Network Policies are how you say otherwise.
We’re going to build a Network Policy step by step. By the time we’re done, you’ll understand how Kubernetes identifies pods, how policies control traffic, and what happens to everything that isn’t explicitly allowed. We’ll use the frontend and backend from the diagram as our working example.
Identifying Pods with Labels
The first thing a Network Policy needs to know is: which pods does it apply to?
Kubernetes identifies pods using labels, simple key-value pairs attached to every pod:
labels:
  app: frontend
  environment: production
In this example, the key app with the value frontend tells Kubernetes this pod is part of the frontend service. The key environment with the value production identifies it as a production workload. Labels are used throughout Kubernetes, not just for Network Policies. Rolling updates, autoscaling, service discovery, and scheduling all use labels to identify and group pods.
For our policy, we want to target the frontend pods. We do that with a pod selector that matches on a specific label:
apiVersion: networking.k8s.io/v1
kind: NetworkPolicy
metadata:
  name: frontend-access
spec:
  podSelector:
    matchLabels:
      app: frontend
The kind is NetworkPolicy, which tells Kubernetes this resource defines a traffic control rule. The metadata.name gives it a name: frontend-access. Under spec, the podSelector with matchLabels tells Kubernetes to apply this policy to every pod carrying the label app: frontend.
Notice that the selector only matches on app: frontend. It doesn’t mention environment. That means if you have two frontend pods, one labeled environment: production and another labeled environment: staging, this policy applies to both. The selector matches any pod that has app: frontend, regardless of what other labels it carries.
There’s something important to understand about how this targeting works. A Network Policy only controls the pods it selects. It says nothing about the pods on the other side of the connection.
Say this policy ends up restricting what traffic the frontend can accept. That restriction lives on the frontend. If the backend pods have no policy applied to them, the backend can still send traffic anywhere it wants. The frontend’s policy governs what the frontend accepts. It doesn’t govern what the backend is allowed to do.
This matters for troubleshooting. If you want to control what reaches the frontend, put the policy on the frontend. That way, when an engineer needs to understand why traffic is being blocked, they look at the pod being protected, and they find the answer right there. If you put the restriction on the backend instead, someone troubleshooting the frontend would find no policy, and might spend hours investigating before discovering the restriction lives somewhere else entirely.
The convention is: put the policy on the pod you want to protect.
Controlling Traffic Direction
Now that we’ve selected the frontend pods, we need to decide: what kind of traffic are we controlling?
Network Policies support two directions. Ingress is traffic coming into the selected pods. Egress is traffic going out from the selected pods.
For our policy, we want to control who can send traffic to the frontend. That’s ingress. We add a policyTypes field and an ingress block with a rule that allows traffic from backend pods on TCP port 80:
apiVersion: networking.k8s.io/v1
kind: NetworkPolicy
metadata:
  name: frontend-access
spec:
  podSelector:
    matchLabels:
      app: frontend
  policyTypes:
    - Ingress
  ingress:
    - from:
        - podSelector:
            matchLabels:
              app: backend
      ports:
        - protocol: TCP
          port: 80
This is the complete policy. Let’s walk through what it does.
The policyTypes: [Ingress] tells Kubernetes this policy controls incoming traffic to the frontend pods. The ingress.from.podSelector says: allow traffic from pods labeled app: backend. The ingress.ports restricts that traffic to TCP on port 80.
Here’s what this policy controls:
- The backend pod can reach the frontend on TCP port 80. That’s explicitly allowed.
- Any other pod trying to reach the frontend on port 80 is blocked.
- The backend pod trying to reach the frontend on port 443 is also blocked. Only port 80 is permitted.
Here’s what this policy does not control:
- The frontend pod can still send traffic to anything it wants. The policy only defines ingress, so egress is completely unrestricted.
- External traffic can still reach the frontend. The policy restricts pod-to-pod ingress as defined by the selector and rules, not all traffic into the cluster.
The policy governs one direction. If you only define ingress rules, egress stays wide open. If you only define egress rules, ingress stays wide open. Kubernetes only restricts a direction when you explicitly write a rule for it.
What Happens to Everything Else
You might have noticed that our policy only says what’s allowed. We never wrote a rule saying “block traffic from client pods” or “deny traffic on port 443.” Yet that traffic is blocked.
This is the implicit deny rule. The moment you apply a Network Policy with an ingress rule, Kubernetes treats that rule as the complete definition of what’s allowed in that direction. Any ingress traffic that doesn’t match is automatically denied. You don’t write deny rules. Kubernetes infers them.
This is a deliberate design choice. If Kubernetes only enforced what you explicitly allowed but left everything else open, a single forgotten rule could leave your pods exposed. You would have to manually deny every other type of traffic, and missing even one would create a gap.
The implicit deny flips that model. You only think about what you want to allow. Everything else is denied by default. If you later decide that a monitoring pod also needs to reach the frontend, you add it to the policy intentionally. Every allowed connection is a deliberate decision, not an oversight.
Before We Apply This: Your CNI Needs to Support Network Policies
There’s one thing to know before we take this policy into a real cluster. Kubernetes defines Network Policies as resources, but it doesn’t enforce them itself. That responsibility belongs to your CNI plugin, the same networking layer we covered in the previous article.
If your CNI supports Network Policies (like Calico or Cilium), the rules are actively enforced the moment you apply them. If your CNI doesn’t support them (like a default Flannel installation), something subtle happens: Kubernetes accepts the policy, stores it as a resource, and reports no errors. But the CNI never reads it. Traffic continues flowing as if the policy doesn’t exist. You think you’re protected, but nothing is actually being enforced.
This is why the hands-on section uses Calico. We need a CNI that enforces the rules so we can see them working. In the next section, we’ll set up a Kind cluster with Calico, deploy the frontend, backend, and a test client pod, apply this exact policy, and verify that allowed traffic gets through and everything else is blocked.
Hands-On: Applying a Network Policy with Kind
We have a policy. Now let’s apply it in a real cluster and see it work.
In this section, we’ll create a local Kubernetes cluster using Kind, install Calico as the CNI, deploy three pods (frontend, backend, and a test client), apply the exact policy we built in the previous section, and verify that it enforces the rules we expect.
Prerequisites
Make sure these tools are installed on your machine:
- Docker: Install Docker
- Kind: Install Kind
- kubectl: Install kubectl
Create the Cluster and Install Calico
Create a file called kind-config.yaml:
kind: Cluster
apiVersion: kind.x-k8s.io/v1alpha4
nodes:
  - role: control-plane
Now create the cluster and install Calico:
# Create the Kind cluster
kind create cluster --config kind-config.yaml

# Install Calico for Network Policy enforcement
kubectl apply -f https://docs.projectcalico.org/v3.25/manifests/calico.yaml
Calico takes a minute or two to start. Wait until all pods in kube-system are running before continuing:
kubectl get pods -n kube-systemOnce every pod shows Running, the cluster is ready.
Deploy the Pods and Services
Create a file called sample-app.yaml:
# Frontend Pod
apiVersion: v1
kind: Pod
metadata:
  name: frontend
  labels:
    app: frontend
spec:
  containers:
    - name: nginx
      image: nginx
---
# Frontend Service
apiVersion: v1
kind: Service
metadata:
  name: frontend-service
spec:
  selector:
    app: frontend
  ports:
    - protocol: TCP
      port: 80
      targetPort: 80
---
# Backend Pod
apiVersion: v1
kind: Pod
metadata:
  name: backend
  labels:
    app: backend
spec:
  containers:
    - name: nginx
      image: nginx
---
# Backend Service
apiVersion: v1
kind: Service
metadata:
  name: backend-service
spec:
  selector:
    app: backend
  ports:
    - protocol: TCP
      port: 80
      targetPort: 80
---
# Client Pod (for testing unauthorized access)
apiVersion: v1
kind: Pod
metadata:
  name: client-pod
  labels:
    app: client
spec:
  containers:
    - name: nginx
      image: nginx
Apply it:
kubectl apply -f sample-app.yamlThis creates three pods: frontend (labeled app: frontend), backend (labeled app: backend), and client-pod (labeled app: client). It also creates services for the frontend and backend so they’re reachable by name.
Before we apply any policy, let’s confirm that all pods can reach the frontend. Right now, there are no restrictions:
# Backend to frontend (should succeed, no policy yet)
kubectl exec backend -- curl -s frontend-service

# Client to frontend (should also succeed, no policy yet)
kubectl exec client-pod -- curl -s frontend-service
Both commands should return the Nginx welcome page. That’s our baseline: everything can talk to everything.
Apply the Network Policy
Now let’s apply the policy we built earlier. Create a file called frontend-policy.yaml:
apiVersion: networking.k8s.io/v1
kind: NetworkPolicy
metadata:
  name: frontend-access
spec:
  podSelector:
    matchLabels:
      app: frontend
  policyTypes:
    - Ingress
  ingress:
    - from:
        - podSelector:
            matchLabels:
              app: backend
      ports:
        - protocol: TCP
          port: 80
Apply it:
kubectl apply -f frontend-policy.yamlThe policy is now active. The frontend pod will only accept ingress traffic from pods labeled app: backend on TCP port 80. Everything else in the ingress direction is denied by the implicit deny rule.
Test the Policy
Let’s verify that the policy is doing what we expect.
First, test from the backend pod. This should succeed because the policy explicitly allows traffic from app: backend on port 80:
kubectl exec backend -- curl -s frontend-serviceYou should see the Nginx welcome page HTML, confirming the backend can reach the frontend.
Now test from the client pod. This should fail because app: client is not in the allowed list:
kubectl exec client-pod -- curl -s --max-time 5 frontend-serviceThis should time out or return a connection refused error. The client pod’s traffic is being blocked by the policy.
Inspect the Policy
To confirm the policy is configured correctly, use kubectl describe:
kubectl describe networkpolicy frontend-accessIn the output, check that PodSelector shows app=frontend, that the ingress rules list app: backend as an allowed source, and that port 80/TCP is specified. If traffic isn’t behaving as expected, this is the first place to look.
You can also verify pod labels and active policies with:
kubectl get pods --show-labels
kubectl get networkpolicies
Clean Up
When you’re done, delete the cluster:
kind delete clusterThat’s the full cycle: we created a cluster with a CNI that enforces policies, deployed pods, applied a policy, and verified that it allows the right traffic and blocks everything else. The same pattern applies in production, just with more pods, more policies, and a managed cluster instead of Kind.
Best Practices for Production
The lab we just ran was intentionally simple: three pods, one policy, one direction. In a real cluster, you’ll have dozens of services across multiple namespaces, each with different access requirements. The concepts are the same, but the discipline around how you apply them matters more.
Here are three practices that make the biggest difference.
Start with Default Deny
The implicit deny rule we covered earlier only kicks in when you apply a policy to a pod. Pods with no policy at all still accept traffic from everywhere. In production, that’s a gap.
The fix is to start every namespace with a default deny policy that blocks all traffic in both directions for every pod:
apiVersion: networking.k8s.io/v1
kind: NetworkPolicy
metadata:
  name: default-deny-all
spec:
  podSelector: {}
  policyTypes:
    - Ingress
    - Egress
The empty podSelector: {} matches every pod in the namespace. The policyTypes list includes both Ingress and Egress, which means all traffic in both directions is blocked by default.
From here, you add targeted policies that allow only the traffic each service actually needs. This is the principle of least privilege applied to networking: nothing is allowed unless you intentionally permit it. It’s more work upfront, but it means every connection in your cluster exists because someone deliberately created it.
Policies Are Additive, Not Exclusive
If you’ve worked with traditional firewalls, you might expect that policies override each other or that rule order matters. Kubernetes Network Policies work differently.
If two policies target the same pod, their rules are combined. Say one policy allows traffic from pod A on port 80, and another policy allows traffic from pod B on port 443. Both connections are allowed. The policies stack. Neither one cancels the other.
This means you can build your access rules incrementally, one policy per concern, without worrying about conflicts. But it also means you can’t write a policy that says “block traffic from pod C” if another policy already allows it. If any policy permits the traffic, it goes through.
Keep your policies focused and simple. One policy per purpose is easier to reason about than a few broad policies trying to cover multiple scenarios.
Troubleshooting
When traffic isn’t behaving as expected, work through these steps:
First, check that the pods have the right labels. A policy targeting app: frontend won’t do anything if your pod is labeled app: front-end with a hyphen:
kubectl get pods --show-labelsSecond, inspect the policy itself. Confirm the selector, the direction, and the allowed sources and ports:
kubectl describe networkpolicy frontend-accessThird, confirm your CNI is actually enforcing policies. If you’re running a CNI that doesn’t support Network Policies, everything we covered in this article will have no effect. No errors, no warnings. The policies exist as resources, but traffic flows right through them:
kubectl get pods -n kube-systemCheck that your CNI pods (Calico, Cilium, or whichever you’re using) are running. If you only see the default networking components, your policies aren’t being enforced.
Most policy issues come down to one of these three things: wrong labels, misconfigured rules, or a CNI that doesn’t enforce them. Start here before digging deeper.
Conclusion
This article covered a lot of ground, so let’s take a moment to bring it together.
We started with the open-by-default problem: every pod in a Kubernetes cluster can talk to every other pod, with no restrictions. Network Policies are how you change that.
A Network Policy starts with a pod selector that targets specific pods using labels. It defines a traffic direction, ingress or egress, and specifies rules for what’s allowed: which pods, on which ports, using which protocols. Everything that doesn’t match is denied automatically through the implicit deny rule. And policies stack, so multiple policies targeting the same pod combine their rules rather than overriding each other.
We built a policy that allows the frontend to accept traffic only from the backend on TCP port 80, applied it in a Kind cluster with Calico, and confirmed that allowed traffic gets through while everything else is blocked. Then we looked at the practices that matter for production: start with default deny, understand how policies combine, and know where to look when things aren’t working.
All of this relies on your CNI plugin to enforce the rules. We used Calico in this article, and it does the job well. But standard Kubernetes Network Policies have limits. They operate at Layer 3 and Layer 4, meaning they can filter based on IPs, labels, ports, and protocols. They can’t inspect what’s happening inside the traffic itself, like which HTTP path is being called or which API method is being used. And they don’t give you much visibility into what’s actually flowing through your cluster.
In the next article, we’ll look at Cilium, a CNI built on eBPF that goes beyond standard Network Policies. It enforces rules at the kernel level, supports Layer 7 filtering, and gives you deep observability into your cluster’s traffic. If Network Policies are how you control access, Cilium is how you control access and understand what’s happening.