Docker for Beginners: How Docker Works Behind the Scenes

Introduction: From Understanding Docker to Running It
In the previous article, we built the mental model for Docker.
Docker solves the environment problem. Instead of relying on every machine to be prepared by hand, Docker lets you package an application with the environment it expects.
You also learned the core pieces:
Image      → the packaged application environment
Container  → a running copy of that image
Engine     → the part of Docker that builds and runs containers
Registry   → where images are stored and shared
Now it is time to make that real.
In this article, we will install Docker, run our first containers, and then slow down to understand what Docker did behind the scenes.
We will start small with hello-world, a tiny container that proves Docker is working. Then we will run nginx, a real web server, and expose it on your machine so you can open it in a browser.
After that, we will look at the flow behind the command:
You type a Docker command
→ Docker Client sends the request
→ Docker Engine does the work
→ Docker pulls an image if needed
→ Docker creates and starts the container
By the end, Docker should no longer feel like an abstract idea. You will have installed it, run real containers, exposed a web server, and learned how to inspect, stop, restart, and clean up the containers you created.
This is the shift from understanding Docker to using it.
Install and Verify Docker
Before we can run containers, Docker needs to be installed and running on your machine.
The easiest starting point is Docker Desktop.
If you are using Windows or macOS, install Docker Desktop from the official Docker website. It includes Docker Engine, the Docker CLI, and a graphical interface for viewing containers, images, volumes, and settings.
If you are using Linux, you can use Docker Desktop or install Docker Engine directly through your package manager. Docker Desktop gives you a more guided experience, while Docker Engine is common on servers and CLI-focused environments.
Docker’s installation steps can change over time, so use the official installation guide for the latest instructions for your operating system:
https://docs.docker.com/get-docker/Once Docker is installed, open your terminal and check that the Docker CLI is available:
docker --versionYou should see output similar to this:
Docker version 28.0.4, build b8034c0Your version number may be different. That is fine. The important thing is that Docker returns a version instead of an error.
Next, check that Docker Engine is running:
docker infoThis prints information about your Docker environment, including the server version, storage driver, number of containers, number of images, and other details.
If docker --version works but docker info fails, Docker may be installed but not running. On Windows or macOS, make sure Docker Desktop is open. On Linux, make sure the Docker service is running.
Once both commands work, your machine is ready to run containers.
Run Your First Container: hello-world
Now that Docker is installed and running, let’s run the smallest possible test container.
Docker provides a tiny image called hello-world. Its job is simple: prove that Docker can pull an image, create a container, run it, and show output in your terminal.
Run this command:
docker run hello-worldYou should see output that includes something like this:
Hello from Docker!
This message shows that your installation appears to be working correctly.
That message is small, but a lot happened behind it.
Docker checked whether the hello-world image already existed on your machine. If it did not, Docker pulled it from Docker Hub. Then Docker created a container from that image, started it, printed the message, and the container exited.
That last part is important.
The hello-world container does not keep running in the background. It starts, prints its message, finishes its job, and exits. That is normal. Some containers are short-lived because they only need to do one small task.
So this command proves two things:
Docker can pull an image.
Docker can create and run a container from that image.
Now that we know Docker is working, let’s run something more realistic: a web server that stays running until we stop it.
Run a Real Web Server: nginx
hello-world proved that Docker can run a container.
Now let’s run something more realistic: a web server.
Nginx is a popular web server, and Docker Hub has an official nginx image we can use. Run this command:
docker run -d -p 8080:80 nginxThere are three important parts here.
nginx is the image we want to run.
-d means detached mode. It tells Docker to run the container in the background, so your terminal is not taken over by the running web server.
-p 8080:80 publishes a port from the container to your machine. The container listens on port 80, but your machine will expose it on port 8080.
So the port mapping means:
localhost:8080 on your machine
→ port 80 inside the container
Now open your browser and go to:
http://localhost:8080You should see the default Nginx welcome page.
That is a real web server running inside a Docker container.
You did not install Nginx directly on your machine. You did not configure it manually. Docker pulled the nginx image, created a container, started the web server, and connected the container’s port to your machine.
That is the shift from hello-world.
hello-world ran a short task and exited.
nginx keeps running because a web server is meant to stay available and wait for requests.
You can check that it is running with:
docker psYou should see a running container based on the nginx image, with a port mapping that looks similar to this:
0.0.0.0:8080->80/tcpThat line means traffic sent to port 8080 on your machine is being forwarded to port 80 inside the container.
We will stop and clean up this container shortly. First, let’s slow down and understand what Docker just did behind the scenes.
What Happened Behind the Scenes?
You have now run two containers.
hello-world started, printed a message, and exited.
nginx started a web server and kept running in the background.
The commands were simple, but Docker did several things for you each time. Let’s use the nginx example to explain the flow.
When you ran:
docker run -d -p 8080:80 nginxyou were using the Docker Client.
The Docker Client is the command-line tool you interact with in your terminal. It takes your command and sends it to Docker Engine.
Docker Engine is the part of Docker that does the work on the Docker host. In diagrams, you will often see this shown as the Docker daemon. The daemon is the background process that receives requests from the client and carries them out.
The diagram below shows the basic picture. You type commands into the Docker Client, the Docker daemon does the work on the Docker host, images can be pulled from a registry, and containers are created from those images.
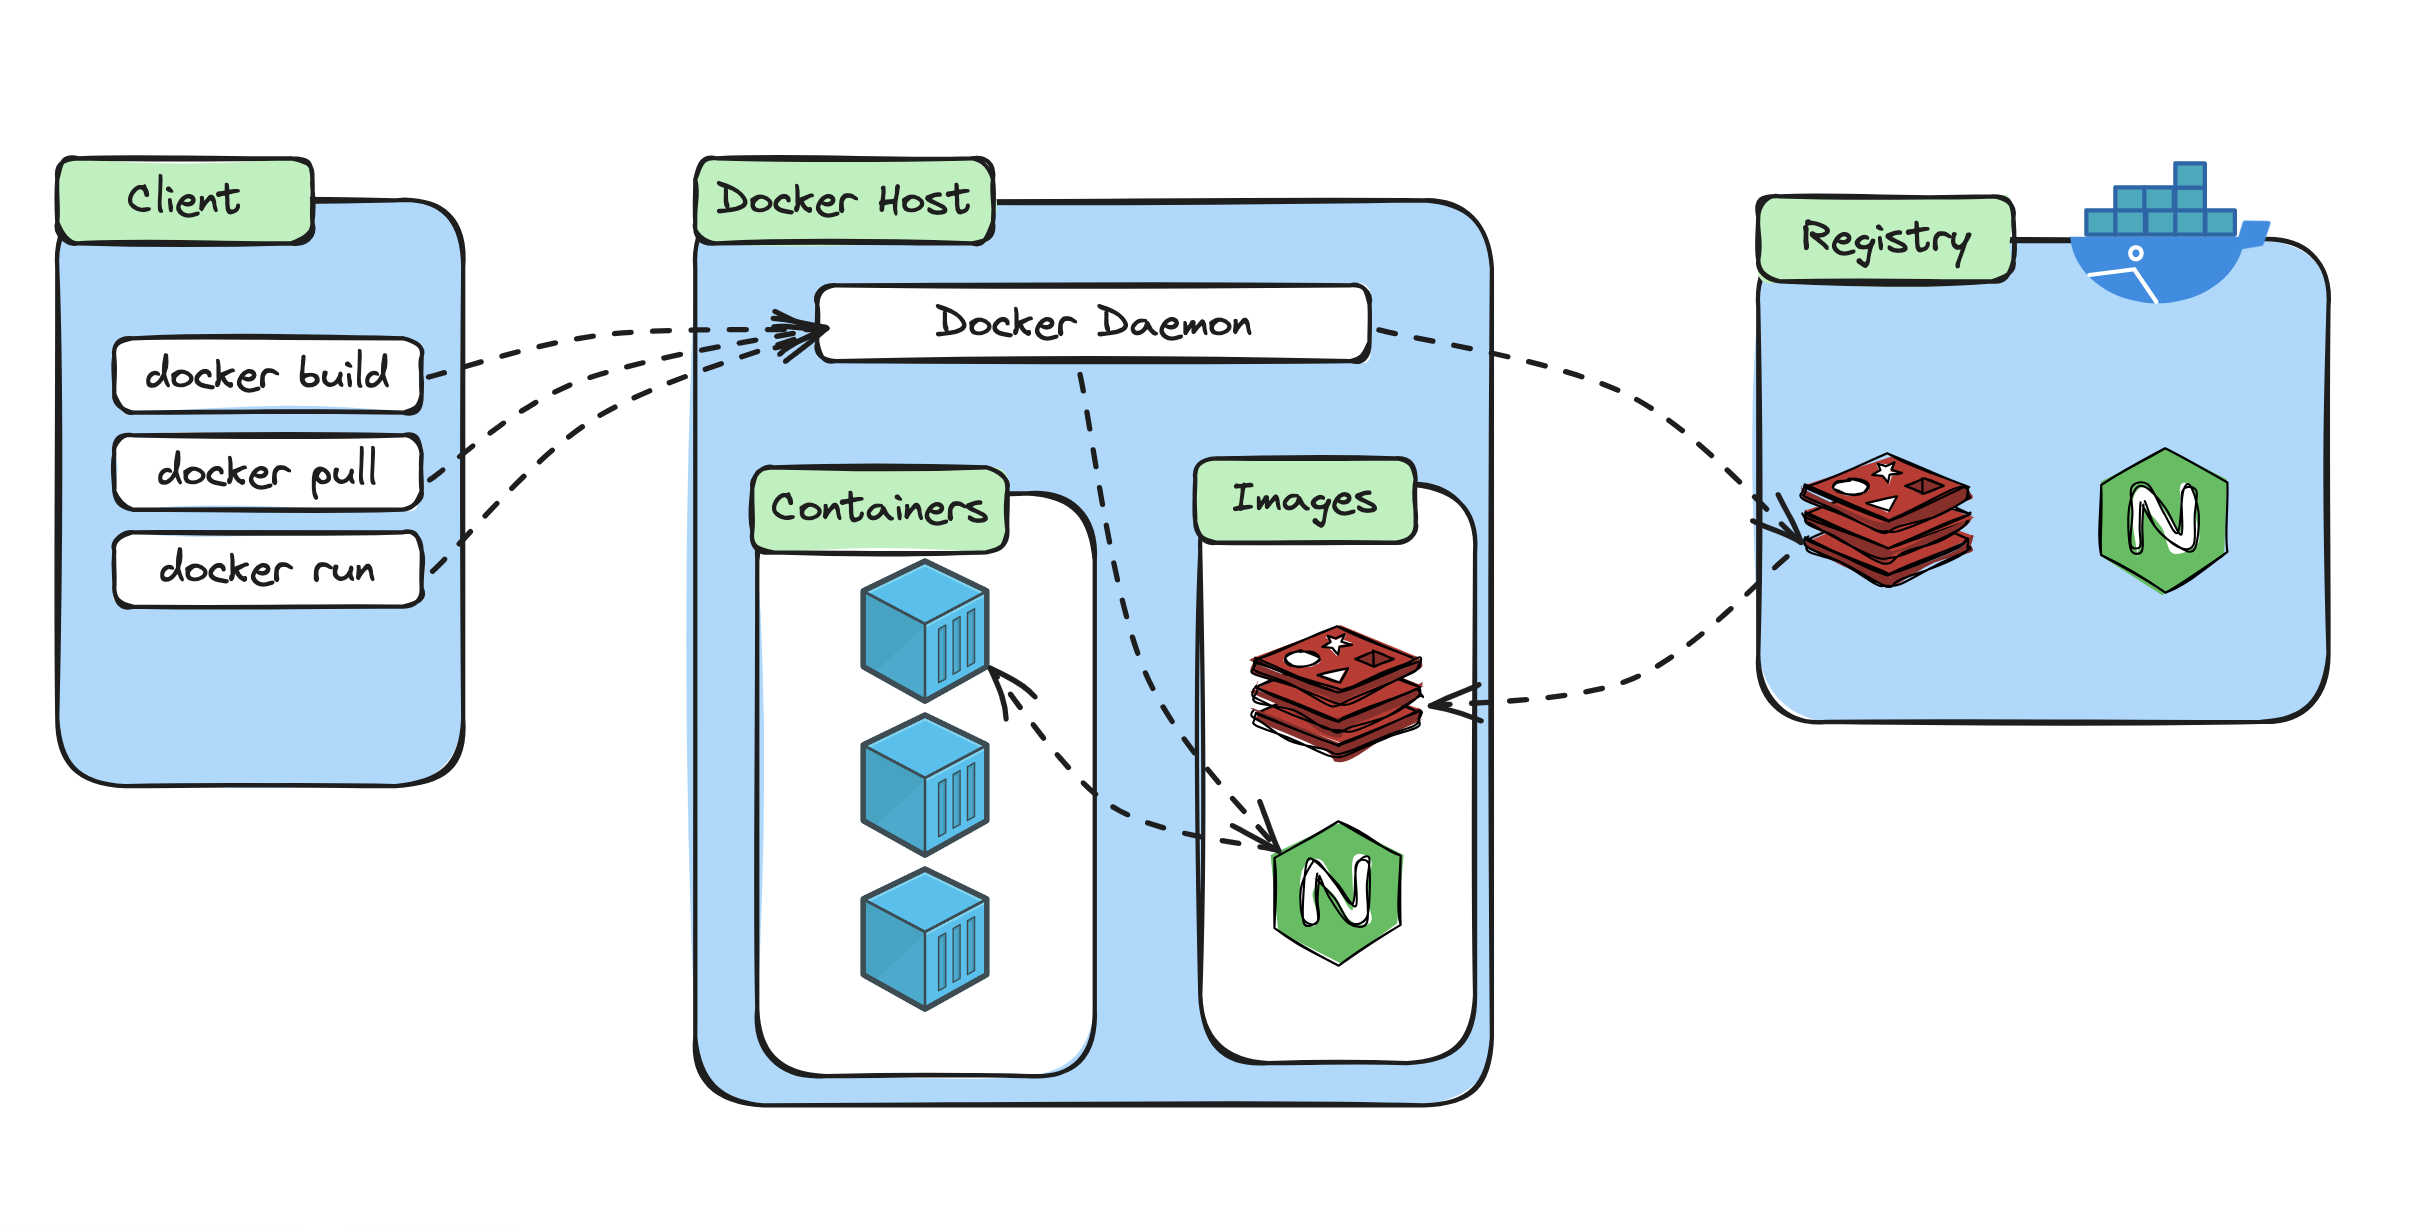
For this section, focus mainly on docker run. The same picture also helps explain commands like docker pull and docker build, but right now we are using it to understand what happened when we ran nginx.
Docker Engine checks whether the nginx image already exists on your machine. If the image is not there, Docker pulls it from a registry. By default, that registry is Docker Hub.
Then Docker creates a container from the image.
After that, Docker starts the container. Because you used -d, the container keeps running in the background. Because you used -p 8080:80, Docker also maps port 8080 on your machine to port 80 inside the container.
So the flow looks like this:
You run docker run -d -p 8080:80 nginx
→ Docker Client sends the request
→ Docker Engine checks for the nginx image
→ Docker Engine pulls the image from Docker Hub if needed
→ Docker Engine creates a container from the image
→ Docker Engine starts the container
→ Docker maps localhost:8080 to port 80 inside the container
That is why one command was enough to start a working web server.
You did not manually download Nginx. You did not install it on your operating system. You did not configure a web server from scratch.
Docker used the image as the packaged application environment, then ran it as a container.
That is the core workflow you will keep seeing:
Image exists or gets pulled
→ Container is created
→ Container starts
→ Application runs
Now that the container is running, the next question is: how do we manage it?
Yes, this image fits perfectly at the end of the Managing the Containers You Created section.
The only thing I would do is not teach every state in the diagram in detail. The diagram includes Paused, Docker Pause, and Docker UnPause, but for this beginner article we can simply say: “The diagram also shows paused as another possible state, but for now the main lifecycle to understand is running, stopped, and removed.”
Here is the rewritten section in one go.
Managing the Containers You Created
You have now created two containers.
The hello-world container ran, printed its message, and exited.
The nginx container is different. It is a web server, so it keeps running in the background until you stop it.
Now we need to manage what we created.
Start by listing the containers that are currently running:
docker psYou should see your nginx container in the output:
CONTAINER ID   IMAGE     COMMAND                  STATUS         PORTS                  NAMES
d2af74abddc4   nginx     "/docker-entrypoint.…"   Up 2 minutes   0.0.0.0:8080->80/tcp   great_kapitsa
The exact container ID and name will be different on your machine. Docker generates a random name if you do not provide one.
Now list all containers, including containers that already stopped:
docker ps -aThis time, you should see both containers:
CONTAINER ID   IMAGE         STATUS                     NAMES
d2af74abddc4   nginx         Up 2 minutes                great_kapitsa
8e721a12e703   hello-world   Exited (0) 10 minutes ago   vibrant_pare
This is an important detail.
A container can stop running but still exist on your machine. The hello-world container finished its job and exited, but Docker still keeps a record of it until you remove it.
To stop the running nginx container, use docker stop with the container ID or name:
docker stop great_kapitsaNow check the running containers again:
docker psThe nginx container should no longer appear because it is stopped.
But if you run:
docker ps -ayou should still see it listed with an Exited status.
You can start it again with:
docker start great_kapitsaAnd if you want to stop it again:
docker stop great_kapitsaWhen you are done with a container, you can remove it:
docker rm great_kapitsaRemoving a container does not remove the image it came from. The nginx image can still stay on your machine, ready to create another container later.
If you want to remove all stopped containers at once, Docker also provides:
docker container pruneDocker will ask you to confirm before it removes stopped containers.
The diagram below shows the basic container lifecycle.
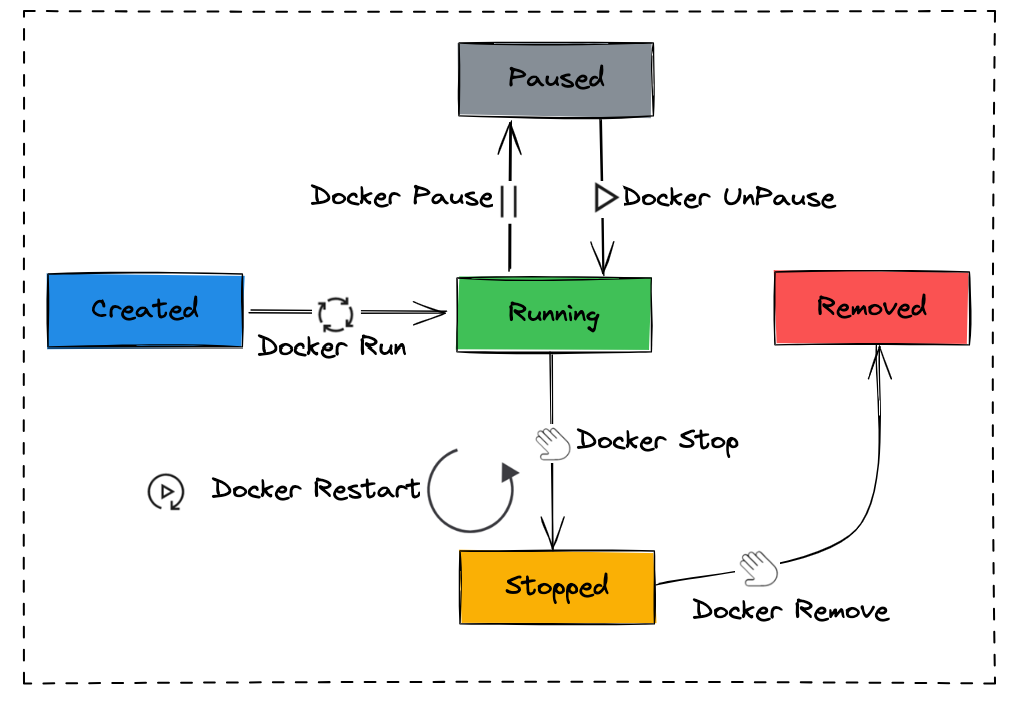
For this article, focus on the main path:
Created
→ Running
→ Stopped
→ Removed
When you run a container, Docker creates it and starts it. When you stop it, the container is no longer running, but it still exists. When you remove it, Docker deletes the container record from your system.
The diagram also shows that a running container can be paused and unpaused. That is useful in some scenarios, but it is not the main thing to remember right now.
The key idea is simpler:
Running and stopping are not the same as deleting.A stopped container is still there until you remove it.
Common Issues You Might Hit
Before we wrap up, let’s cover a few issues you might run into while following this walkthrough.
Docker daemon is not running
If you see an error like this:
Cannot connect to the Docker daemon. Is the docker daemon running?Docker is installed, but the Docker Engine is not running.
On Windows or macOS, open Docker Desktop and wait until it finishes starting. On Linux, check that the Docker service is running.
Permission denied on Linux
On Linux, you may see an error like this:
Got permission denied while trying to connect to the Docker daemon socketThis usually means your user does not have permission to talk to Docker.
For a quick test, you can run the command with sudo:
sudo docker psFor a longer-term fix, add your user to the docker group using Docker’s Linux post-installation guidance.
Port 8080 is already in use
When you run:
docker run -d -p 8080:80 nginxDocker tries to bind port 8080 on your machine.
If another application is already using that port, Docker will fail with a port binding error.
The easiest fix is to use a different host port:
docker run -d -p 8081:80 nginxThen open:
http://localhost:8081The container is still listening on port 80 inside. You only changed the port exposed on your machine.
Container exits immediately
Some containers are meant to keep running. Others run a short task and then exit.
For example, hello-world exits immediately because its job is only to print a message.
If a container exits when you expected it to keep running, check its logs:
docker logs <container_id_or_name>The logs usually tell you whether the application crashed, missed a configuration value, or finished its job normally.
Docker is using too much disk space
As you run more containers and pull more images, Docker stores more data on your machine.
You can check Docker’s disk usage with:
docker system dfTo remove stopped containers, unused networks, dangling images, and build cache, you can run:
docker system pruneDocker will ask for confirmation before deleting anything.
Be careful with cleanup commands. They are useful, but you should understand what they remove before using them on a machine where you have important containers or images.
The Docker Mental Model
At this point, you have done more than run a few commands.
You have seen the basic Docker workflow in action.
When you ran hello-world, Docker pulled a small image, created a container, ran it, printed a message, and then the container exited.
When you ran nginx, Docker pulled a web server image, created a container, started it in the background, and mapped a port from your machine to the container.
So the model should now look like this:
Docker Client
→ sends your command to Docker Engine

Docker Engine
→ checks for the image
→ pulls it from a registry if needed
→ creates a container
→ starts the container

Docker Registry
→ stores images like hello-world and nginx
And the container lifecycle should also be clearer:
Created
→ Running
→ Stopped
→ Removed
The most important idea is this:
An image is the packaged application environment.
A container is a running copy of that image.
A stopped container is not the same as a deleted container. It can still exist on your machine after it stops. You can inspect it, start it again, or remove it when you no longer need it.
That is the foundation for working with Docker day to day.
You are no longer just thinking, “Docker runs things.”
You now have a more useful picture:
Docker pulls or builds images,
then uses those images to create and manage containers.
Where This Leads
You have now moved from understanding Docker to actually using it.
You installed Docker, verified that it was running, ran your first containers, exposed a web server through a port, looked at what happened behind the scenes, and learned how to stop, start, inspect, and remove containers.
That is a solid first hands-on step.
But so far, every image you used was created by someone else.
hello-world came from Docker.
nginx came from the official Nginx image on Docker Hub.
That is useful, but it is only the beginning.
The next step is to build your own image.
In the next article, we will take a simple application, write a Dockerfile, build a Docker image from it, run that image as a container, and then push it to a registry so it can be used somewhere else.
That is where Docker starts to become part of your real development workflow:
Write the app
→ describe its environment in a Dockerfile
→ build an image
→ run it as a container
→ share it through a registry
→ deploy it somewhere else
So far, you have been running containers.
Next, you will create the image those containers run from.