Introduction
A long time ago in a galaxy far, far away… okay, maybe not that long ago, and certainly closer to home, we embarked on an epic journey exploring the powers of Cilium and eBPF in our previous article. We discovered how these technologies revolutionize Kubernetes networking and security, making our clusters faster, safer, and more observable than ever before. 🌌
Now, get ready to witness the force of Cilium awakening in a new realm—the Azure Kubernetes Service (AKS)! 🚀 In this exciting sequel, we’ll embark on a thrilling adventure that combines the robustness of AKS with the unmatched networking and security capabilities of Cilium. We’ll guide you through this intergalactic journey using the Star Wars Demo, a fun and interactive way to showcase Cilium’s features in action. 🌠
Imagine having the power to control access to the most critical resources in your cluster, the Deathstar ☠️, while ensuring secure communication between your pods. With Cilium as your trusty co-pilot, you’ll be able to enforce network policies, secure pod-to-pod communication, and maintain order in your cluster, like a true Kubernetes master. ⚔️
So, buckle up and prepare for hyperspace! In this article, we’ll first introduce you to the Azure Kubernetes Service and explain why Cilium is the perfect companion for your AKS journey. Then, we’ll guide you step-by-step through setting up Cilium in your AKS cluster and deploying the Star Wars Demo. Along the way, you’ll learn how to wield Cilium’s powers to secure your cluster and witness firsthand how these features can be applied to real-world scenarios. 🛡️
By the end of this adventure, you’ll have mastered the art of using Cilium with AKS, and you’ll be ready to take on any networking or security challenge that comes your way. So, let’s fire up our lightsabers and embark on this thrilling journey together! 🔥
May the force of Cilium be with you! 🙏
Azure Kubernetes Service (AKS)
In the vast galaxy of cloud computing, Azure Kubernetes Service (AKS) shines brightly as a managed Kubernetes offering from Microsoft Azure. ☁️ AKS simplifies the deployment, management, and operations of Kubernetes clusters, allowing you to focus on your applications rather than the underlying infrastructure.
With AKS, you can easily provision a production-ready Kubernetes cluster in just a few clicks or a single command. Azure takes care of the heavy lifting, managing the control plane, and providing seamless integrations with other Azure services like storage, monitoring, and security. This means you can spend more time developing your applications and less time worrying about the plumbing. 🔧
To further strengthen the power of AKS and effectively tackle any networking and security challenges, Cilium steps in, like a faithful companion, ready to navigate the complex network space of your cluster. 🤖
Cilium is a perfect match for AKS, thanks to its eBPF-powered networking and security capabilities. By leveraging eBPF, Cilium offers a highly efficient and scalable way to enforce network policies, secure pod-to-pod communication, and monitor network traffic. This means you can create a secure and performant network layer for your AKS cluster without sacrificing flexibility or control.
But don’t just take our word for it – in the following sections, we’ll show you how to deploy Cilium in your AKS cluster and witness its powers firsthand through the Star Wars Demo. Get ready to embark on an exciting journey where AKS and Cilium join forces to create a secure and efficient Kubernetes environment! 🚀
Setting Up an AKS Cluster (Optional)
This tutorial requires a test AKS cluster to explore and implement the concepts demonstrated. If you already have a test AKS cluster set up, you’re all set to proceed! If not, don’t worry—you can quickly create your own using the Azure CLI. Please note that creating an AKS cluster will incur costs, so make sure to follow our guide on deleting the cluster when you’re done with the demo to minimize expenses. 💰
To create an AKS cluster with one control plane node and two worker nodes, use the following command:
|
|
-node-vm-size Standard_B2s: We’re using a small VM size to keep costs low for our demo.-node-count 1: We’ll create a cluster with a single node, which is sufficient for our purposes.-generate-ssh-keys: This option generates SSH keys for accessing the cluster securely.-network-plugin none: We’re creating the cluster without a CNI, giving us flexibility to install Cilium later.
Replace myResourceGroup with the name of your Azure resource group and myAKSCluster with your desired cluster name.
Once your cluster is created, fetch the credentials to interact with it using kubectl:
|
|
Verify that you can connect to your cluster by running:
|
|
You should see output similar to this:
|
|
Now that you have your AKS cluster up and running, you can proceed with installing Cilium as described in the next section.
Deleting Your AKS Cluster
When you’re done with the Star Wars Demo and want to delete your AKS cluster to avoid unnecessary costs, use the following command:
|
|
Make sure to replace myResourceGroup and myAKSCluster with the appropriate values for your cluster.
⚠️ Warning: Deleting your AKS cluster will permanently remove all resources associated with it, so make sure you’ve backed up any important data or configurations before proceeding.
Setting Up Cilium in AKS
Before we proceed with installing Cilium in our AKS cluster, let’s make sure you have the Cilium CLI installed on your machine. I’ll provide instructions for macOS, but you can find installation instructions for other operating systems in the Cilium documentation here.
For macOS, you can install the Cilium CLI using Homebrew:
|
|
Installing Cilium as the CNI in your AKS cluster
Now that we have our AKS cluster up and running without a CNI, let’s install Cilium as the networking plugin.
-
Install Cilium as the CNI in your AKS cluster using Cilium CLI:
1cilium install --helm-set azure.resourceGroup=myResourceGroupReplace
myResourceGroupwith the name of your Azure resource group. -
Verify the installation by running:
1cilium status
If everything is working as expected, you should see output confirming that Cilium is running and ready to secure your cluster.
Enabling L7 Network Policy in Cilium
By default, Cilium’s L7 (HTTP) network policy enforcement is not enabled. However, we’ll need it for our Star Wars Demo later. Let’s enable L7 network policy using the Cilium CLI.
-
Enable the L7 proxy in Cilium:
1 2cilium config set proxy.prometheus.enabled=true cilium config set proxy.sidecarImageRegexp="cilium/istio_proxy" -
Restart the Cilium pods to apply the configuration changes:
1kubectl delete pod -n kube-system -l k8s-app=ciliumWait for the Cilium pods to restart and become ready.
-
Verify that the L7 proxy is enabled and functioning correctly by running the Cilium connectivity test:
1cilium connectivity test --test "l7"This command will run a series of tests to verify the L7 proxy functionality. You should see output similar to the following:
1 2 3 4 5 6 7✅ Test [echo-ingress-l7] [51/78] ✅ Test [echo-ingress-l7-named-port] [52/78] ✅ Test [client-egress-l7-method] [53/78] ✅ Test [client-egress-l7] [54/78] ✅ Test [client-egress-l7-named-port] [55/78] ✅ All 5 tests (34 actions) successful, 73 tests skipped, 0 scenarios skipped.The successful tests indicate that the L7 proxy is enabled and functioning correctly.
Congratulations! You now have an AKS cluster with Cilium installed as the CNI, and L7 network policy enforcement enabled. You’re ready to unleash Cilium full potential! In the next section, we’ll introduce you to the Star Wars Demo and show you how to deploy it in your cluster. Get ready to witness Cilium’s power in action! 🚀
The Star Wars Demo: A Cilium Adventure
Now that you have your AKS cluster up and running with Cilium installed, it’s time to embark on an exciting adventure through the Star Wars Demo! This demo is a fun and interactive way to explore Cilium’s powerful networking and security features, all while immersing yourself in the iconic Star Wars universe. 🌌
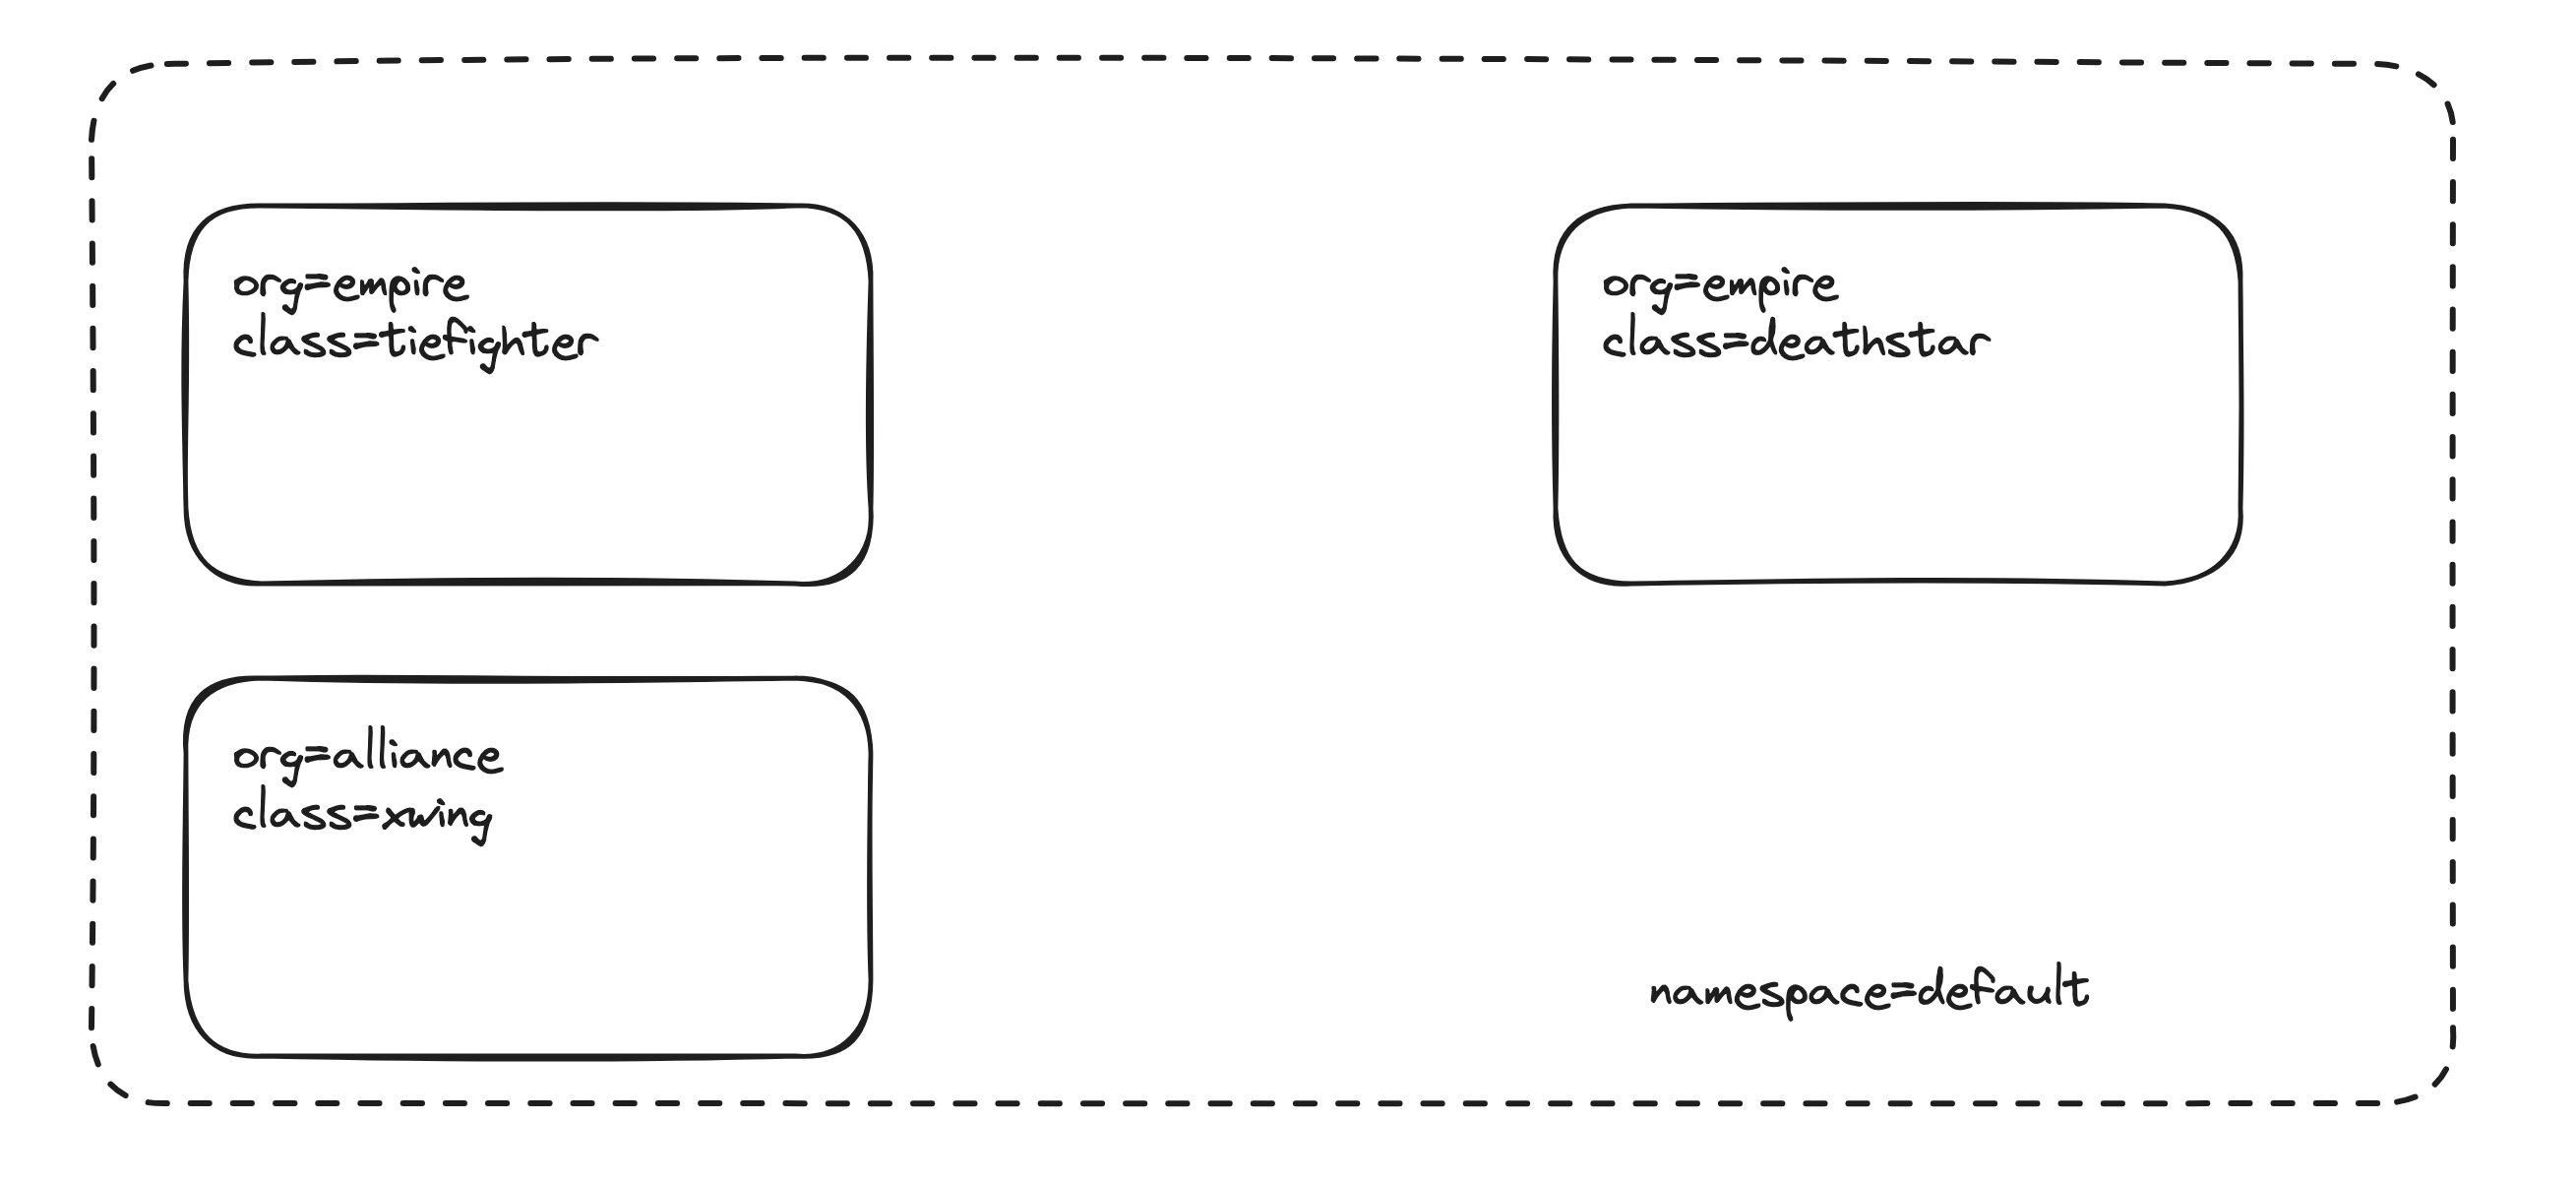
The Star Wars Demo consists of three main components:
- The Deathstar ☠️: This is a simple HTTP webservice that provides information about the Deathstar plans. It represents a sensitive resource that needs to be protected.
- Tiefighters 🚀: These are pod-to-pod communication clients that periodically send requests to the Deathstar service. Since they represent the empire, they should be granted access to the Deathstar. However, they may pose potential security threats to the Deathstar if they are given access to information they are not authorized to access.
- X-Wings 🛸: These are pod-to-pod communication clients that send requests to the Deathstar plans. They represent the brave Rebel Alliance trying to access the critical information. Access to the Death Star should be denied to them as they pose a threat.
Throughout the demo, you’ll see how Cilium secures the communication between these components using its advanced networking and security features. Here’s a sneak peek of what you’ll experience:
- L3/L4 Network Policies 🛡️: Cilium’s Layer 3 and Layer 4 network policies allow you to control traffic between pods based on IP addresses, ports, and protocols. You’ll see how these policies can be used to restrict access to the Deathstar service.
- L7 Network Policies 🔐: Cilium’s Layer 7 network policies take security to the next level by enabling filtering based on application-layer attributes like HTTP methods and paths. You’ll witness how these policies can be used to protect specific endpoints within the Deathstar service.
By exploring the Star Wars Demo, you’ll gain hands-on experience with Cilium’s features and understand how they can be applied to secure your own applications running on AKS.
In the next section, we’ll guide you through deploying the Star Wars Demo in your AKS cluster. Get ready to put your Cilium skills to the test and embark on an intergalactic adventure like no other! 🚀
🌟 Deploying the Star Wars Demo on AKS
Alright, it’s time to bring our Star Wars Demo to life on our AKS cluster. In this section, we’ll guide you through the process of deploying the demo application and setting the stage for an epic battle between the Empire and the Alliance. 🚀
Once we have our demo up and running, we’ll embark on a thrilling journey to explore Cilium’s powerful network policies. First, we’ll dive into L4 (Layer 4) policies, where we’ll use the force of Cilium to restrict access to the Deathstar service based on protocol and port number. 🛡️
We’ll then take our skills to the next level by exploring L7 (Layer 7) policies. With L7 policies, we’ll be able to filter traffic based on HTTP attributes, allowing us to control access to specific endpoints on the Deathstar service with precision. ⚔️
So, buckle up and get ready to deploy the Star Wars Demo on your AKS cluster. Here’s what you need to do:
Step 1: Deploy the Deathstar, Tiefighter, and X-Wing Services
To begin, we’ll deploy our Star Wars Demo app using below YAML file. Run the following command:
|
|
This command will create the necessary deployments and services for our Star Wars-inspired microservices. You can see the content of that file here:
|
|
Step 2: Verify the Deployment
To ensure that our services are up and running, let’s check the status of our pods and services:
|
|
You should see output similar to the following:
|
|
Once all the pods are in the “Running” state, our Star Wars Demo is ready for action! 🎉
Step 3: Test the Connectivity
Before we apply any network policies, let’s test the connectivity between our services. Execute the following commands to send requests from the Tiefighter and X-Wing pods to the Deathstar service:
|
|
|
|
Both requests should return the message “Ship landed,” indicating that the Empire and the Alliance ships can successfully communicate with the Deathstar.
But fear not, young Jedi! In the next sections, we’ll use the power of Cilium’s network policies to control this communication and bring order to our galaxy. 🌌
Get ready to wield the force of L4 and L7 policies as we embark on an exciting adventure to secure our microservices! 🚀✨
🔒 Exploring Cilium’s L4 Network Policy
Now that our Star Wars Demo is up and running, it’s time to dive into the world of L4 network policies and witness the power of Cilium in action! 💪
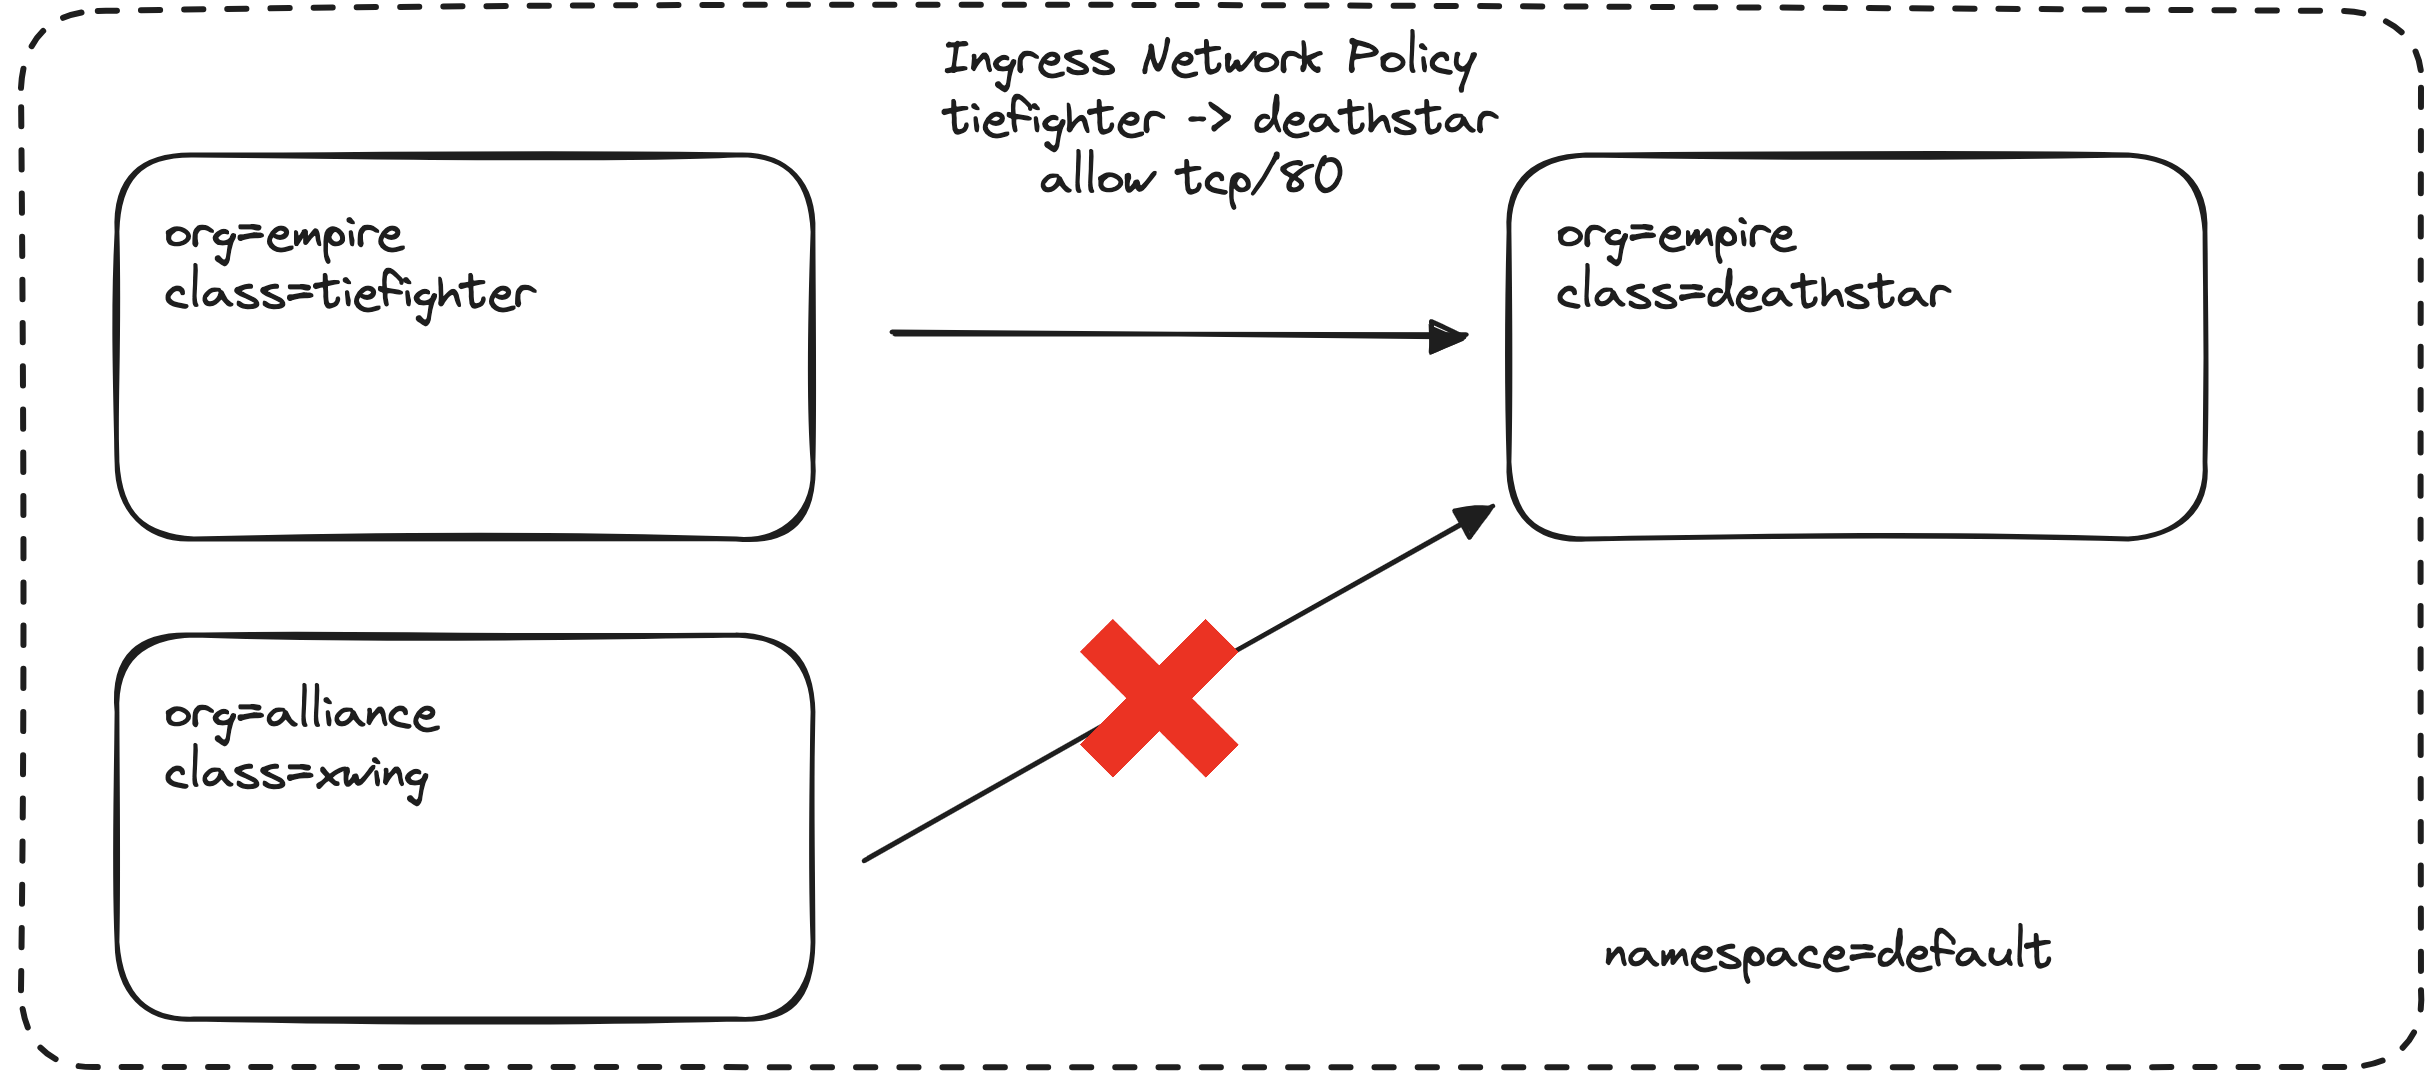
In this section, we’ll create an L4 policy to restrict access to the Deathstar service, allowing only the “empire” ships to communicate with it. This is where the fun begins! 😄
Step 1: Create the L4 Network Policy
To create our L4 network policy, apply the following CiliumNetworkPolicy:
|
|
This policy allows ingress traffic from pods with the label org=empire to the Deathstar service on TCP port 80.
|
|
Step 2: Test the L4 Policy
Let’s test our L4 policy by sending requests from the Tiefighter and X-Wing pods:
|
|
The request from the Tiefighter pod (part of the “empire”) should succeed, while the request from the X-Wing pod (part of the “alliance”) should hang and eventually time out. The L4 policy is working as expected! 🎉
|
|
This request will hang, so press Control-C to kill the curl request or wait for it to time out.
Step 3: Inspect the Policy
To inspect the applied L4 policy, use the following commands:
|
|
The output will show you the details of the L4 policy, including the endpoint selector and the ingress rules.
Congratulations! You’ve successfully applied an L4 network policy to restrict access to the Deathstar service. In the next section, we’ll explore the advanced capabilities of L7 policies and take our security to the next level! 🚀
🛡️ Exploring Cilium’s L7 Network Policy
Prepare yourself, young Jedi, for we are about to unleash the true power of Cilium’s network policies! In this section, we’ll explore L7 policies, which allow us to filter traffic based on HTTP attributes like paths and methods. 🌐
In the simple scenario above, it was sufficient to either give tiefighter / xwing full access to deathstar’s API or no access at all. But to provide the strongest security (i.e., enforce least-privilege isolation) between microservices, each service that calls deathstar’s API should be limited to making only the set of HTTP requests it requires for legitimate operation.
For example, consider that the deathstar service exposes some sensitive APIs which should not be called by unauthorised empire ships. To see this run:
|
|
This is so dangerous. If put in the wrong hands, our Deathstar could explode 😁, so to avoid unauthorised access, we’re going to implement our L7 network policy next.
Step 1: Create the L7 Network Policy
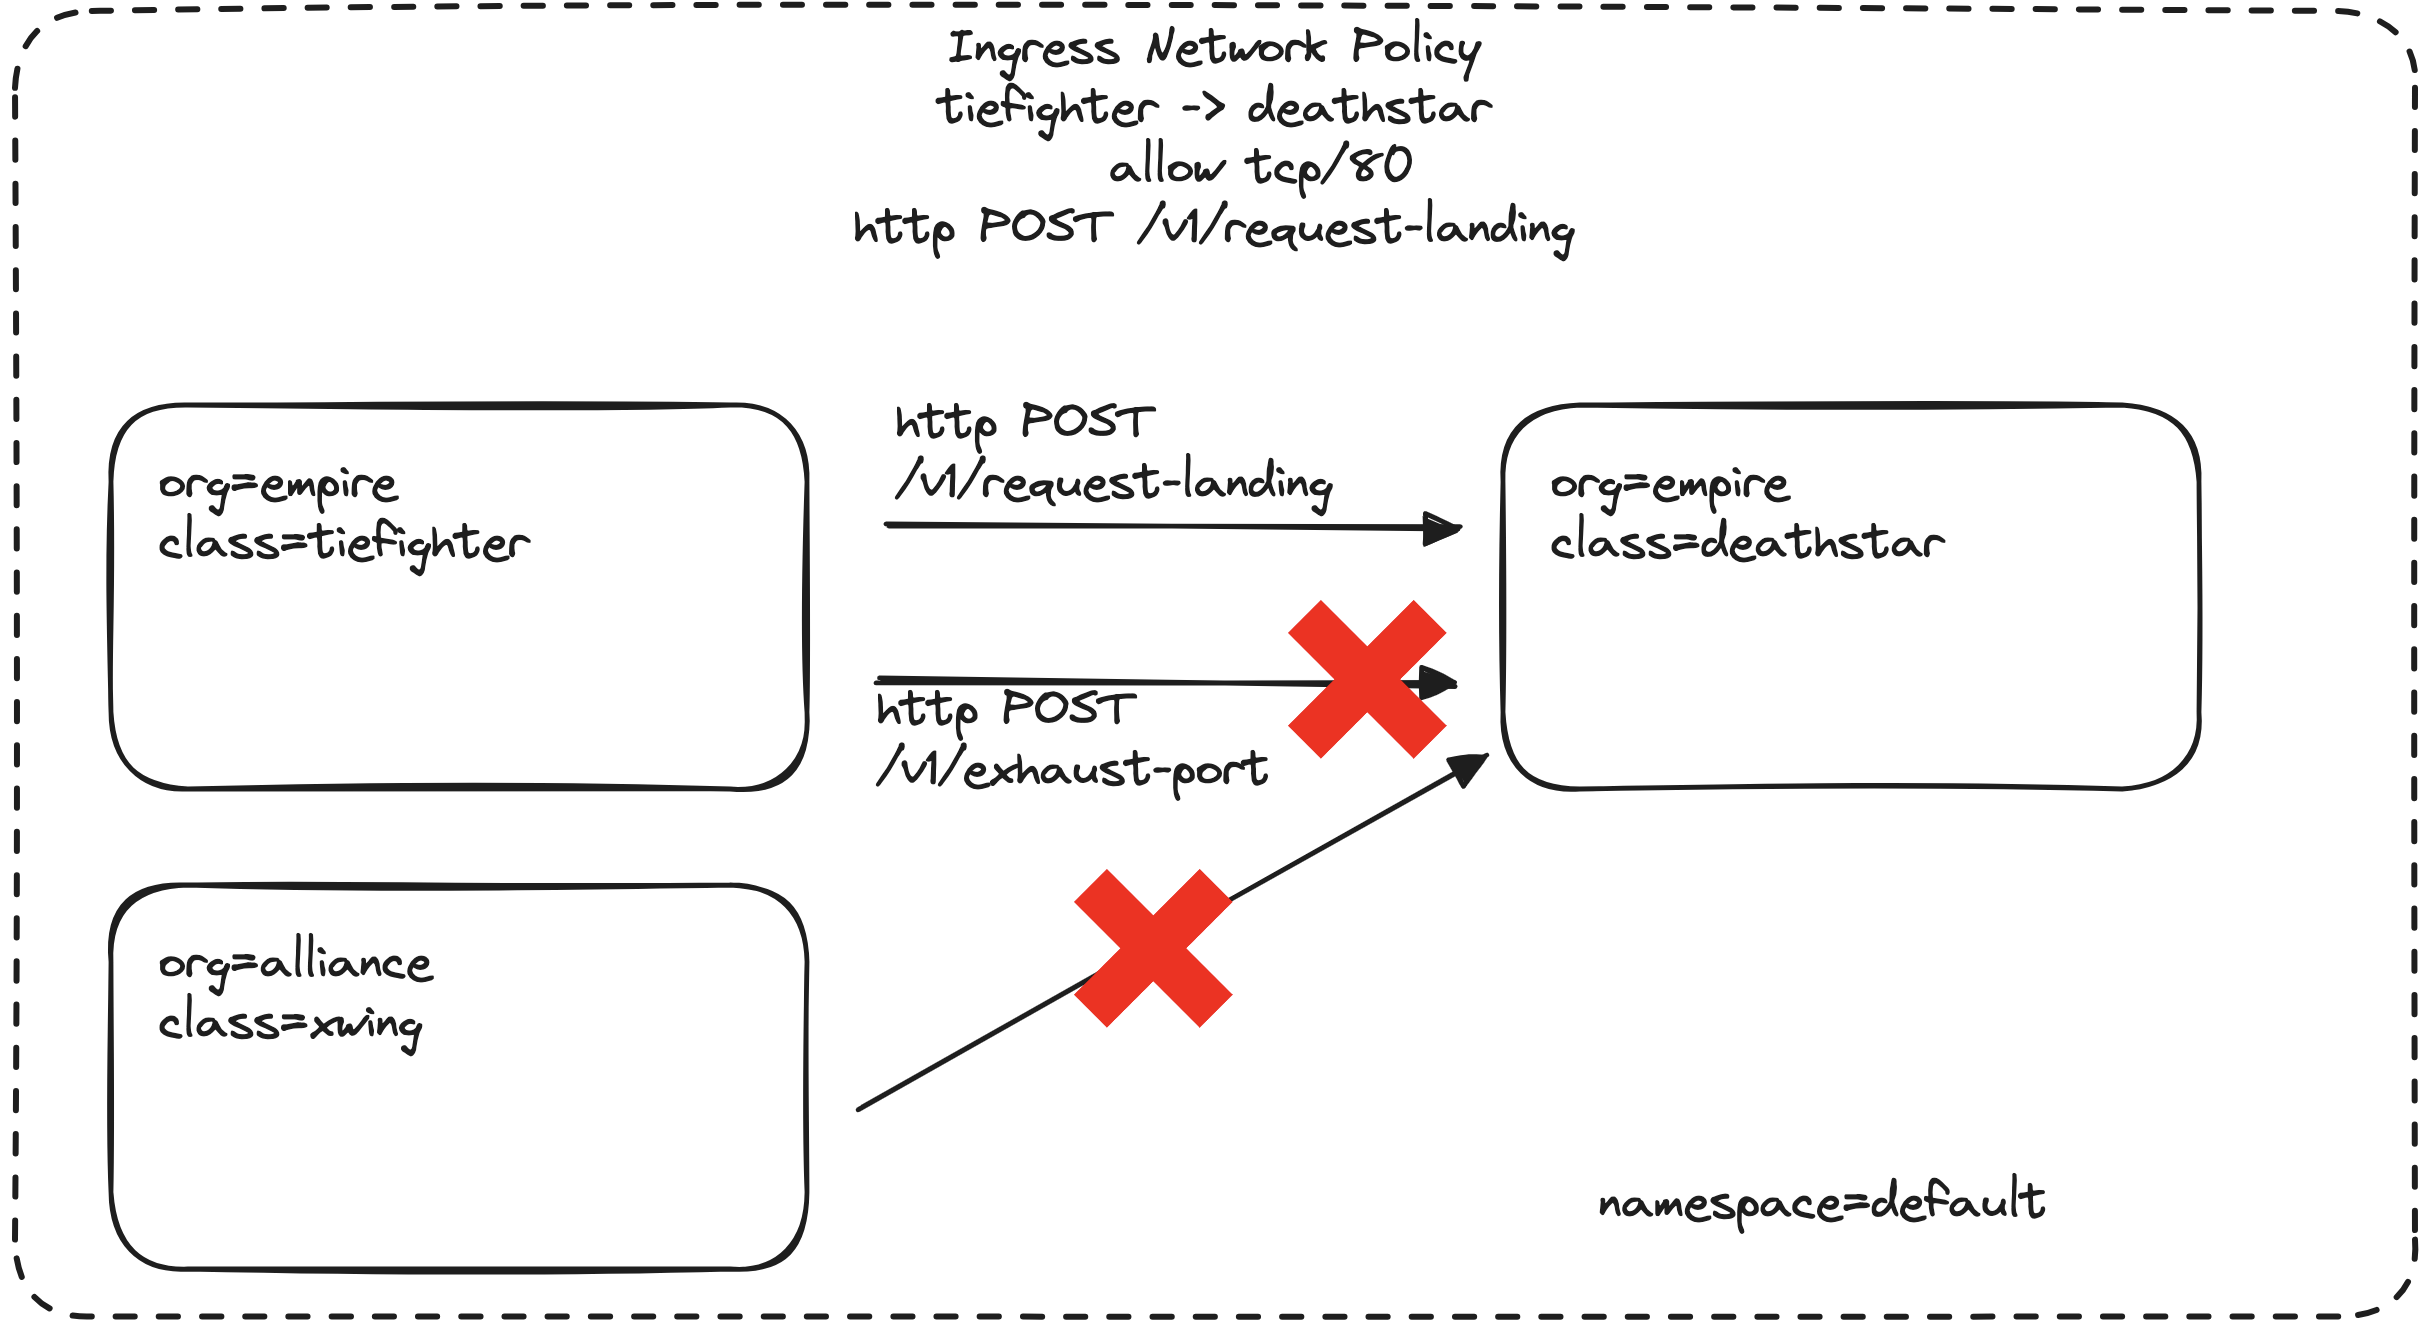
Ok, let’s first create our L7 policy that restricts access to specific HTTP endpoints on the Deathstar service. Implement the following CiliumNetworkPolicy:
|
|
This policy allows only POST requests to the /v1/request-landing endpoint on the Deathstar service, while denying all other HTTP requests.
Step 2: Apply the L7 Policy
|
|
Step 2: Test the L7 Policy
Let’s test our L7 policy by sending allowed and denied HTTP requests from the Tiefighter pod:
|
|
|
|
The L7 policy should allow the first request (POST to /v1/request-landing), while rejecting the second request (PUT to /v1/exhaust-port). You’ll likely see similar messages reflecting this.
|
|
Excellent work, Jedi Master! You’ve now mastered the art of L7 network policies and taken your Cilium skills to new heights! 🎉
🎉 Conclusion
Congratulations on completing this thrilling adventure through the world of Cilium and Azure Kubernetes Service! You’ve deployed the Star Wars Demo and also learned how to secure your microservices using the power of L4 and L7 network policies. 🌟
Throughout this journey, we’ve seen how Cilium’s integration with AKS enables you to effortlessly manage and secure your Kubernetes network. By leveraging the force of eBPF, Cilium provides unparalleled visibility, control, and performance for your microservices.
Remember, the key takeaways from this adventure are:
- Cilium seamlessly integrates with AKS, making it easy to deploy and manage your Kubernetes network. 🚀
- L4 policies allow you to restrict access based on protocol and port number, providing a strong foundation for securing your services. 🔒
- L7 policies take security to the next level by filtering traffic based on HTTP attributes, enabling fine-grained control over your APIs. 🛡️
I hope you found this helpful. Stay tuned, see you soon!
May the force of Cilium be with you, always! 🙏✨