Introduction
Hey everyone! 👋 Welcome back to our journey through Kubernetes’ world! If you’ve been following along, you remember our last adventure where we explored Kubernetes Network Policies. We used Kubernetes in Docker (Kind) and the Flannel CNI plugin to get our hands dirty with some real-world implementations. I hope you found it helpful and enjoyed reading it as much as I enjoyed writing it!
Today, I’m excited to introduce you to Cilium—a feature-rich CNI plugin that’s about to make your Kubernetes networking and security a whole lot easier and more robust, thanks to the magic of eBPF (Extended Berkeley Packet Filter). 🪄 In this article, we’ll explore Cilium and eBPF, exploring how they work together to supercharge your Kubernetes clusters. You’ll learn how to install and configure Cilium in a Kind cluster and see firsthand how it enhances network security and performance.
I remember when I first discovered Cilium and eBPF—it was a game-changer for my Kubernetes projects. The granular control and visibility they provided allowed me to troubleshoot network issues faster and implement more effective security policies. I’m thrilled to share this knowledge with you and help you level up your Kubernetes networking skills!
So, fasten your seatbelts and get ready to explore the exciting world of Cilium and eBPF! 🚀
Why Cilium?
Let’s imagine you are just starting you journey learing about Kubernetes networking, eager to dive into the world of container networking. You start exploring, and soon you stumble on a surprising fact—Kubernetes doesn’t handle networking natively! 😮 Instead, it relies on a modular component called Container Network Interface (CNI) plugins.
At first, I was puzzled by this design choice. But then it hit me—it’s actually genius! By delegating networking responsibilities to CNI plugins, Kubernetes can focus on what it does best: orchestrating containers efficiently and effectively. This modular approach gives users the freedom to choose how they want their network managed and optimized. Similar to a “Pick Your Own Superhero” game 🦸♀️🦸♂️
Now, here’s where Cilium comes in and steals the show. 🌟 Cilium is like the Iron Man of CNI plugins—it’s powered by the cutting-edge technology of eBPF (Extended Berkeley Packet Filter). Just like how Iron Man’s suit is deeply integrated with his arc reactor, Cilium is designed from the ground up to leverage eBPF.
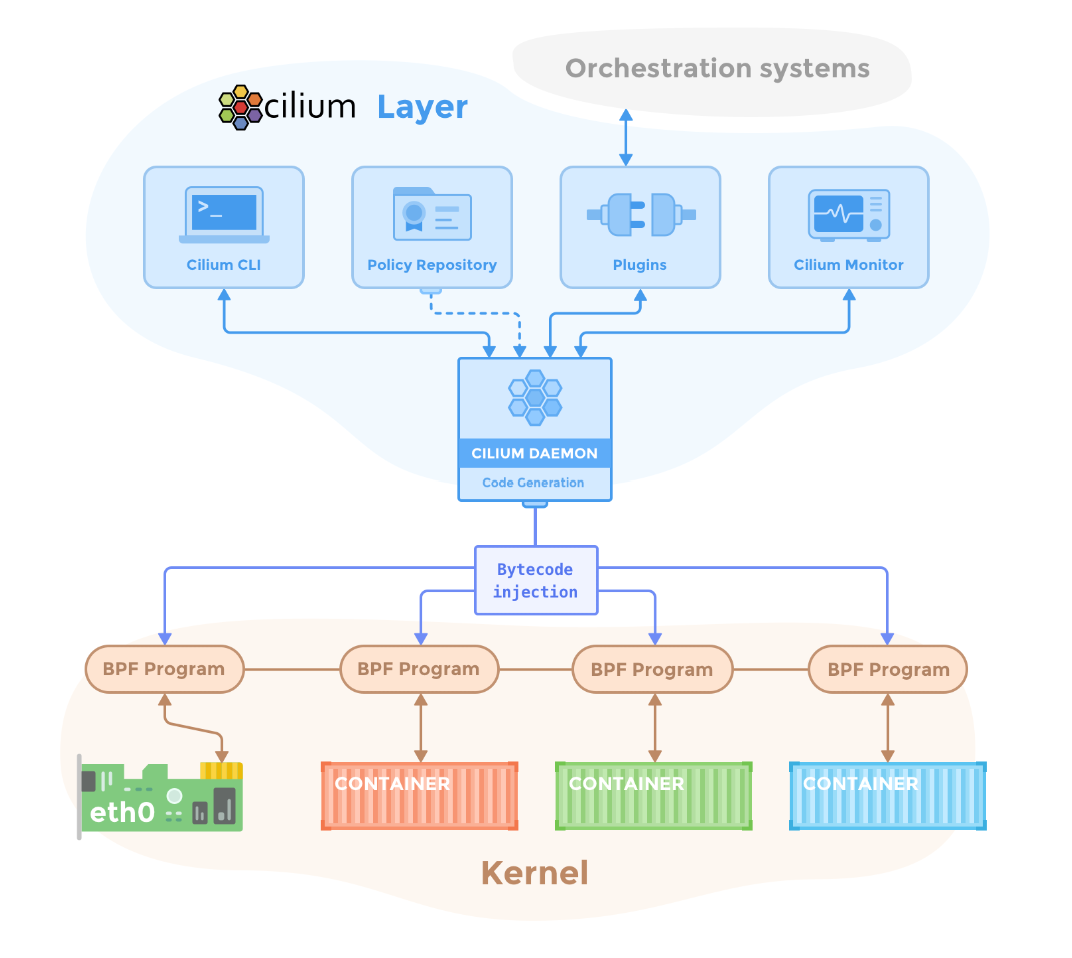
This deep integration allows Cilium to operate at the kernel level, executing networking, security, and observability functions with minimal overhead and maximum efficiency. This architectural choice enhances Cilium performance and also gives it superpowers not typically found in other CNIs. For instance, Cilium provides API-aware network security, transparent encryption, and multi-cluster networking—capabilities that are essential for complex Kubernetes deployments. The following diagram shows how Cilium’s components fit into our Kubernetes and container networking setup.
The unique combination of eBPF integration and a comprehensive suite of features explains why Cilium is increasingly favoured in Kubernetes environments focused on performance and security. So, if you want to give your Kubernetes clusters a superhero upgrade, Cilium is the way to go! 🦸♂️🦸♀️
Exploring eBPF (Extended Berkeley Packet Filter)
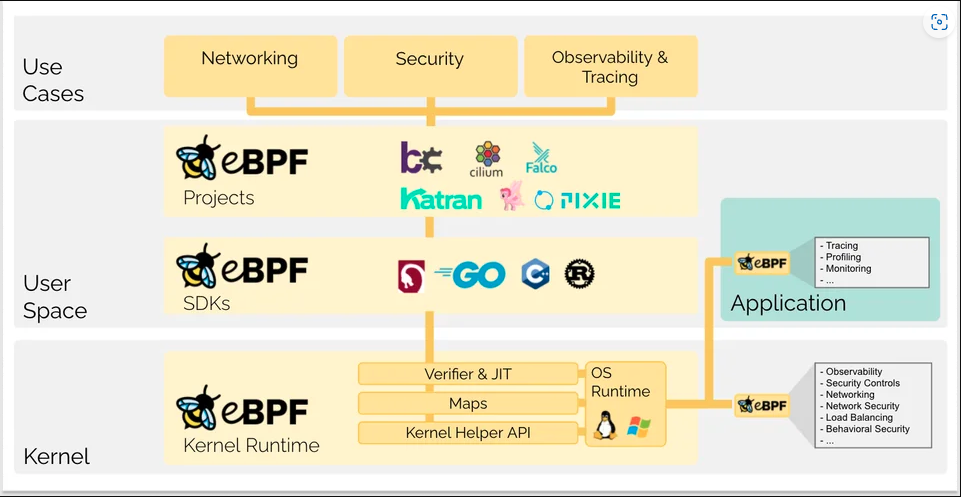
eBPF is a technology which greatly enhances networking and security functions within Kubernetes clusters. eBPF is like a secret weapon for Kubernetes, enabling developers to run sandboxed programs directly in the Linux kernel, eliminating the need to alter the kernel source code or load kernel modules. Here are three reasons why eBPF is a game-changer for Kubernetes networks:
- Better Performance: With eBPF, programs run at the kernel level, processing data right where it’s managed. This minimizes the back-and-forth between user space and kernel space, reducing overhead and boosting data handling speeds—essential for high-performance networking. ⚡
- Enhanced Safety and Security: eBPF can inspect data packets as they enter or leave the kernel. This allows you to create dynamic and fine-grained access controls that are applied close to the data source. With eBPF, you can strengthen your cluster’s security without sacrificing performance. 🔒
- Improved Observability: eBPF operates deep within the kernel, giving you access to rich metadata about system operations. From network traffic flows to system calls and resource usage, eBPF provides detailed insights into the behaviour of your applications and network. Troubleshooting and monitoring have never been easier! 🔍
By leveraging eBPF, Cilium delivers unparalleled performance, security, and observability in Kubernetes environments. 🌟 This integration results in operations with low latency and high efficiency, firmly positioning Cilium as a leading solution in network management.
Now let’s get ready to experience the magic of eBPF and Cilium in your Kubernetes clusters! ⚡🔒🔍
Hands-On Example
Alright, it’s time to roll up our sleeves and dive into the exciting world of Cilium and Kubernetes! 💪 In this hands-on guide, we’ll start a step-by-step adventure, installing and configuring Cilium in a Kubernetes cluster using Kubernetes in Docker (Kind). 🐳. 🚀
We’ll start by setting up a Kind cluster and then proceed to install Cilium using Helm. Along the way, I’ll share tips and best practices to ensure a smooth and successful deployment. 🛠️ We’ll also explore how to configure network policies and test them to secure your cluster like a pro.
Prerequisites
For a smoother ride 🚲, ensure you have the following tools installed on your local machine:
- Docker: Install Docker. 🐳
- kubectl: Install kubectl. ☸️
- Helm: Install Helm. 🎡
- Kind: Install Kind. 🎠
Creating a Kind Cluster
Let’s kick things off by setting up our Kubernetes cluster. We’ll be using Kind for this and here’s how you can do it:
-
Create a Configuration File: Start by setting up a single-node Kind cluster. First, create a
kind-config.yamlfile with the following content:1 2 3 4 5 6kind: Cluster apiVersion: kind.x-k8s.io/v1alpha4 nodes: - role: control-plane networking: disableDefaultCNI: trueTo take full advantage of Cilium’s advanced features, we must turn off Kind’s default networking handler,
kindnet.kindnetdoesn’t support the network policies we aim to implement. By settingdisableDefaultCNI: truein our cluster configuration, we prevent Kind from installing its default CNI. This allows Cilium to take over and manage all networking aspects effectively. -
Create the Cluster: Now that our configuration file is prepared, go ahead and create your Kind cluster by executing the following command:
1kind create cluster --config=kind-config.yaml
This prepares your cluster for the Cilium installation.
Installing Cilium with Helm
With our cluster ready, the next step is to install Cilium. Helm, Kubernetes’ package manager, makes this process straightforward:
-
Download Cilium: First, setup Helm repository:
1helm repo add cilium https://helm.cilium.io/ -
Install Cilium with Helm: Use Helm to install Cilium into the
kube-systemnamespace with the following command:1 2 3 4helm install cilium cilium/cilium --version 1.15.4 \ --namespace kube-system \ --set image.pullPolicy=IfNotPresent \ --set ipam.mode=kubernetes
Once you’ve completed these steps, Cilium will be up and running in our Kubernetes cluster. The Helm chart takes care of the initial setup, automatically tailoring Cilium’s configuration to suit most environments.
Monitoring Cilium Installation
As Cilium and the required components are being installed in our Kubernetes cluster, you can track the progress to ensure everything is initializing as expected using below command:
|
|
This command provides you with real-time update of the pod statuses within the kube-system namespace. You’ll be able to see the Cilium components, like cilium-operator and other related pods, as they transition from statuses like Pending and ContainerCreating to Running. The monitoring keeps going until you decide to stop it, giving you live feedback on the installation. Here’s what you should see as a final outcome indicating a successful setup:
|
|
Configuring Network Policies
With our Kubernetes Cluster and Cilium now up and running, we can move on to the next exciting step - installing our sample app and setting up network policies using Cilium as our CNI plugin. Let’s dive right in and create a manifest for our sample app:
-
Set Up a Sample Application: Before we can define our network policies, we first need a sample application to put these policies to the test. So, go ahead and create a file called
sample-app.yaml. Here’s what to include in the file:1 2 3 4 5 6 7 8 9 10 11 12 13 14 15 16 17 18 19 20 21 22 23 24 25 26 27 28 29 30 31 32 33 34 35 36 37 38 39apiVersion: v1 kind: Pod metadata: name: frontend labels: app: frontend spec: containers: - name: frontend image: nginx ports: - containerPort: 80 --- apiVersion: v1 kind: Pod metadata: name: backend labels: app: backend spec: containers: - name: backend image: nginx --- apiVersion: v1 kind: Service metadata: name: frontend-service spec: selector: app: frontend ports: - protocol: TCP port: 80 targetPort: 80Before applying this command make sure to navigate back to where the
sample-app.yamlfile is then apply this configuration using:1kubectl apply -f sample-app.yaml -
Define and Apply Network Policies: With the sample application up and running, you can now create and apply network policies. Here’s an example policy that restricts communication between the two pods:
1 2 3 4 5 6 7 8 9 10 11 12 13 14 15 16apiVersion: "cilium.io/v2" kind: CiliumNetworkPolicy metadata: name: "frontend-policy" spec: endpointSelector: matchLabels: app: frontend ingress: - fromEndpoints: - matchLabels: app: backend toPorts: - ports: - port: "80" protocol: TCPApply this policy using:
1kubectl apply -f frontend-policy.yaml -
Test the Network Policy: Let’s check if the Network Policy functions correctly by testing the pod-to-pod connectivity.
1kubectl exec backend -- curl frontend-serviceYou should be successful in executing the command and viewing the Nginx welcome page. This confirms that the system permits the traffic. Great job! ✅
To test unauthorized access, we use a special command that performs two actions: it creates a temporary Pod and attempts a connection to the
frontendPod:1kubectl run test --image=nginx --restart=Never --rm -it -- curl frontend-serviceThis command is quite common in testing scenarios because it allows us to quickly deploy a test Pod, execute a test command (
curl), and clean up automatically.This command should fail, as this test Pod is not allowed to communicate with the frontend Pod according to our Network Policy. ❌
-
Clean Up: Congratulations on making it this far! 🎉 You’ve successfully installed Cilium, configured network policies, and tested the functionality in your Kubernetes cluster. Take a moment to appreciate your hard work and the knowledge you’ve gained. When you’re ready, you can clean up by deleting the Kind cluster:
1kind delete cluster
Conclusion
Congratulations on completing this guide! 🎉 You’ve taken a significant step in mastering Kubernetes networking and security with Cilium and eBPF. The hands-on experience you’ve gained, from installing Cilium in a Kind cluster to setting up advanced network policies, provides a strong foundation for leveraging Cilium’s capabilities in your own projects.
Thank you for joining me on this adventure. I hope this guide has empowered you with the skills and confidence to effectively use Cilium in your Kubernetes environments. Keep practicing, exploring, and sharing your experiences – and most importantly, enjoy your networking adventures! 😄
Stay tuned for our next article, where we’ll dive into using Cilium with Azure Kubernetes Service (AKS)! We’ll explore how to integrate Cilium’s powerful networking and security features with AKS, taking your Kubernetes deployments to the next level. See you soon! 🚀
Images sources: What is eBPF? eBPF.io, Cilium Components cilium.io