Introduction to Kubernetes: Your Journey Begins Here

Introduction
In the previous article, we named orchestration as one of the four traits of a cloud native application. The argument was that once you have many containers running across many machines, something has to decide where they run, restart them when they fail, and scale them with demand. That something is an orchestrator, and the one that dominates cloud native is Kubernetes.
When you run Kubernetes, you run a cluster, a set of machines that Kubernetes treats as a single pool of compute. This article is about how that cluster is built. We’ll look at what a cluster actually is, split it into its two halves, walk through the components in each, and then follow a single request end to end to see them cooperate. By the end, you’ll have a working model of Kubernetes itself, which is the foundation the rest of the series builds on.
If containers are new to you, the Docker series is the right starting point. This article assumes you know what a container is and how a runtime like containerd fits in.
Let’s start with what a cluster actually is, because every component we’re about to meet exists in service of it.
What a Cluster Actually Is
Before Kubernetes, deploying an application meant picking a server and putting the application on it. You had a machine, you SSH’d into it, you ran your container, it was there. If you needed a second copy for redundancy, you picked a second server and ran it there too. And you did all the coordinating work yourself. If traffic went up, you started more copies on more servers. If a server died at 3am, you got paged and moved the workload somewhere else. If a container crashed, you restarted it. You were the orchestrator.
Kubernetes takes over that coordinating work. Instead of pointing at a specific server when you deploy, you hand Kubernetes a group of machines and tell it what you want running. Kubernetes picks the servers, starts the containers, restarts them when they fail, moves them when a server dies, and starts more copies when you ask for more. The servers are still there, but you stop thinking about them individually. The group as a whole becomes the thing you deploy to.
That group is what Kubernetes calls a cluster. A cluster is a set of machines that Kubernetes pools together and manages as one. You give it workloads, it runs them somewhere in the pool.
This changes how you tell Kubernetes what to do. You don’t give it a sequence of commands to follow. You give it a description of the end result you want, and Kubernetes figures out how to get there. A description like this: run three copies of this service, make them reachable at this address, use this configuration. Kubernetes reads that, looks at what’s actually running, and takes whatever actions make reality match the description. If a copy crashes, Kubernetes notices the gap and starts a new one. If you change the description to say five copies instead of three, Kubernetes starts two more. It keeps doing this constantly, a process Kubernetes calls reconciliation.
This is the declarative model we named in the previous article as one of the four traits of cloud native. In a Kubernetes cluster, it’s the model the whole system runs on.
So every component we’re about to meet exists to serve this model. Something has to receive the description you send. Something has to store it so it isn’t lost. Something has to decide which server each workload runs on. Something has to actually start the containers on that server and keep an eye on them. Those jobs are split across the cluster’s components, and the components are split across two kinds of machines.
The Two Halves of a Cluster
Kubernetes splits the work of a cluster across two kinds of machines, each with a very different job.
The first kind is the control plane. This is where the thinking happens. The control plane takes the description you send in, stores it, compares it against what’s currently running, and works out what needs to change. When you ask for three copies of a service, it’s the control plane that decides which machines those three copies should land on.
The second kind is the worker node. A worker node is a machine that actually runs your containers. It’s where the workload physically lives. When the control plane picks a worker node for a pod, that node starts the containers, keeps them running, and reports their status back to the control plane.
So the control plane makes the calls, and the worker nodes do the running. Neither one does the other’s job.
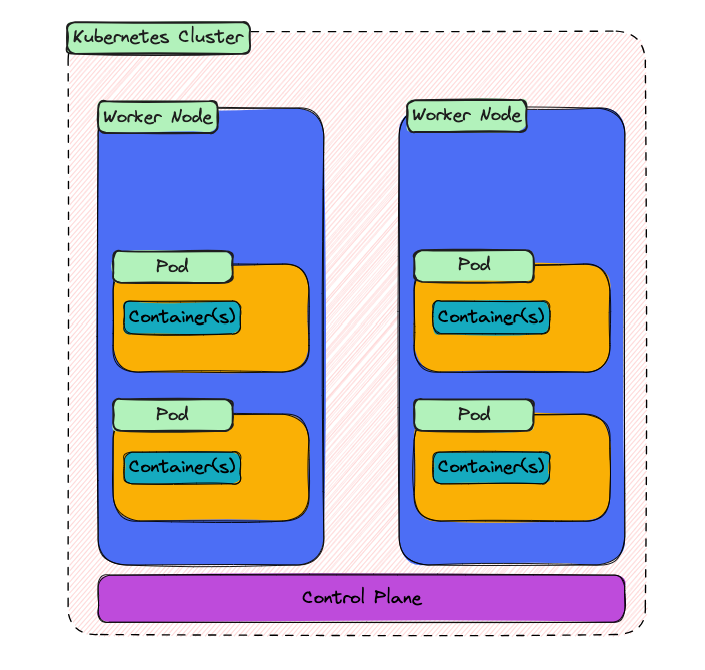
The diagram shows a cluster with two worker nodes sitting side by side at the top. Inside each worker node are pods, and inside each pod are the containers that pod is running. Underneath it all, there’s a bar representing the control plane. We’ll cover pods properly in the next article, but for now treat a pod as a unit that wraps one or more containers and lives on a node.
The control plane appears here as a separate layer, which is a simplification. In practice, it also runs on machines, usually a small set of nodes set aside just for it.
A cluster, then, is two groups of machines doing two different jobs. The next two sections will step inside each group and look at what’s actually running in there. We’ll start with the control plane, because that’s where a request arrives first.
Inside the Control Plane
The control plane is where the thinking happens, but “thinking” is really four specific jobs, handled by four components. Each one sits inside the control plane and does one of those jobs.
API server. The API server is the front door to the cluster. Every request that changes anything in Kubernetes goes through it: from you when you run kubectl apply, from other components inside the cluster, from automation tools, all of it. It validates the request, authenticates who sent it, and either accepts it or rejects it. Nothing else in the cluster is allowed to skip this step. If you want Kubernetes to do something, you’re talking to the API server, even if you don’t realise it.
etcd. Once the API server accepts a request, the new state has to be stored somewhere. That somewhere is etcd. etcd is the cluster’s database, a distributed key-value store that holds the complete picture of what’s supposed to be running, what configuration each workload should have, and the current status of everything. If etcd loses its data, the cluster has lost its memory. This is why production clusters run etcd on multiple machines, so the data survives the failure of any one of them.
Scheduler. When a new pod gets submitted, something has to decide which worker node should run it. That’s the scheduler’s job. It looks at the pods waiting to be placed, checks the available worker nodes, and works out the best fit based on things like available CPU and memory, the pod’s requirements, and any rules you’ve set for where the pod is allowed to run. The scheduler doesn’t run the pod itself, it just picks a node and writes that decision back through the API server.
Controller manager. Remember the reconciliation loop, where Kubernetes keeps comparing what’s running against what you asked for, and takes action to close the gap? The controller manager is what runs those loops. It’s not one controller, it’s a collection of them, each watching a particular kind of object and making sure reality matches the description. A controller for replica sets makes sure the right number of pods exist. A controller for nodes notices when a node goes unhealthy. A controller for endpoints keeps the service-to-pod mappings up to date. If you ever wonder how Kubernetes “notices” things and “decides” to act, the controller manager is the answer.
Those four components, working together, are what the control plane actually is. The API server receives the request, etcd remembers it, the scheduler decides where new work goes, and the controllers keep reality matching the description.
Inside a Worker Node
The control plane decides what should happen. The worker node is what makes it actually happen. Every worker node runs the same small set of components, each playing its part in turning a scheduling decision into a running container.
kubelet. The kubelet is the agent that represents a node to the control plane. Every node has one. Its job is to take instructions from the API server and make sure they get carried out on its own node. When the scheduler decides a pod should run on node A, it’s the kubelet on node A that receives the assignment, pulls the container images if they aren’t already there, and tells the container runtime to start the containers. Once they’re running, the kubelet keeps watching them, restarts them if they crash, and reports their status back to the control plane. If the control plane is the brain, the kubelet is the hand on each node.
Container runtime. The kubelet doesn’t actually run containers itself. It tells something else to do it, and that something else is the container runtime. You’ve met these before in the Docker series: containerd and CRI-O are the two you’ll see most often. The runtime is what pulls the image, unpacks it, sets up the container’s filesystem and namespaces, and starts the process. Kubernetes doesn’t care which runtime you use, as long as it speaks the standard interface Kubernetes expects. The kubelet on each node talks to whatever runtime that node happens to have installed.
kube-proxy. The third component on every node is kube-proxy, which handles the node’s side of cluster networking. Pods on a node need to be able to talk to pods on other nodes, and they need to be reachable through services with stable addresses even as pods come and go. kube-proxy sets up the networking rules on its node that make that possible. The full story of Kubernetes networking is its own topic, covered properly in the networking series, but kube-proxy is the node-local piece of it.
Three components per node, doing their specific jobs. The kubelet drives the node, the container runtime runs the containers, and kube-proxy wires the node into the cluster’s network.
Following a Request Through the Cluster
We’ve named the components in both halves of the cluster. Now we can watch them cooperate. The best way to see how a Kubernetes cluster actually works is to follow a single request all the way through it, from the moment you run a command to the moment a container is running on a node.
Let’s trace what happens when you run the simplest request there is:
kubectl apply -f pod.yamlThis file describes a pod you want to exist. Here’s what the cluster does with it.
1. The request arrives at the API server. kubectl on your machine doesn’t talk to any node directly. It sends the request to the API server, which sits in the control plane. The API server validates the request, checks that you’re allowed to make it, and confirms the pod description is well-formed. If any of that fails, the request is rejected and nothing else in the cluster hears about it.
2. The API server writes to etcd. Once the request is accepted, the API server stores the new pod description in etcd. At this moment, the cluster has a record that says “a pod is supposed to exist”, but nothing is running yet. The pod is sitting in etcd with no node assigned to it.
3. The scheduler notices the unassigned pod. The scheduler is continuously watching the API server for pods that don’t have a node yet. As soon as it sees the new pod, it looks at the available worker nodes, works out which one is the best fit, and writes that decision back through the API server. The API server updates etcd with the new information: this pod is going to run on this specific node.
4. The kubelet on the chosen node picks it up. Every kubelet watches the API server for pods that have been assigned to its own node. When the kubelet on the chosen node sees the new assignment, it takes ownership of making the pod actually exist. It asks the container runtime to pull the images if they aren’t already on the node, triggers the networking setup for the pod, and hands off the job of starting the containers to the runtime.
5. The container runtime starts the containers. This is where the work becomes visible. The runtime unpacks the images, creates the containers, and starts the processes inside them. The pod is now running.
6. The kubelet reports back. As the containers come up, the kubelet watches them and sends their status back to the API server, which writes it into etcd. The pod’s status changes from “scheduled” to “running”. If you run kubectl get pods, the API server reads the current status out of etcd and hands it back to you.
That’s the whole path. Your request went through the API server, got stored in etcd, was picked up by the scheduler, assigned to a node, acted on by the kubelet, and carried out by the container runtime. Every component we named in the last two sections had a specific role to play.
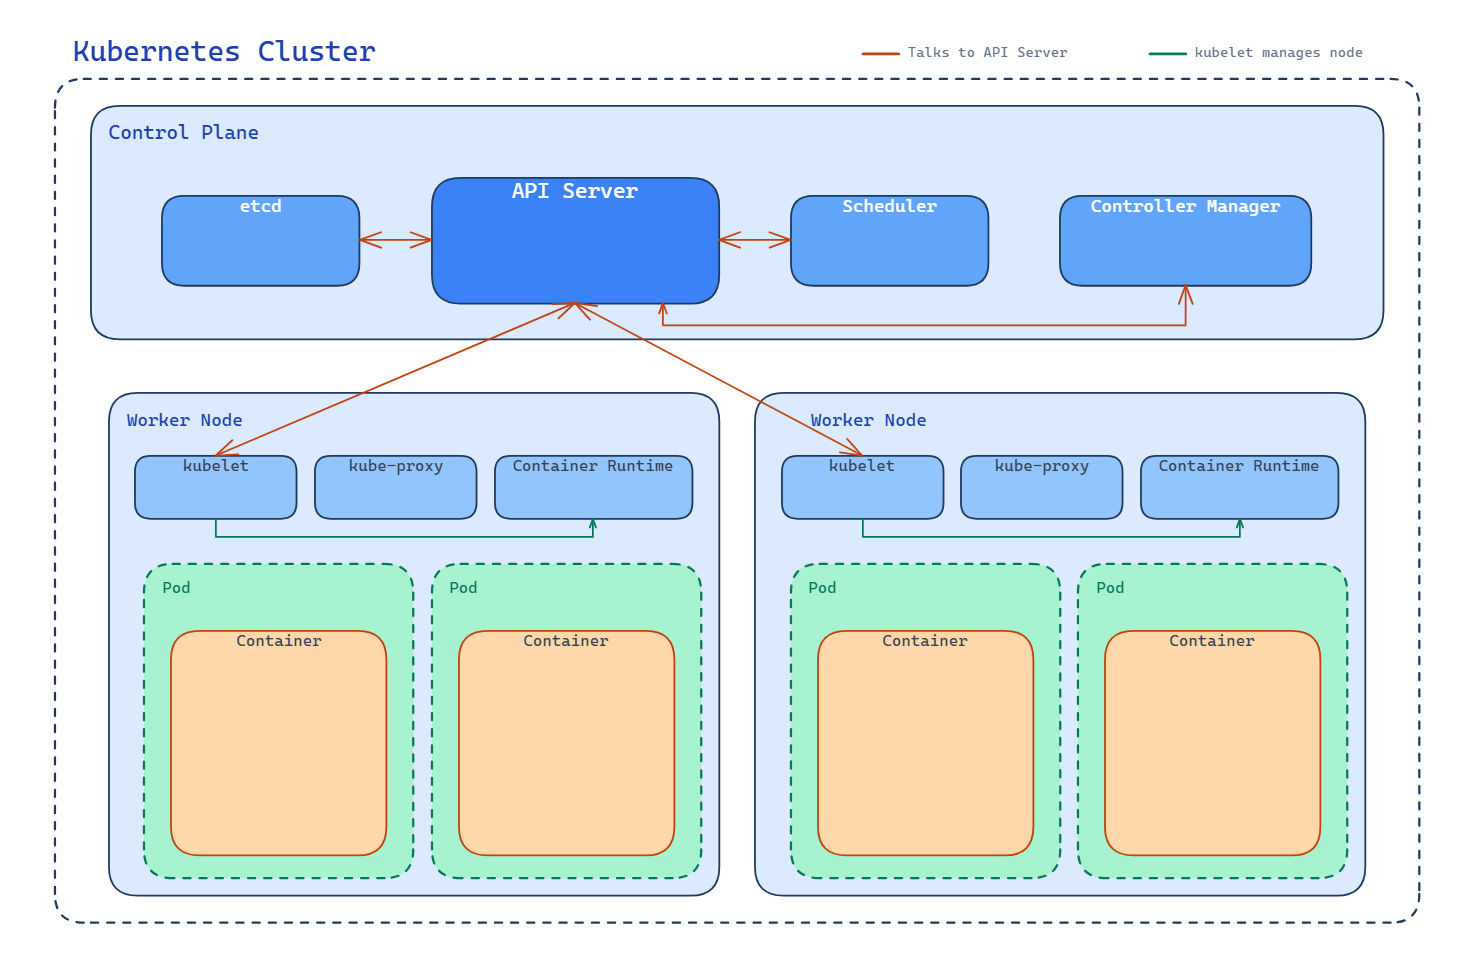
Look at the diagram again. The red arrows all point to the API server, from the scheduler, from the controller manager, from the kubelets on each node. That’s the shape of the whole system. The API server is the hub, and every other component talks through it. The scheduler doesn’t tell the kubelet what to do directly; it writes its decision to the API server, and the kubelet reads it from there. etcd holds the state; every read and write goes through the API server. Even components inside the control plane don’t talk to each other except through this one front door.
This is why the API server is the most important component to understand. Everything flows through it. If you can see the API server sitting at the centre of the diagram, with every other component reaching in to read or write state, you’ve understood the structural shape of Kubernetes.
Where the Series Goes From Here
You now have the shape of a Kubernetes cluster. Two halves of machines, seven components between them, and a single path that every request follows: through the API server, into etcd, out to the scheduler, across to a kubelet, down to a container runtime. That’s the foundation.
What we haven’t covered is what actually gets scheduled onto those nodes. Every example in this article used a pod as the unit of work, but we’ve only described pods in passing: a wrapper around one or more containers, the thing Kubernetes places on a node. Pods are worth a closer look, because they’re where the design decisions that make Kubernetes interesting start to show up. Why wrap containers in a pod at all? Why not just schedule containers directly? What does a pod share between its containers, and what does it isolate?
That’s the next article. From there, the series moves through replica sets (running multiple copies of a pod reliably), services and networking (giving pods stable addresses and routing traffic between them), and then into the Kubernetes networking series for the deeper story of how pods actually communicate across nodes. Each article picks up one piece of what we’ve laid out here and goes further with it.
For now, the cluster is the frame. Everything else fits inside it.