Docker for Beginners: Understanding Docker Storage and Volumes

Introduction: From Connected Containers to Persistent Data
In the previous article, we looked at Docker networking.
We created a custom Docker network, placed two containers inside it, and proved that containers on the same network can talk to each other by name. Then we looked at port mapping, which lets traffic from your machine reach an application running inside a container.
That answered the communication question:
How do containers connect?Now we need to answer a different question:
What happens to data when a container is removed?Containers are designed to be easy to create, stop, remove, and recreate. That is one of Docker’s strengths. If a container breaks, you can delete it and start a new one from the same image.
But that creates an important problem.
What if the container wrote data before you removed it?
A database might store records. An application might save uploaded files. A service might write logs or generated content. If that data only lives inside the container, removing the container can remove the data with it.
So Docker storage is about separating the container lifecycle from the data lifecycle.
The container can be temporary.
The data may need to survive.
In this article, we will look at three storage ideas:
Container writable layer → temporary data tied to one container
Docker volume            → Docker-managed persistent storage
Bind mount               → a folder from your host machine mounted into a container
By the end, the key idea should be clear:
Containers are replaceable.
Important data should live outside the container.
The Problem: Containers Forget by Default
Let’s make the storage problem concrete.
Imagine you run a database in a container. The database starts successfully, accepts connections, and writes records while the container is running.
At first, everything looks fine.
But then you remove the container.
If the database stored its data only inside the container, that data is removed with the container. When you create a new container from the same image, Docker gives you a fresh container, not the old container’s internal filesystem.
That behaviour is useful for application code.
It means you can throw away a broken container and start again from the image. You get a clean, predictable runtime.
But it is dangerous for important data.
The image gives Docker the starting point:
Image
→ new container
The container gets a writable layer where it can create or change files while it runs. That writable layer belongs to that container.
So if the container writes data here:
Container writable layerand then you remove the container, the writable layer goes with it.
That is why we need storage outside the container itself.
The rule is simple:
Container filesystem:
good for temporary runtime changes

Persistent storage:
needed for data you want to keep
This is the problem Docker volumes and bind mounts solve.
Three Places Container Data Can Live
Now that the problem is clear, let’s place the storage options in one picture.
A container can write data into its own writable layer, but that data is tied to the container. If the container is removed, that data is removed with it.
For data that needs to survive, Docker gives us two main options:
Docker volume
→ Docker-managed persistent storage

Bind mount
→ a specific folder from the host machine mounted into the container
The diagram below shows the difference.
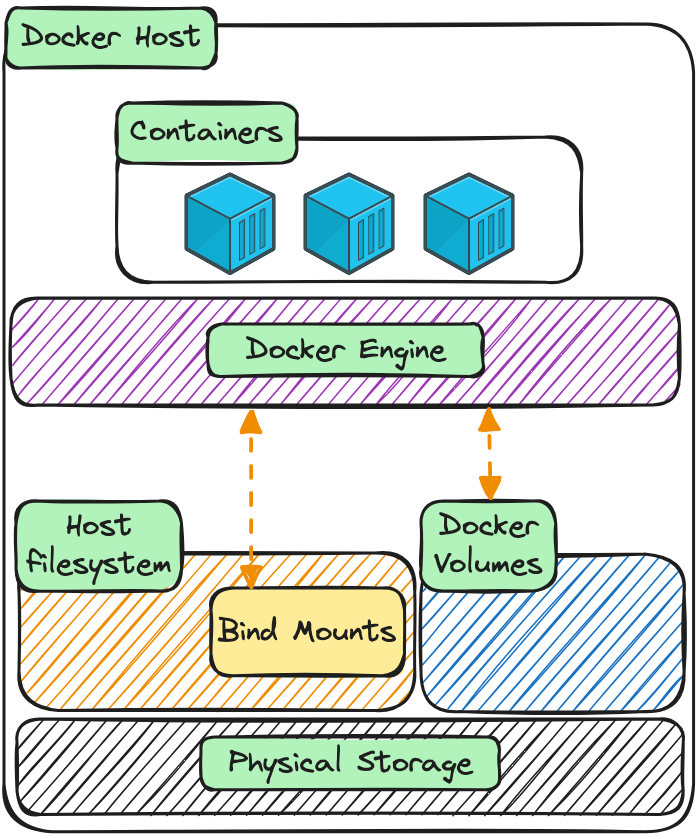
The important distinction is simple.
A Docker volume is managed by Docker. You give it a name, and Docker decides where it lives on the host.
A bind mount points to a specific folder or file on your host machine. You choose the exact path.
So the storage model becomes:
Container writable layer
→ temporary data tied to one container

Docker volume
→ persistent data managed by Docker

Bind mount
→ host folder connected directly to the container
For most application data, a Docker volume is the better default.
For local development, a bind mount is often useful because changes you make on your machine can appear immediately inside the container.
Now let’s start with Docker volumes, because they are the safest default for persistent container data.
Docker Volumes: Data That Survives the Container
Let’s start with the safest default for persistent container data: a Docker volume.
A Docker volume is storage managed by Docker.
You give the volume a name, and Docker handles where it lives on the host machine. A container can mount that volume and write data into it. If the container is removed, the volume can stay behind.
That is the key difference:
Container removed
→ container writable layer is removed

Container removed
→ Docker volume can remain
Create a volume:
docker volume create mysql-dataCheck that it exists:
docker volume lsYou should see mysql-data in the list.
Now run a MySQL container and attach the volume to the place where MySQL stores its database files:
docker run -d \
  --name mysql-demo \
  -e MYSQL_ROOT_PASSWORD=my-secret-password \
  -v mysql-data:/var/lib/mysql \
  mysql:8
There are a few important parts here.
--name mysql-demo gives the container a clear name.
-e MYSQL_ROOT_PASSWORD=my-secret-password sets the root password MySQL needs when it starts.
-v mysql-data:/var/lib/mysql mounts the Docker volume into the container.
The left side is the volume name:
mysql-dataThe right side is the path inside the container:
/var/lib/mysqlSo the mount means:
Docker volume mysql-data
→ mounted at /var/lib/mysql inside the container
That matters because /var/lib/mysql is where this MySQL image stores its database files.
Give MySQL a little time to start, then open a shell inside the container:
docker exec -it mysql-demo mysql -u root -pWhen prompted, enter the password:
my-secret-passwordNow create a small database and table:
CREATE DATABASE demo_db;
USE demo_db;

CREATE TABLE users (
  id INT,
  name VARCHAR(50)
);

INSERT INTO users VALUES (1, 'Alice');

SELECT * FROM users;
You should see:
+------+-------+
| id   | name  |
+------+-------+
|    1 | Alice |
+------+-------+
Exit MySQL:
EXIT;At this point, MySQL has written data to /var/lib/mysql inside the container.
But because that path is backed by the mysql-data Docker volume, the data is not only living in the container’s writable layer.
It is living in the volume.
Prove It: Recreate the Container and Keep the Data
Now we need to prove that the data is really living outside the container.
Stop and remove the MySQL container:
docker stop mysql-demo
docker rm mysql-demo
At this point, the container is gone.
But the volume still exists.
Check the volume:
docker volume lsYou should still see:
mysql-dataNow create a new MySQL container using the same volume:
docker run -d \
  --name mysql-demo-2 \
  -e MYSQL_ROOT_PASSWORD=my-secret-password \
  -v mysql-data:/var/lib/mysql \
  mysql:8
Notice what stayed the same:
-v mysql-data:/var/lib/mysqlThis new container is using the same Docker volume as the old container.
Give MySQL a little time to start, then connect to the new container:
docker exec -it mysql-demo-2 mysql -u root -pEnter the same password:
my-secret-passwordNow check whether the database is still there:
USE demo_db;
SELECT * FROM users;
You should still see the row we inserted earlier:
+------+-------+
| id   | name  |
+------+-------+
|    1 | Alice |
+------+-------+
That is the proof.
The original container was removed, but the data stayed because it was stored in the Docker volume.
The container changed:
mysql-demo
→ removed

mysql-demo-2
→ new container
But the storage stayed:
mysql-data
→ same volume
That is the key value of Docker volumes.
They let you replace the container without losing the data.
Bind Mounts: Connecting a Host Folder to a Container
Docker volumes are the safer default for persistent application data because Docker manages where the data lives.
But sometimes you want a different workflow.
During local development, you may want a container to use files directly from your project folder. That way, when you edit a file on your machine, the container sees the change immediately.
That is where a bind mount is useful.
A bind mount connects a specific file or folder from your host machine into a specific path inside the container.
The model looks like this:
Host folder
→ mounted into container
→ container reads or writes that folder
Let’s create a simple folder on your machine:
mkdir bind-demo
cd bind-demo
Now create a file called index.html:
<h1>Hello from a bind mount</h1>
<p>This file lives on the host machine.</p>
Now run an Nginx container and mount the current folder into the location where Nginx serves web content:
docker run -d \
  --name bind-demo-web \
  -p 8080:80 \
  -v "$(pwd)":/usr/share/nginx/html \
  nginx
The important part is:
-v "$(pwd)":/usr/share/nginx/htmlThe left side is the folder on your host machine:
"$(pwd)"That means the current folder.
The right side is the path inside the container:
/usr/share/nginx/htmlThat is where Nginx serves its default website files.
So the bind mount means:
Current folder on your machine
→ mounted at /usr/share/nginx/html inside the container
Now open your browser:
http://localhost:8080You should see:
Hello from a bind mountNow edit index.html on your machine:
<h1>This changed on the host</h1>
<p>The container can see the updated file.</p>
Refresh the browser.
You should see the updated page.
That is the main value of a bind mount for development. The file lives on your machine, but the container can use it immediately.
This is different from a Docker volume.
With a Docker volume, Docker manages the storage location.
With a bind mount, you choose the exact host path.
When you are finished, clean up the demo container:
docker rm -f bind-demo-webYou can also leave the bind-demo folder or remove it from your machine manually.
The key idea is:
Volume:
Docker manages the storage.

Bind mount:
You choose a host path and mount it into the container.
Volumes vs Bind Mounts
At this point, you have seen both storage options in action.
A Docker volume let the MySQL data survive after the original container was removed.
A bind mount let an Nginx container serve a file directly from your machine, and changes appeared immediately when you refreshed the browser.
Both options mount storage into a container, but they are useful in different situations.
A Docker volume is managed by Docker. You give it a name, and Docker decides where the data lives on the host. This makes volumes a good default for persistent application data, especially when the container should own and manage the data.
A bind mount points to a specific path on your host machine. You choose the folder or file, and Docker makes it available inside the container. This is useful when you want a direct connection between your local files and the container, especially during development.
The comparison is:
| Question | Docker Volume | Bind Mount |
|---|---|---|
| Who manages the storage location? | Docker | You |
| Where does the data live? | In Docker-managed storage | In a specific host path |
| Best for | Persistent app data | Local development and direct file access |
| Example | Database files | Source code or static website files |
| Easy to move between machines? | Usually easier | Depends on the host path |
| Risk | Less tied to host folder layout | Can break if the host path changes |
The simple rule is:
Use a volume when the container should keep data safely.
Use a bind mount when you want the container to use files from your machine.
For example:
Database data
→ Docker volume

Local source code during development
→ bind mount
Neither option is “better” in every situation. They solve different problems.
Volumes are about persistence without caring where Docker stores the files.
Bind mounts are about connecting a known host path into a container.
Common Storage Issues
Before we wrap up, let’s cover a few storage issues you might run into while working with volumes and bind mounts.
My data disappeared
If data disappears after you remove a container, it was probably written into the container’s writable layer instead of a volume or bind mount.
That means the data belonged to the container lifecycle.
When the container was removed, the writable layer was removed too.
For data you want to keep, mount storage outside the container:
Docker volume
→ for Docker-managed persistent data

Bind mount
→ for a specific host folder mounted into the container
The bind mount does not show my file
If the container does not show the file you expected, check the host path you mounted.
For example, this command mounts the current folder:
-v "$(pwd)":/usr/share/nginx/htmlIf you run the command from the wrong folder, Docker will mount the wrong folder into the container.
So check:
pwd
ls
Make sure the file you expect is actually in the folder you are mounting.
Permission denied
Sometimes the container can see the mounted file or folder, but cannot read or write to it.
That is usually a file permission issue between the host machine and the user running inside the container.
The exact fix depends on your operating system, the image you are using, and whether the container process runs as root or as a non-root user.
The important thing is to recognise the pattern:
The mount exists,
but the container process does not have permission to use it.
When that happens, check the file permissions on the host and the user your container runs as.
I removed the container, but the volume is still there
That is expected.
A Docker volume has its own lifecycle. Removing a container does not automatically remove the volume attached to it.
You can list volumes with:
docker volume lsIf you are sure you no longer need a volume, remove it with:
docker volume rm mysql-dataBe careful with this command. Removing a volume removes the data stored in that volume.
Docker is using too much disk space
Volumes, images, containers, and build cache can all use disk space over time.
You can check Docker’s disk usage with:
docker system dfYou can also list volumes with:
docker volume lsIf you want to remove unused volumes, Docker provides:
docker volume pruneUse this carefully. Docker will ask for confirmation, but once a volume is removed, the data inside it is gone.
The Docker Storage Mental Model
At this point, the storage model should be much clearer.
A container is easy to create, stop, remove, and recreate. That is useful, but it means the container itself is not the right place for important long-term data.
The container has a writable layer, but that layer belongs to that specific container.
If the container is removed, that writable layer is removed too.
So the storage model is:
Container writable layer
→ temporary data tied to one container

Docker volume
→ persistent data managed by Docker

Bind mount
→ host file or folder connected directly into the container
Use the container writable layer for temporary runtime changes.
Use a Docker volume when the application needs persistent data and you want Docker to manage the storage location.
Use a bind mount when you want the container to use files from a specific place on your machine, especially during local development.
The key idea is:
Containers are replaceable.
Important data should live outside the container.
That is the foundation for using containers safely with databases, uploaded files, generated content, and anything else that should survive beyond one container instance.
Where This Leads
You now understand Docker from the developer side.
You have seen how images package application environments, how containers run from images, how containers connect through Docker networks, and how data can live beyond a container through volumes and bind mounts.
That gives you a strong working model:
Image
→ Container
→ Network
→ Storage
But there is still one layer underneath all of this.
When you run a container, Docker gives you a friendly developer experience. You type commands like docker run, docker build, and docker volume create.
But underneath that experience, something still has to do the low-level work of starting and managing containers.
That leads us to the container runtime layer.
In the next article, we will look beneath Docker and introduce the runtime pieces that modern container platforms rely on, including containerd, runc, and CRI-O.
This is where Docker connects to the wider cloud-native world.
So far, we have learned how to use containers.
Next, we will look at what actually runs them.