Introduction
You’ve already seen how Cilium and eBPF transform Kubernetes networking in local environments—bringing security, visibility, and performance to a whole new level. Now, it’s time to take that power to the cloud.
In this guide, you’ll learn how to deploy Cilium on Azure Kubernetes Service (AKS)—one of the most widely used managed Kubernetes platforms—and see how it enables production-grade network policy enforcement, observability, and control in real-world cloud-native environments.
And because serious tech deserves a little fun, we’ll be showcasing everything using the Star Wars Demo—an interactive app created by the Cilium maintainers at Isovalent. You’ll defend the Death Star ☠️ (yes, really) and control which services can access it, using fine-grained Cilium policies enforced at the kernel level. It’s a great way to experience how Cilium works in a live, multi-service AKS cluster.
Here’s what you’ll explore in this article:
- A quick tour of Azure Kubernetes Service (AKS) and how it handles networking
- Why Cilium is an ideal match for enterprise-grade AKS clusters
- Step-by-step deployment of Cilium on AKS using Azure CLI and Helm
- Installation and walkthrough of the Star Wars Demo to simulate real policy enforcement
- A breakdown of how Cilium powers traffic control and observability in AKS
With that, let’s jump into the cloud and explore what AKS has to offer—and how Cilium fits right in.
Azure Kubernetes Service (AKS)
Azure Kubernetes Service (AKS) is Microsoft Azure’s fully managed Kubernetes platform. It’s designed to make it easy to deploy, scale, and operate production-grade Kubernetes clusters without the operational overhead of managing the control plane, patching nodes, or handling upgrades.
With AKS, you can provision a reliable Kubernetes cluster in minutes—via the Azure portal, CLI, or infrastructure-as-code tools. Azure handles the control plane, integrates natively with services like Azure Monitor, Azure Active Directory, and Azure Policy, and provides built-in support for autoscaling, load balancing, and persistent storage. This makes AKS an excellent choice for running Kubernetes workloads at scale in the cloud.
Why Use Cilium on AKS?
While AKS includes a functional default networking stack, it doesn’t provide built-in support for deep observability, real-time security enforcement, or granular policy control. That’s where Cilium comes in.
Cilium replaces the default CNI (Container Network Interface) with an eBPF-powered networking engine—bringing high-performance, low-overhead packet processing directly into the Linux kernel. It enables:
- Kernel-level enforcement of network policies
- Transparent encryption and service-aware access control
- Real-time observability of traffic flows and system behavior
Together, AKS and Cilium offer a cloud-native foundation that is secure, scalable, and production-ready—without requiring you to compromise on visibility or control.
AKS + Cilium in a Nutshell
AKS simplifies Kubernetes operations on Azure
Cilium enhances AKS with eBPF-powered security and observability
Together, they provide a modern, flexible foundation for cloud-native networking
In the next section, we’ll spin up a new AKS cluster and prepare it for Cilium—your gateway to secure, observable, high-performance networking in the cloud.
Provisioning an AKS Cluster for Cilium
To run Cilium on Azure Kubernetes Service (AKS), you’ll need a test cluster with the right configuration.
If you already have one available, feel free to skip ahead. If not, this section walks you through how to provision a minimal AKS cluster using the Azure CLI—perfect for learning and experimentation.
⚠️ Note: This tutorial provisions real Azure infrastructure. To avoid unexpected charges, we’ll show you how to delete the cluster once you’re done.
Step 1: Create the Cluster
To create a small AKS cluster with one node, run the following command:
|
|
Flag Breakdown:
--node-vm-size Standard_B2s: A small, low-cost VM suitable for demo clusters.--node-count 1: Creates a single worker node. The AKS control plane is fully managed by Azure.--generate-ssh-keys: Creates SSH keys for optional secure access to the node.--network-plugin none: Prevents Azure from installing its default CNI. This gives Cilium full control over networking—just like we did in our Kind setup.
Tip: This step may take a few minutes. You can monitor progress in the Azure Portal, or continue once the cluster is ready.
Step 2: Fetch Cluster Credentials
Once the cluster is provisioned, configure kubectl to connect to it:
|
|
This command adds your AKS cluster context to your local Kubernetes config so you can interact with it using kubectl.
Step 3: Verify Cluster Access
Now, confirm that your cluster is up and the node is ready:
|
|
Expected output:
|
|
Once the node appears with a Ready status, your AKS cluster is live and ready for Cilium.
In the next section, we’ll install Cilium and configure it to take full control of networking in your AKS environment—unlocking observability, enforcement, and performance through eBPF.
Let’s go.
Installing Cilium as the CNI in AKS
With your AKS cluster up and running—and no default CNI installed—it’s time to bring in Cilium to handle all cluster networking.
In this step, you’ll install Cilium as the primary CNI plugin, giving your cluster eBPF-powered security, observability, and performance.
Prerequisite: Install the Cilium CLI
You’ll need the Cilium CLI to install and manage Cilium in your cluster.
-
macOS:
Install via Homebrew:1brew install cilium-cli -
Linux / Windows:
Refer to the Cilium CLI installation guide for detailed instructions.
Step 1: Install Cilium in AKS
Now that your cluster is ready (with no default CNI), let’s install Cilium as the networking provider.
Run the following command, replacing myResourceGroup with your actual Azure resource group name:
|
|
This command uses Helm under the hood to install Cilium with Azure-specific configuration.
Because we created the cluster with --network-plugin none, there’s no default CNI. This gives Cilium full control over all networking functions — without conflicts from Azure’s default plugins.
Step 2: Verify the Installation
To check whether Cilium installed correctly and is ready to manage networking, run:
|
|
You should see output like:
|
|
If everything is marked as Ok, Cilium is now live in your cluster and ready to enforce policies, secure traffic, and monitor flows at the kernel level.
What’s Next?
Before we begin applying network policies, we need to enable Layer 7 policy enforcement to take full advantage of Cilium’s capabilities.
Let’s do that in the next step.
Enabling Layer 7 (L7) Policy Enforcement in Cilium
Cilium supports Layer 7 (L7) network policies, which give you fine-grained control over application-level traffic, such as HTTP. This means you can write rules not just for IP addresses or ports, but for specific API paths, HTTP methods, and headers.
We’ll need this capability for the upcoming Star Wars demo, where we’ll control access to certain resources based on HTTP-level rules. Let’s enable L7 enforcement so we’re ready to go.
Step 1: Enable the L7 Proxy
These commands configure Cilium to support L7-aware traffic filtering. You’ll enable the Prometheus metrics exporter for the proxy and configure Cilium to recognise Istio sidecar containers (used in the demo).
|
|
🛠️
cilium config setmodifies the runtime configuration of your Cilium installation. These changes are persistent across restarts, unless the cluster is recreated or reset.
Step 2: Restart the Cilium Pods
To apply the changes, restart the Cilium pods in the kube-system namespace:
|
|
This command will trigger Kubernetes to automatically recreate the pods with the updated configuration. Wait until the pods are back in a Running state.
Step 3: Verify L7 Policy Functionality
To confirm everything is working, use the Cilium connectivity test:
|
|
If successful, you’ll see output like:
|
|
These successful tests confirm that Cilium’s L7 proxy is active and working correctly.
With Layer 7 policy enforcement now enabled, your AKS cluster is fully equipped to support HTTP-aware network policies.
In the next section, we’ll deploy the Star Wars demo and put these capabilities to work — securing, routing, and observing traffic in action. Let’s bring it to life.
Hands-On: Securing Kubernetes Apps with Cilium (The Star Wars Demo)
With your AKS cluster now running Cilium and Layer 7 policy enforcement enabled, it’s time to apply what you’ve built. In this section, you’ll deploy the Star Wars Demo — a visually engaging, hands-on environment designed to showcase how Cilium enforces network policies across Layers 3, 4, and 7.
Originally created by the team at Isovalent, the demo offers a playful but practical way to understand real-world traffic flows, policy enforcement, and observability. You’ll learn how Cilium secures pod-to-pod communication, restricts unauthorized access to sensitive services, and enables deep visibility into what’s happening across your cluster.
What’s in the Star Wars Demo?
The demo consists of three key components:
-
Deathstar ☠️
A simple HTTP web service that holds “classified” plans. This represents a sensitive, high-value service we want to protect. -
Tiefighters 🚀
Friendly pods allowed to access the Deathstar under strict conditions. These simulate trusted workloads — but even trusted services need scoped access. -
X-Wings 🛸
Untrusted pods attempting to reach the Deathstar. These simulate unauthorized access that should be blocked by policy.
This setup creates a testbed for simulating real scenarios: allowing internal service-to-service traffic while blocking untrusted connections — all enforced with Cilium’s eBPF-powered policy engine.
Layer 3 / Layer 4 (L3/L4) Policies
Cilium’s L3/L4 policies let you control traffic based on:
- IP address or pod identity (labels)
- Ports and protocols
In this demo, you’ll use L3/L4 policies to:
- ✅ Allow Tiefighters to reach the Deathstar on port 80
- ❌ Block X-Wings from connecting entirely
Layer 7 (L7) Policies
L7 policies enable filtering based on application-level details, such as:
- HTTP method (e.g.,
GET,POST) - HTTP path (e.g.,
/plans,/status)
You’ll use them to:
- ✅ Allow Tiefighters to GET non-sensitive endpoints
- ❌ Block access to protected paths like
/plansor anyPOSTrequest, even from trusted pods
This allows for granular, intent-aware security, enforced at the kernel level — without needing proxies or sidecars.
TL;DR – What You’ll Learn in This Demo
- Deploy a multi-service app with trusted and untrusted pods
- Apply L3/L4 policies to restrict communication by pod identity and port
- Apply L7 policies to secure HTTP endpoints
- Observe how Cilium enforces these policies with live traffic
What’s Next?
In the next section, you’ll deploy the Star Wars Demo into your AKS cluster and put Cilium’s policy engine into action — one layer at a time.
Let’s dive in.
Deploying the Star Wars Demo Application to AKS
With your AKS cluster up and running — and Cilium fully installed with Layer 7 policy enforcement enabled — it’s time to bring our environment to life.
We’ll deploy the Star Wars Demo, a purpose-built microservice application designed by the Cilium team (Isovalent) to showcase real-world traffic patterns. This setup simulates trusted and untrusted communication flows between pods and gives you a controlled sandbox to observe how Cilium enforces network policies across Layers 3, 4, and 7.
Visual Overview of the Demo
Here’s a visual representation of what we’re about to deploy. All pods will live in the default namespace and are labeled to simulate organizational and trust boundaries:
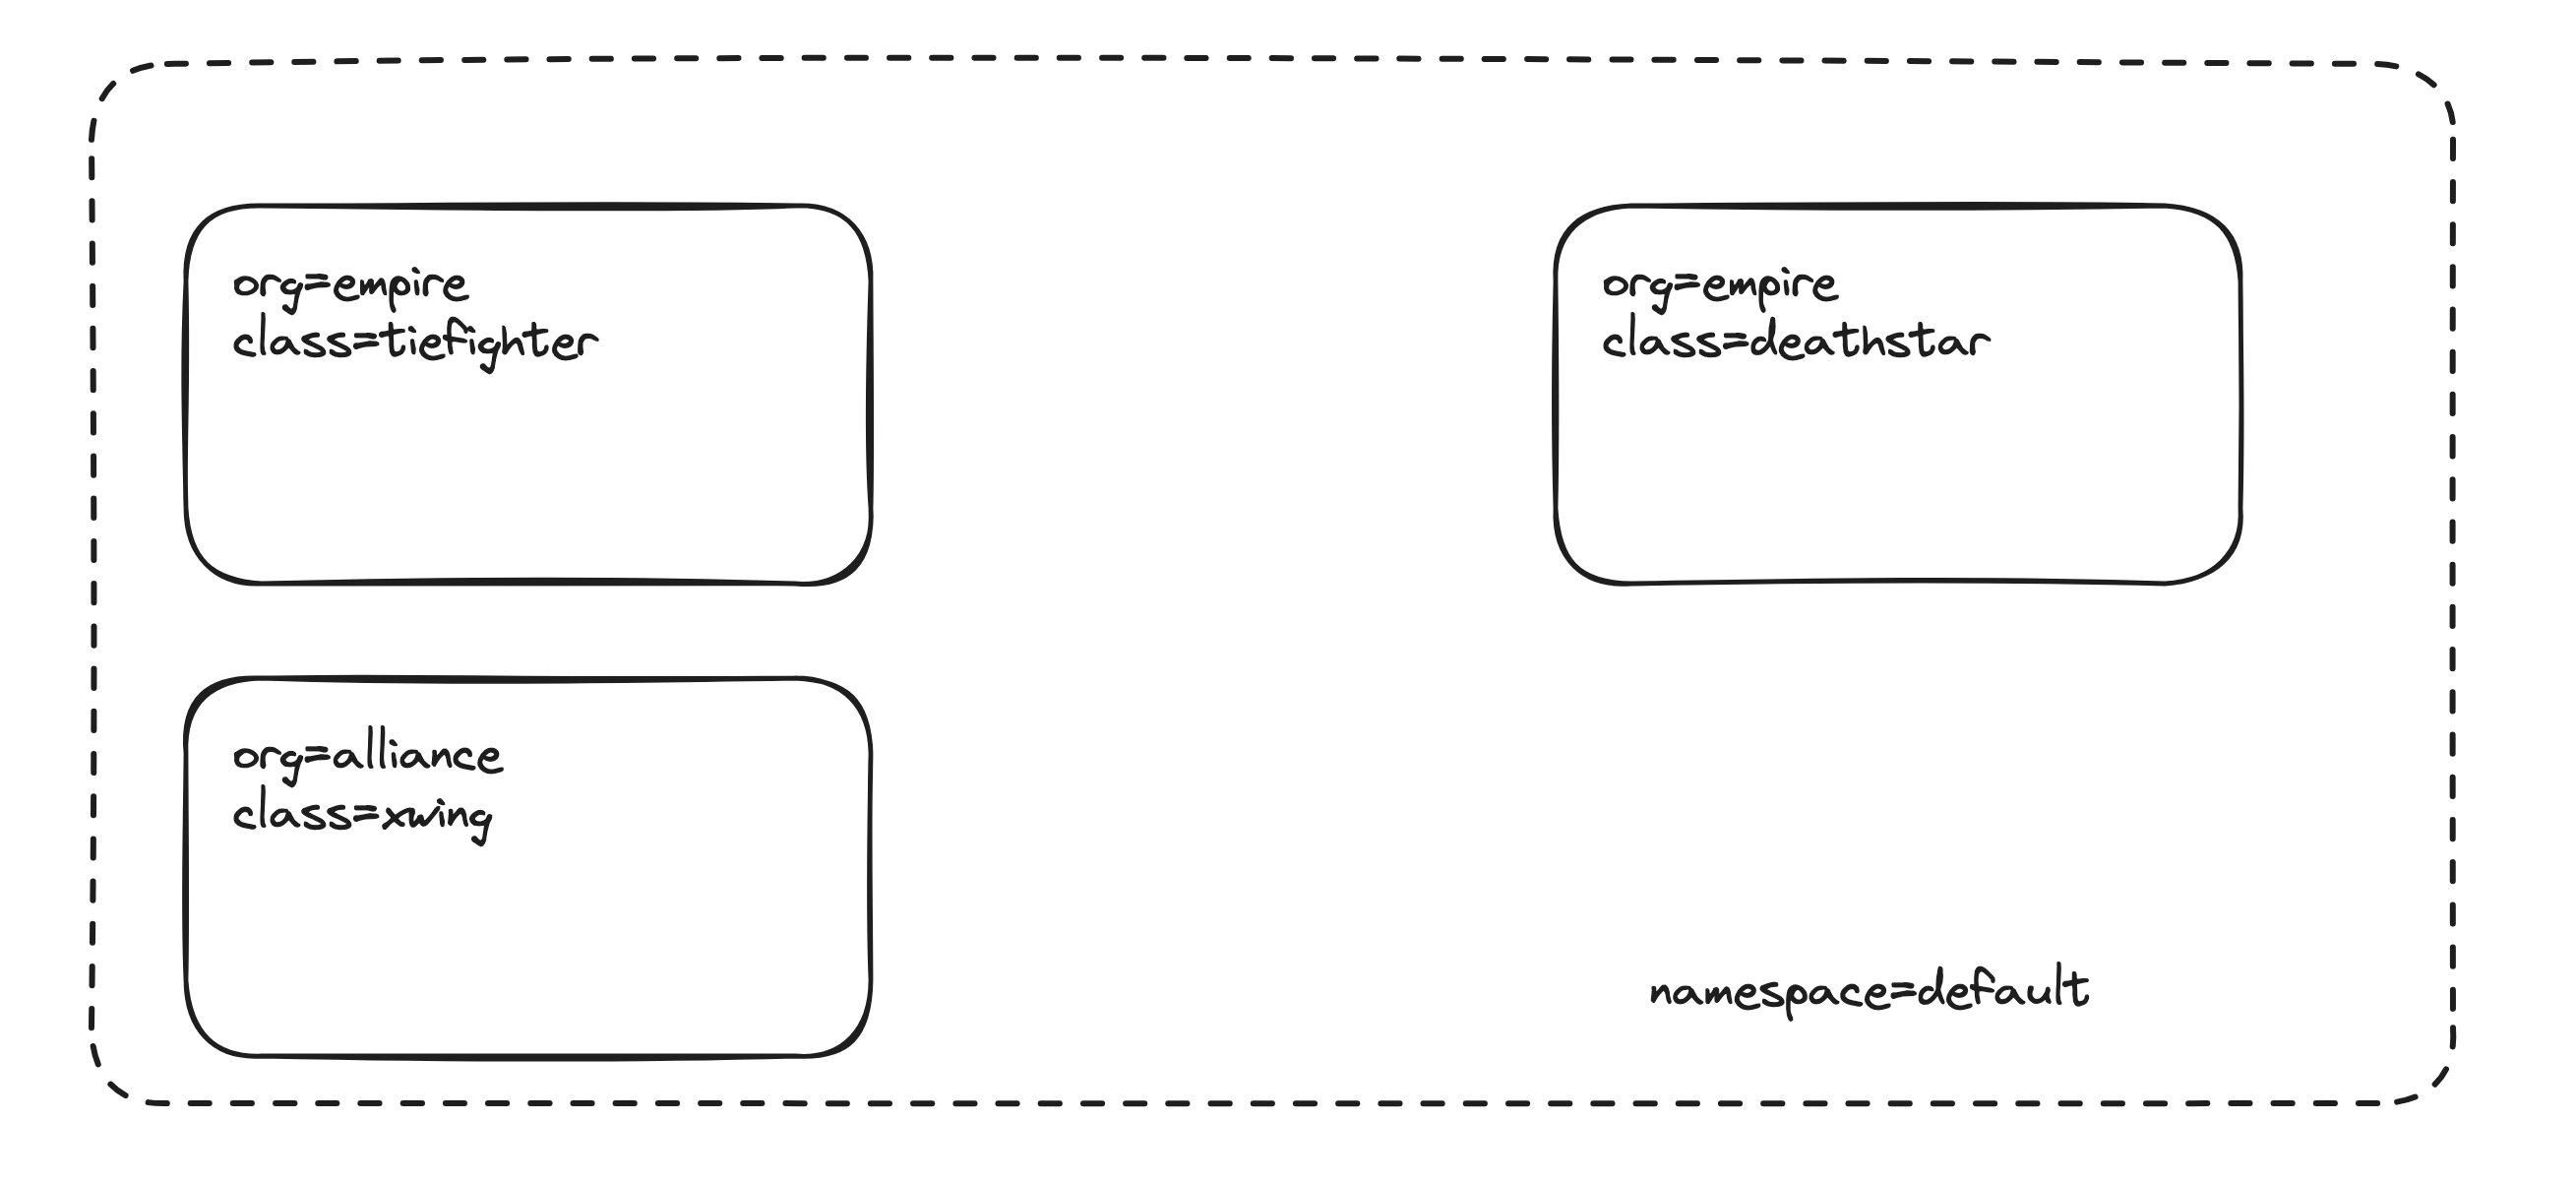
Each label plays a crucial role in how Cilium applies identity-aware policies.
TL;DR — What This Deployment Will Do
- ✅ Deploy a target service (
Deathstar) - ✅ Deploy two pods that simulate client access (
Tiefighter= trusted,Xwing= untrusted) - ✅ Label each pod to simulate security contexts (
org,class) - ✅ Set the stage for applying L3, L4, and L7 Cilium network policies
Deploy the Demo Application
This manifest is published and maintained by the Cilium project team and is used in Cilium’s official learning labs.
To apply it to your AKS cluster:
|
|
This YAML creates the following resources:
Deploys the Deathstar
|
|
Deploys the Tiefighter (Trusted Pod)
|
|
Deploys the X-Wing (Untrusted Pod)
|
|
What’s Next
Now that your Star Wars Demo is deployed, we’ll verify the pods and services are running and test basic connectivity. This will give us a baseline before applying any Cilium network policies.
In the next section, we’ll test connectivity and then begin enforcing security rules using Cilium’s identity-aware network policies. Buckle up — this is where the real power of eBPF meets applied Kubernetes security.
Confirm App Deployment and Pre-Policy Connectivity
Before we enforce any network policies, let’s make sure the Star Wars demo application is deployed successfully and all services are functioning. We’ll also test connectivity between the pods to establish a baseline — so we can later observe the impact of Cilium’s L4 and L7 enforcement.
Verify Pods and Services
Use the following command to check the status of your deployed pods and services:
|
|
You should see output similar to this:
|
|
Success check: If all pods show a
Runningstatus and thedeathstarservice has a validClusterIP, your demo environment is ready.
Test 1: X-Wing → Deathstar
|
|
Expected Output:
|
|
This confirms that untrusted pods (X-Wings) can currently access the Deathstar. That’s not what we want in a secure system — and we’ll fix that shortly using Cilium policies.
Test 2: Tiefighter → Deathstar
|
|
Expected Output:
|
|
Trusted pods like Tiefighters are also able to land — which is the intended behavior. Once policies are in place, we’ll ensure this access remains while untrusted traffic is blocked.
🔄 TL;DR:
- ✅ All pods are running and services are healthy.
- ✅ X-Wings and Tiefighters can both access the Deathstar service.
- ⏭️ Next: Apply Cilium L4 and L7 network policies to restrict and secure pod communication.
Right now, both the Empire and the Rebel Alliance can land at the Deathstar. But not for long.
In the next section, we’ll use Cilium network policies to enforce access control — allowing only trusted ships to land and denying all unauthorized requests.
Let’s secure the galaxy.
Apply L4 Network Policy: Allow TIE Fighters, Deny X-Wings
With the Star Wars application up and running and all pods currently able to reach the Death Star, it’s time to enforce some access control.
In this step, we’ll apply a Layer 4 (L4) Cilium network policy that restricts ingress to the Death Star service. Only pods from the Empire — like the TIE Fighter — should be allowed to connect on TCP port 80. All other pods, including X-Wings from the Rebel Alliance, will be blocked.
L4 policies operate at the transport layer, matching traffic based on IP addresses, ports, and protocols — perfect for defining service-level access boundaries.
Visual Overview
The diagram below shows how our policy will affect traffic within the default namespace:
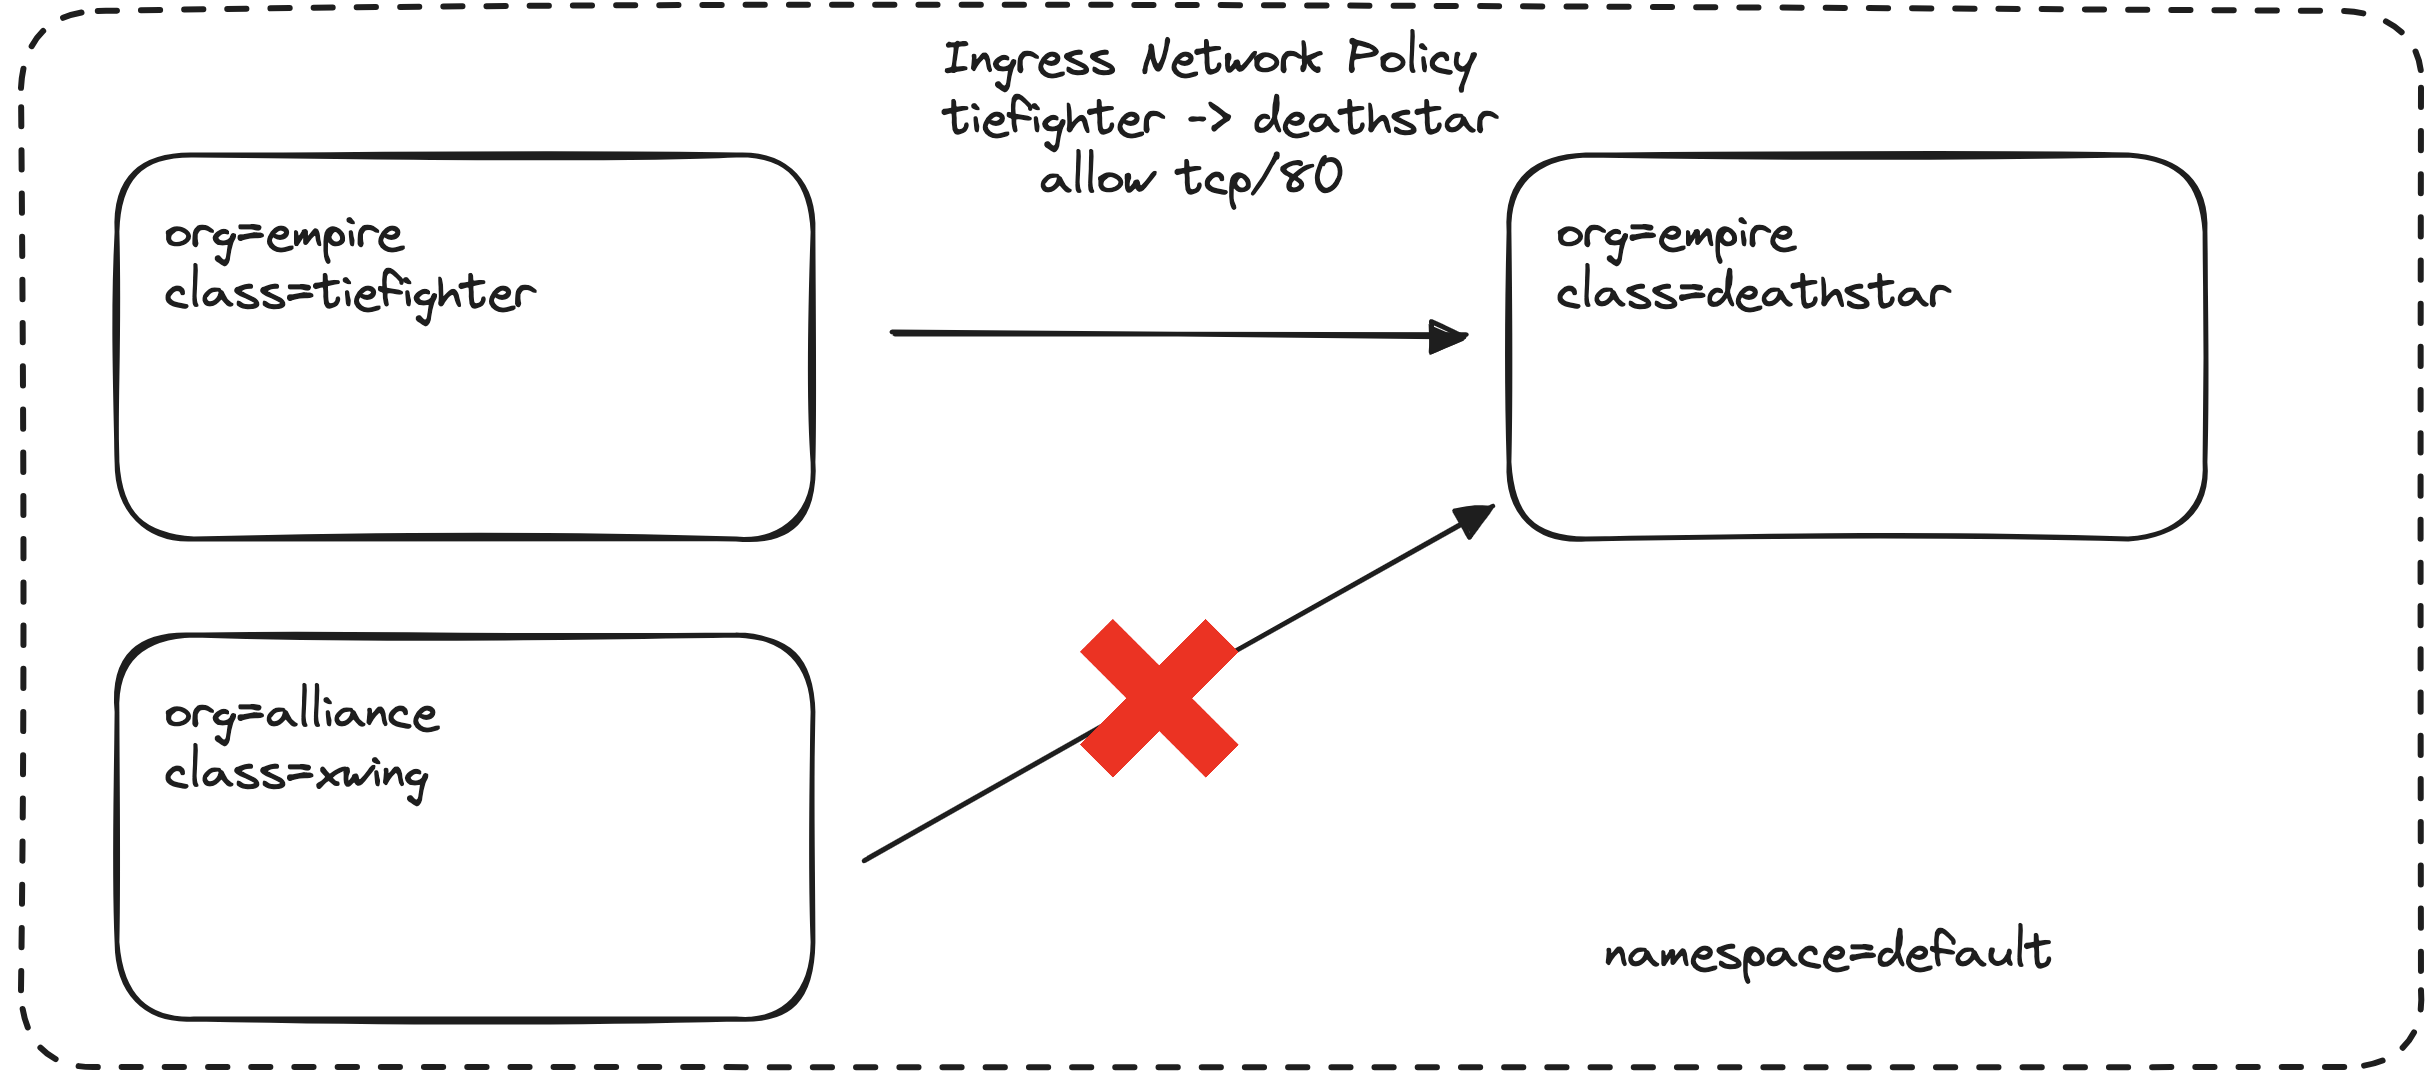
- ✅ Allowed: Pods with
org=empire, such as the TIE Fighter, can access the Death Star on TCP port 80 - ❌ Denied: Pods with
org=alliance, like the X-Wing, are blocked - The policy applies to all pods labeled
class=deathstarin thedefaultnamespace
Apply the L4 Network Policy
Apply the following CiliumNetworkPolicy to enforce L3/L4 rules using pod labels and port-level filtering:
|
|
You can apply this policy directly from the official Cilium GitHub repository using below kubectl command:
|
|
💡 Note: This YAML is part of the Cilium project’s official demo, and defines an ingress policy for the Death Star service. It ensures only Empire-aligned pods are granted access.
TL;DR – L4 Policy Summary
- Allows: Pods with
org=empireto access the Death Star on TCP port 80 - Denies: All others (e.g. X-Wing from
org=alliance) - Applies to: Pods labeled
class=deathstar - Enforced at: Layer 4 (transport level) via CiliumNetworkPolicy
What’s Next?
Once applied, this policy will lock down ingress access to the Death Star. In the next step, we’ll test whether:
- ✅ TIE Fighters can still land
- ❌ X-Wings are now denied
Let’s validate that Cilium is enforcing the rule as expected.
Test L4 Policy Enforcement: TIE Fighters Succeed, X-Wings Denied
The L4 network policy is now in place.
Let’s validate that it’s doing exactly what we intended:
- ✅ Allowing traffic from TIE Fighters (
org=empire) - ❌ Blocking traffic from X-Wings (
org=alliance)
This ensures that only trusted services can access the Death Star — enforcing application-layer security even within the same namespace.
Step 1: Test X-Wing Access (Should Be Denied)
Run the following command to simulate an access attempt from the X-Wing pod:
|
|
You should not see a response like Ship landed.
Instead, expect one of the following:
- No output (connection silently dropped)
- A timeout
Connection refused
This confirms that unauthorised pods like X-Wings can no longer reach the Death Star — as enforced by Cilium’s Layer 4 policy.
Step 2: Test TIE Fighter Access (Should Be Allowed)
Now run the same request from the TIE Fighter pod, which is part of the Empire:
|
|
You should receive:
|
|
This means our L4 policy is allowing traffic from trusted Empire pods, as expected.
Why This Matters
With this test, you’ve seen Cilium enforce transport-layer access control using only pod labels and port rules.
This level of precision is essential in production environments, where different teams, workloads, or tenants may operate in shared namespaces — and where even intra-cluster traffic must be secured.
TL;DR – What We Just Verified
- ❌ X-Wing (unauthorised) was blocked from accessing the Death Star
- ✅ TIE Fighter (authorised) was allowed to access port 80
- 🛡️ Cilium enforced this access control at Layer 4 (TCP) using pod labels and port-level filtering
In the next section, we’ll take it a step further with Layer 7 (L7) policies, filtering traffic based on HTTP paths — and locking down sensitive Death Star endpoints even more tightly.
Let’s level up.
Understanding the Risk Before Enforcing Layer 7 Policy
Before we apply Cilium’s powerful Layer 7 (L7) network policies, we need to understand why we need them — and what they protect us from.
So far, we’ve used Layer 4 (L4) policies to control who can connect to the Deathstar service based on IPs, ports, and labels. But in real-world microservice environments, that’s not enough. Once a pod is allowed to connect, it can access any endpoint exposed by the service.
To truly secure your applications, we need to enforce least-privilege access — allowing pods to call only the HTTP methods and paths they need, and nothing more. That’s where Cilium’s Layer 7 capabilities come in.
A Real Threat: What We’re Protecting
The Deathstar service exposes multiple HTTP endpoints. One of them, /v1/request-landing, is safe — it allows ships to request landing access.
But there’s also a dangerous endpoint: /v1/exhaust-port. If called, it triggers catastrophic failure — even if the caller is an “authorized” pod like a TIE Fighter.
Visual Overview
The diagram below illustrates the problem we’re solving:
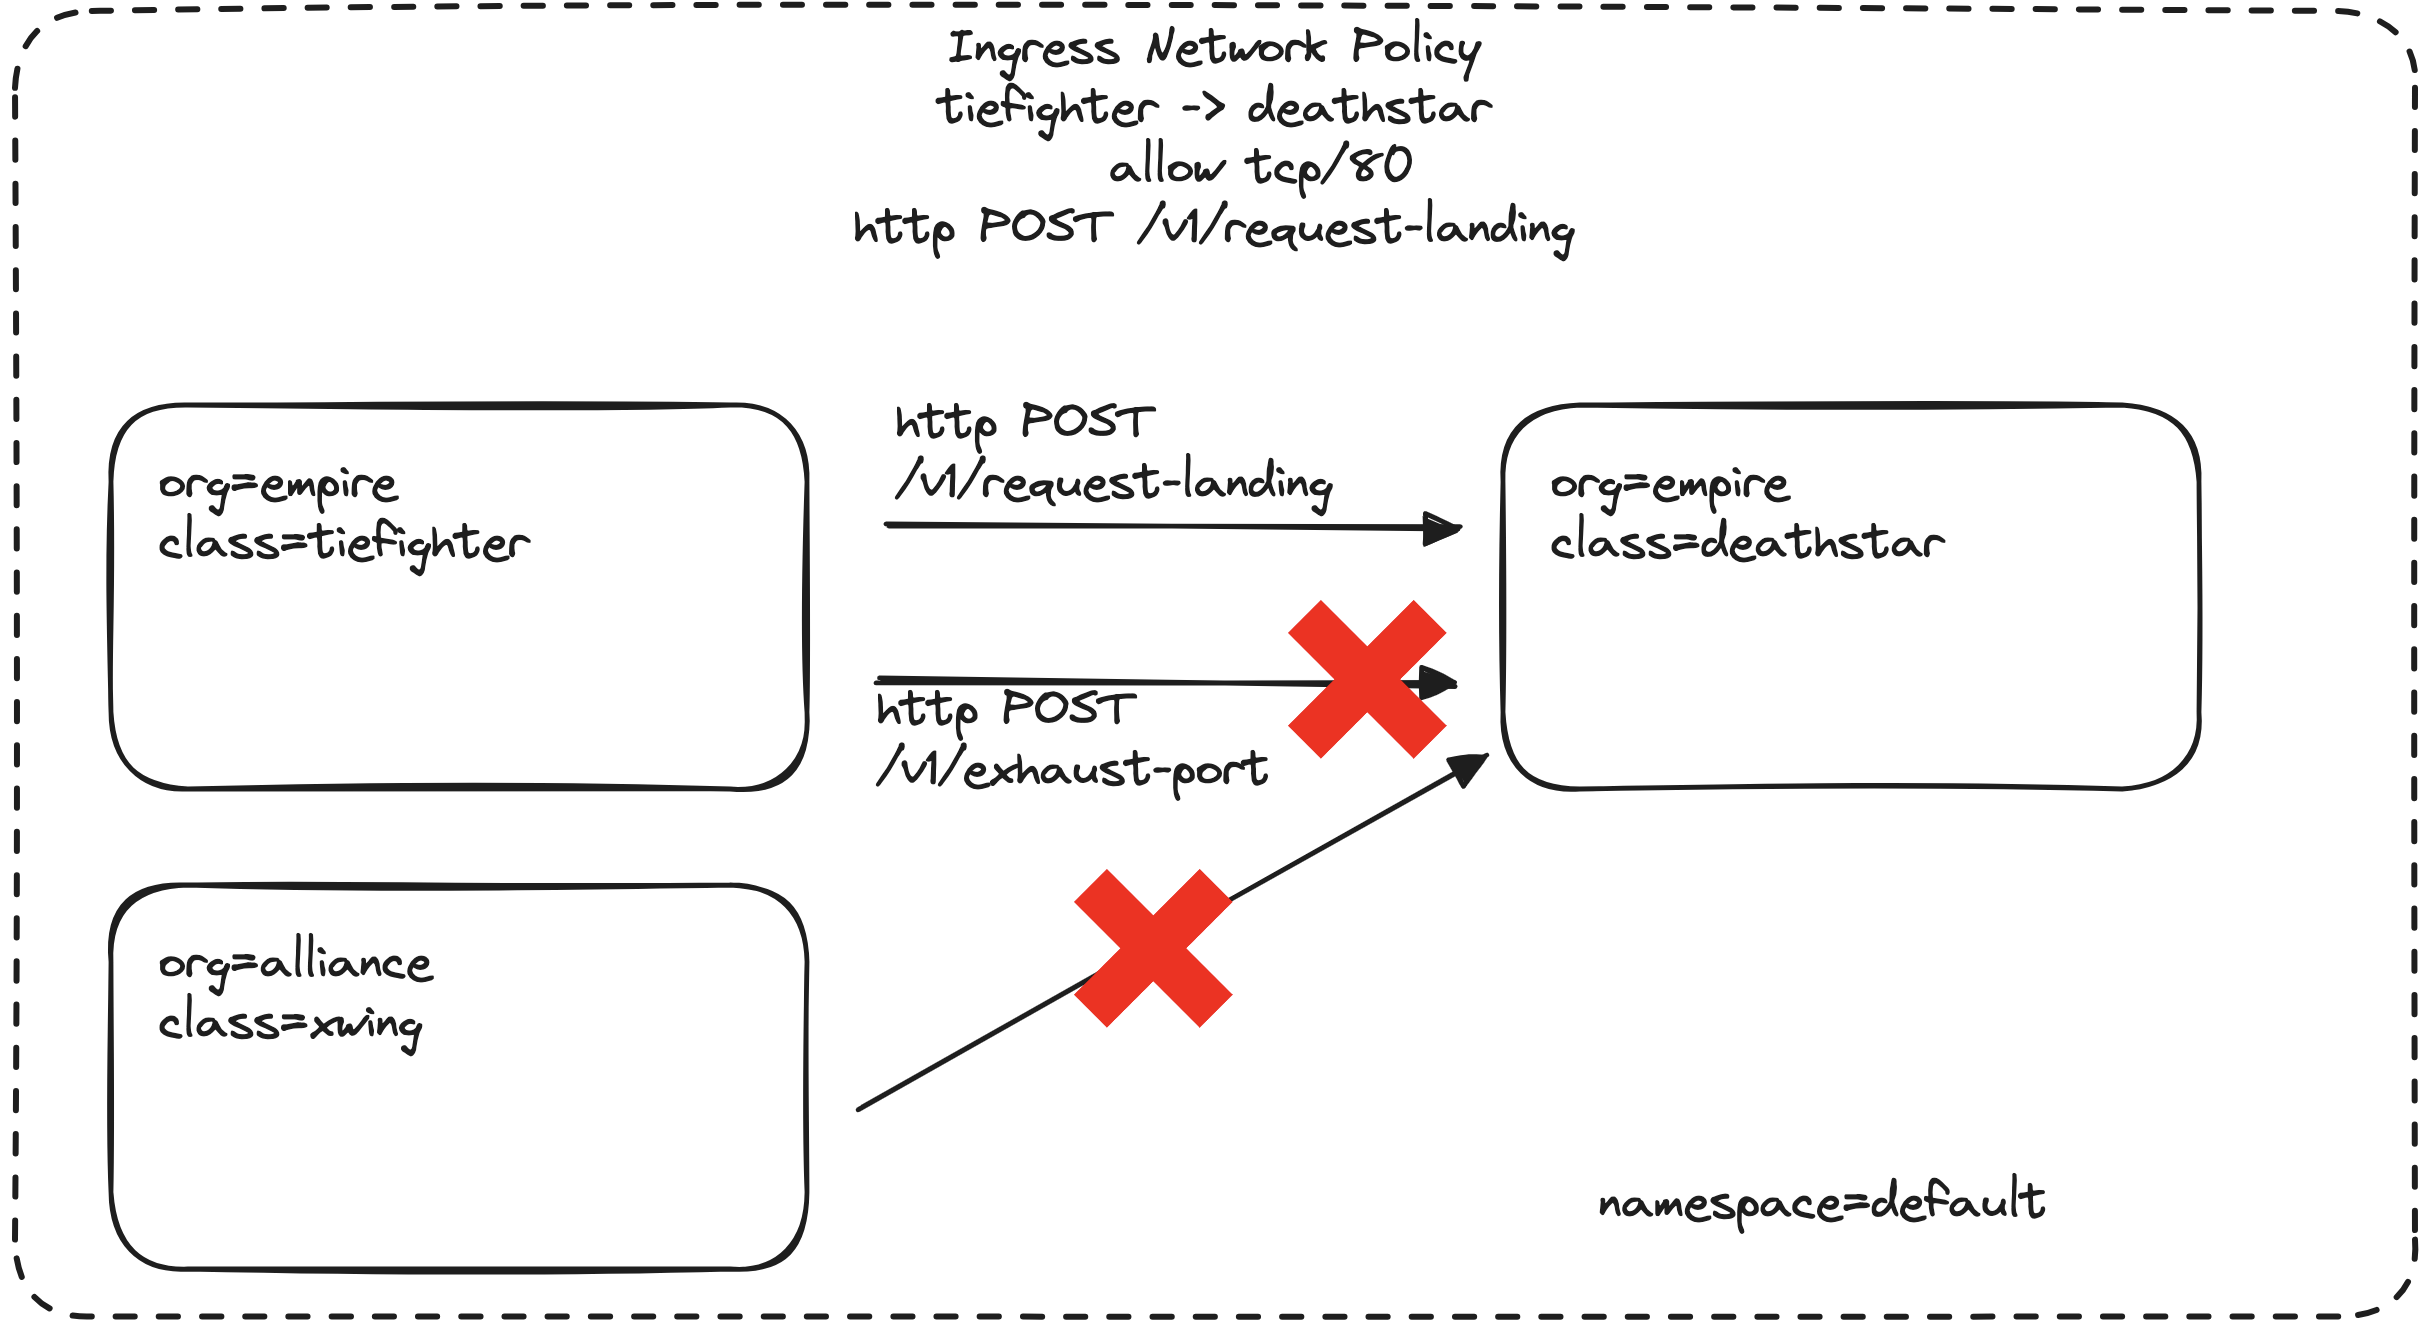
- ✅ TIE Fighters (pods with
org=empire) should be able toPOST /v1/request-landing - ❌ But even TIE Fighters must not be allowed to
POST /v1/exhaust-port - ❌ X-Wings (pods with
org=alliance) should be denied access to everything — as defined earlier by our L4 policy
Demo: What Happens Without L7 Protection
Let’s simulate a dangerous scenario. Run this command to send an HTTP PUT request to the Deathstar’s exhaust port from the TIE Fighter pod:
|
|
If L7 policies are not yet enforced, you’ll see output like this:
|
|
Even though TIE Fighters are authorized at the L4 level, they can still destroy the Deathstar by calling the wrong API.
Why This Matters
Without L7 rules in place, any pod allowed by your L4 policies can access any path. That means even trusted services can accidentally (or maliciously) call sensitive operations.
Enforcing Layer 7 policies isn’t just about compliance — it’s about protecting critical functionality from unintended or unauthorized access.
TL;DR – Why We Need Layer 7 Policy
| Feature | Layer 4 (L4) Policy | Layer 7 (L7) Policy |
|---|---|---|
| Controls who can connect | ✅ Yes | ✅ Yes |
| Controls what they can do | ❌ No | ✅ Yes — filter by HTTP method + path |
| Needed for least-privilege | ❌ Not enough | ✅ Enforces API-level access boundaries |
Up Next
We’ve seen why L4 isn’t enough. In the next section, we’ll write and apply a Cilium L7 policy to allow only safe HTTP requests — and block everything else, including /v1/exhaust-port.
Let’s make sure only the right pods can do the right things.
Apply a Layer 7 Policy to Enforce API-Level Access Control
With the risk now clear, it’s time to lock things down at the application layer.
In this step, we’ll apply a Cilium Layer 7 (L7) policy that allows only safe HTTP requests to the Deathstar — and blocks everything else, including dangerous endpoints like /v1/exhaust-port.
Step 1: Review the L7 Policy Definition
Here’s the CiliumNetworkPolicy that defines our L7 enforcement:
|
|
Policy Summary:
- ✅ Allows: TIE Fighters (
org=empire) toPOSTto/v1/request-landing - ❌ Denies: All other HTTP methods and paths — including
/v1/exhaust-port
Step 2: Apply the L7 Policy
Use the following command to apply the policy from the official Cilium GitHub repository:
|
|
💡 This policy comes directly from the Cilium project’s GitHub examples, and represents production-grade enforcement at the HTTP layer.
Next Up: Test and Verify L7 Policy Enforcement
Now that the policy is in place, let’s confirm that:
- ✅ TIE Fighters can still safely request landing
- ❌ But even they are denied access to the
/v1/exhaust-portendpoint
Ready? Let’s put our L7 rules to the test.
Verify Layer 7 Enforcement: Allow Safe API, Deny Dangerous Calls
Now that we’ve applied our Layer 7 policy, it’s time to validate that it’s doing what it’s meant to:
✅ Allow only specific API calls to the Death Star,
❌ Deny all others — even from trusted Empire pods.
We’ll send two test requests from the tiefighter pod:
- A safe
POSTto/v1/request-landing— which should succeed - A restricted
PUTto/v1/exhaust-port— which must be blocked
This gives us application-layer assurance that Cilium is enforcing least-privilege access.
Step 1: Allowed – Request Landing
|
|
Expected Output:
|
|
✅ This confirms that our Layer 7 policy permits the correct HTTP method (POST) to the correct path (/v1/request-landing).
Step 2: Blocked – Exhaust Port Attack
|
|
Expected Output:
|
|
❌ This proves that even trusted pods (like the TIE Fighter) are blocked from hitting sensitive API paths unless explicitly allowed.
Why This Matters
This shows how Cilium’s Layer 7 policy delivers deep application-level security by:
- Enforcing HTTP method and path rules
- Protecting sensitive APIs from misuse — even inside trusted zones
- Supporting least-privilege principles in microservices communication
TL;DR – What We Just Verified
- ✅
POST /v1/request-landing→ Allowed- ❌
PUT /v1/exhaust-port→ Blocked
✔️ Cilium’s L7 policy controls what clients can do — not just who can connect.
What’s Next?
🎉 Amazing work!
You’ve now secured a Kubernetes application not just at the network level, but at the API level.
Up next, let’s clean up your AKS cluster and safely conclude the mission — and avoid unnecessary cloud costs in the process.
Clean Up: Delete Your AKS Cluster and Avoid Extra Costs
You’ve completed the full journey — from deploying an AKS cluster to securing microservices with Cilium using Layer 3 through Layer 7 network policies. Now it’s time to clean up and avoid any unnecessary Azure charges.
To delete your AKS cluster, run:
|
|
Replace myResourceGroup and myAKSCluster with the actual values you used when creating your cluster.
💡 Tip: Not sure of your cluster name?
Runaz aks list -o tableto view existing clusters and confirm before deleting.
⚠️ Warning: This action is irreversible.
Deleting your AKS cluster will permanently remove all workloads and associated resources.
Make sure you’re targeting the demo cluster used in this tutorial.
With your cluster now deleted, you’ve officially completed the full lifecycle — from deployment and enforcement to teardown and cost control.
Let’s now take a moment to recap what you’ve accomplished.
Wrapping Up: What You’ve Built and What Comes Next
You’ve just completed a full hands-on journey — provisioning an Azure Kubernetes Service (AKS) cluster, installing Cilium as the CNI, deploying a microservices demo, and securing pod-to-pod communication using real-world Layer 4 and Layer 7 network policies.
By integrating Cilium into your AKS setup, you unlocked kernel-level control powered by eBPF — giving you deep visibility, fine-grained security, and scalable network observability.
Here’s what you now know how to do:
- ✅ Deploy and run Cilium on AKS using the Cilium CLI and Helm
- ✅ Apply Layer 4 policies to control traffic using pod identity and TCP ports
- ✅ Enforce Layer 7 policies to secure specific HTTP methods and paths
- ✅ Validate policy behaviour using structured tests in a simulated microservices setup
- ✅ Audit and enforce least privilege communication across your workloads
These aren’t just demo skills — they’re patterns and techniques used in production-grade Kubernetes networking.
Whether you’re securing development clusters or scaling mission-critical workloads, you’re now equipped to use Cilium as a foundational tool for secure, observable cloud-native systems.
Stay tuned — in future guides, we’ll explore:
- 🔍 Observability with Hubble
- 🌐 Multi-cluster communication
- 📊 Advanced traffic flow monitoring and policy management