Introduction
In our previous article, we explored how Kubernetes Network Policies give you powerful control over pod-to-pod communication. But we also saw their limits — especially when it comes to visibility, enforcement consistency, and real-world troubleshooting.
Today, we introduce a CNI plugin that changes the game: Cilium — a modern, high-performance networking solution built on Linux’s secret weapon: eBPF (Extended Berkeley Packet Filter). Cilium doesn’t just enforce policies — it gives you the tools to observe, secure, and scale Kubernetes networking with confidence.
In this article, we’ll:
- Explain how Cilium and eBPF work together to manage pod traffic
- Install and configure Cilium in a local Kind cluster
- Apply and test Kubernetes Network Policies using Cilium
- Explore how Cilium improves reliability and security over traditional CNIs
While tools like Calico offer solid policy enforcement, Cilium goes further — offering deep integration with the kernel, lower latency, and features that unlock next-level Kubernetes observability and security.
Let’s dive in and see how Cilium transforms your cluster from just connected… to controlled, secure, and smart.
Why Cilium?
Most people assume Kubernetes comes with built-in networking.
But it doesn’t.
Instead, Kubernetes delegates that responsibility to CNI plugins—modular networking layers that plug into your cluster. And while that may sound like a low-level detail, it turns out to be one of Kubernetes’ most powerful design decisions. By outsourcing networking to CNI plugins, Kubernetes stays focused on orchestration, while letting you choose the networking model that best fits your performance, security, and observability needs.
CNI Plugins: The Modular Approach
This modular architecture means you get to decide how your cluster handles traffic, security, and connectivity. Some CNI plugins focus on simplicity. Others focus on policy enforcement. Some aim for speed. But if you’re looking for something that brings all of those capabilities together — and then some — that’s where Cilium enters the scene.
Enter Cilium: Superpowers Through eBPF
If Calico is your standard tactical gear, Cilium is the Iron Man suit of Kubernetes networking — powered by eBPF, deeply integrated with the Linux kernel, and built for visibility, speed, and control.
Most traditional CNIs rely on tools like iptables or userspace proxies to manage traffic. These solutions work, but they can be slow, CPU-hungry, and difficult to observe. Cilium, on the other hand, uses eBPF to inject logic directly into the Linux kernel. This allows it to:
- Inspect packets as soon as they hit the interface
- Apply security policies at the source
- Monitor traffic without leaving userspace
All with minimal overhead.
This architecture isn’t just fast — it’s precise. It gives you features like:
- API-aware network security (think L7-aware rules)
- Transparent encryption between pods and services
- Multi-cluster networking without kludgy add-ons
- Live observability and debugging using Cilium tooling
The Architecture Behind Cilium
The diagram below shows how Cilium fits into the Kubernetes networking stack.
At the top, orchestration systems and tools (like Cilium CLI, policy repositories, and plugins) interact with the Cilium Daemon, which is responsible for code generation and eBPF policy injection.
At the bottom, eBPF programs are loaded directly into the kernel, where they sit next to your containers and network interfaces — enforcing rules and collecting data at the source of truth.
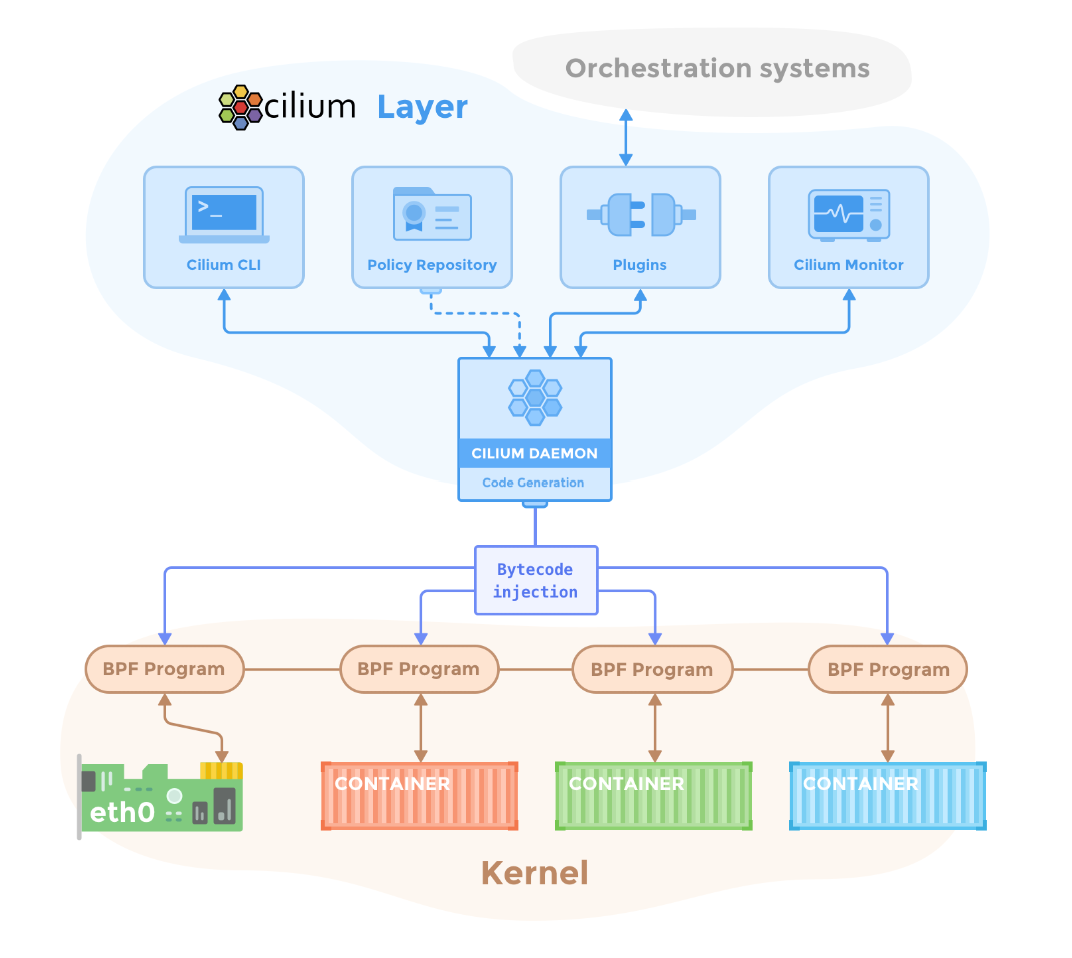
This design gives Cilium its superpowers — direct kernel-level control without sacrificing security, performance, or visibility.
Why Cilium?
If your Kubernetes workloads demand performance, visibility, or multi-cluster flexibility, Cilium doesn’t just meet the bar — it raises it.
It’s not just a CNI plugin.
It’s a platform for next-generation Kubernetes networking.
Exploring eBPF (Extended Berkeley Packet Filter)
When most people think about Kubernetes networking, they picture traffic flowing through layers of proxies, firewalls, and routing tables. That’s how it’s always been — until now.
But what if your programs could run inside the Linux kernel, inspecting traffic in real-time, enforcing policies, and tracing behavior — all without touching kernel source code or loading modules?
That’s exactly what eBPF does.
eBPF (Extended Berkeley Packet Filter) is the technology powering next-gen Kubernetes networking and security tools like Cilium. It allows safe, sandboxed programs to run at the kernel level, turning the operating system into a programmable platform. And that changes everything.
eBPF Superpowers for Kubernetes
Here’s why eBPF is transforming Kubernetes networking from the inside out:
Performance: Process Data Where It Lives
eBPF runs programs directly in the Linux kernel, eliminating the costly back-and-forth between user space and kernel space. This means less overhead, faster response, and high-throughput networking — crucial for performance-sensitive workloads.
Security: Enforce Rules at the Source
eBPF allows you to filter, inspect, and control traffic as it enters or exits the kernel. This enables real-time, fine-grained access control applied at the packet source, without relying on proxies or traditional firewalls.
Observability: See Everything Without the Overhead
Operating deep in the kernel, eBPF provides low-level, high-fidelity visibility into your system — from network flows to system calls and resource usage. You can trace behavior, profile applications, and monitor infrastructure without slowing it down.
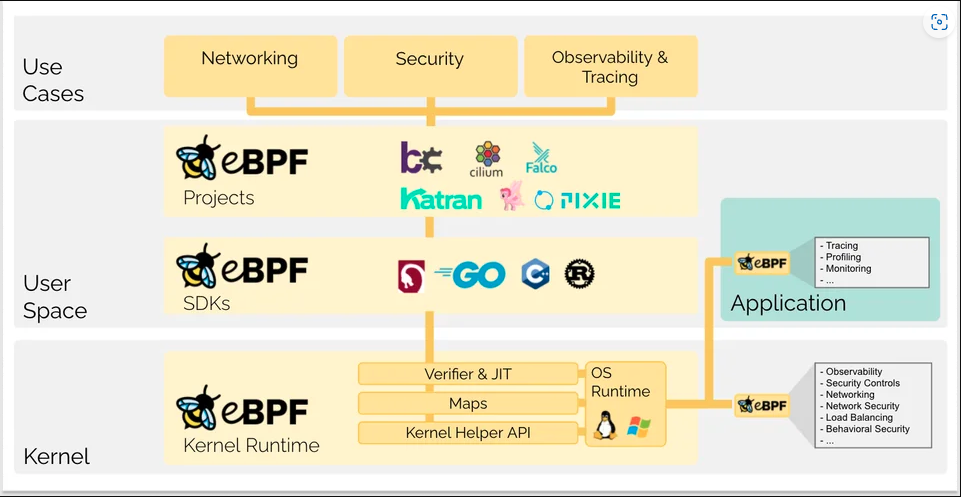
Understanding the eBPF Stack
The diagram below shows the eBPF ecosystem across the kernel and user space. At the base, eBPF integrates with the kernel runtime, exposing hooks and APIs. In user space, SDKs in Go, Rust, and C allow developers to write eBPF programs. At the top, tools like Cilium, Falco, and Pixie bring eBPF to life — delivering advanced capabilities in networking, observability, and security.
eBPF in a Nutshell
eBPF lets you run safe, sandboxed programs directly in the Linux kernel. It powers tools like Cilium to deliver fast, secure, and deeply observable Kubernetes networking — without modifying the kernel itself.
Thanks to eBPF, Cilium can deliver next-gen networking with zero compromises — combining speed, security, and visibility in one clean architecture.
Now that you’ve seen the engine behind the magic, it’s time to bring it to life. In the next section, we’ll walk through installing and using Cilium in a real Kubernetes cluster to see eBPF in action.
Hands-On Example: Building a Cilium-Ready Kubernetes Cluster with Kind
Ready to bring Cilium and eBPF to life?
In this hands-on guide, we’ll build a local Kubernetes cluster using Kind, install Cilium, and prepare the foundation for secure, high-performance networking. Whether you’re experimenting locally or validating policies for production, this lab setup gives you everything you need to explore Cilium step by step.
We’ll begin by setting up the cluster and disabling the default CNI. This clears the path for Cilium to take full control of networking, observability, and policy enforcement in the next step.
Prerequisites
Ensure the following tools are installed on your machine:
- 🐳 Docker: Install Docker
- ☸️ kubectl: Install kubectl
- 🎡 Helm: Install Helm
- 🏗️ Kind: Install Kind
Cluster Preview
Here’s a quick preview of what we’re about to build:
|
|
Cilium will power the network layer, replacing Kind’s default configuration with a faster, more secure, and policy-aware setup.
Step 1: Create the Kind Cluster Configuration
Start by creating a configuration file called kind-config.yaml:
|
|
⚠️ Why disable the default CNI?
Kind installs a basic CNI plugin calledkindnetby default, we disabled Kind’s built-in CNI (kindnet) to give full control to Cilium. That’s important because:
- Kindnet doesn’t support Network Policies
- It lacks eBPF capabilities
- It can interfere with advanced networking features
By disabling it, we let Cilium take over pod networking, policy enforcement, and observability—exactly what we want in this tutorial.
Step 2: Create the Cluster
Now spin up your cluster using the config you just created:
|
|
💡 Tip: This may take a minute.
Use the command below to verify when your node is ready:
|
|
Wait until the node shows a STATUS of Ready before continuing.
Your Kind cluster is now live — minimal, clean, and ready for Cilium to take control.
In the next section, we’ll install Cilium using Helm and unlock the full power of eBPF for networking and observability. Let’s go!
Installing Cilium with Helm
With our cluster ready and waiting, it’s time to give it superpowers. In this step, we’ll install Cilium using Helm, Kubernetes’ package manager, and set it up to handle all networking, security, and observability in our cluster. Whether you’re here to learn, experiment, or prep for production, this is where the magic begins.
Step 1: Add the Cilium Helm Repository
Helm helps us manage Kubernetes applications as installable charts. Let’s start by adding the official Cilium repository:
|
|
This makes the Cilium Helm chart available on your machine for installation.
Step 2: Install Cilium into the Cluster
Now we’ll install Cilium into the kube-system namespace using Helm:
|
|
This command deploys the Cilium agent and operator into your cluster. The Helm chart takes care of most configuration, setting you up with sane defaults.
Step 3: Watch the Cilium Installation Progress
To monitor the installation and ensure everything is spinning up correctly, run:
|
|
This command gives you a live view of pod status in the kube-system namespace.
Watch for components like:
cilium-*: runs on each node, enforcing policies and managing trafficcilium-operator: manages state and datapath lifecycle
They’ll typically move through Pending → ContainerCreating → Running.
✅ Success Tip: When both
ciliumandcilium-operatorshowSTATUS: Running, your installation is complete and ready for use.
Here’s an example of what a successful setup might look like:
|
|
You’ll typically see one
ciliumpod per node and a singlecilium-operatormanaging them.
(Optional) Check Readiness
If you’re unsure whether everything is fully initialized, you can confirm node and pod status:
|
|
Wait until all pods are Running and nodes are Ready before proceeding.
What’s Next?
With Cilium now active in your cluster, it’s time to put it to work. In the next section, we’ll deploy a sample application and see how Cilium secures and manages traffic behind the scenes—powered by eBPF.
Setting the Stage: Deploying a Frontend/Backend App for Policy Testing
Now that your Kubernetes cluster is running Cilium, it’s time to deploy a sample application that we’ll use to test real-world network policies.
We’ll spin up a simple frontend-backend microservice setup—a common architecture pattern in Kubernetes. This will give us a clear, visual way to test how Cilium enforces pod-level communication rules.
Once the application is running, we’ll simulate allowed and blocked traffic scenarios using Cilium-powered policies.
Step 1: Define the App
Create a file called sample-app.yaml and add the following resources. This manifest includes:
- A frontend pod with the label
app: frontend, exposed via a Kubernetes Service. - A backend pod labeled
app: backend, which the frontend may call internally. - The frontend-service, which routes external traffic to the frontend pod on port 80.
|
|
Step 2: Deploy the App
Ensure you’re in the directory where you saved sample-app.yaml, then run the following command to apply it to your cluster:
|
|
Visual Overview
Here’s a simplified view of the application setup you’ve just deployed:
|
|
frontend-serviceroutes external traffic to thefrontendpod.frontendpod may connect to thebackendpod in real-world scenarios.- The client shown above represents any unauthorized pod trying to access the frontend — we’ll simulate this using a temporary pod in our upcoming tests.
- We’ll use Cilium Network Policies to define exactly what traffic is allowed and what gets blocked.
With your application up and running, you’re now ready to enforce fine-grained communication rules using Cilium. In the next section, we’ll define and apply a network policy to restrict traffic between these pods.
Let’s get to the fun part: locking things down and testing what breaks.
Applying a CiliumNetworkPolicy: Enforce Granular Traffic Control
Now that your frontend and backend pods are up and running, it’s time to put Cilium to work.
In this step, you’ll apply a Cilium-powered network policy that enforces traffic control at the kernel level, allowing only the backend pod to access the frontend pod on port 80—and denying everything else.
Step 1: Define the Cilium Network Policy
Cilium provides its own custom resource called CiliumNetworkPolicy (CNP), which gives you fine-grained, eBPF-powered traffic control.
Create a file called frontend-policy.yaml and paste in the following:
|
|
Step 2: Apply the Policy
Make sure you’re in the same directory where you saved the file, then run:
|
|
This will create a CiliumNetworkPolicy that only allows pods with label app=backend to send TCP traffic to port 80 on frontend pods.
Step 3: Test the Policy - Backend Access (Should Succeed)
Since our policy explicitly allows traffic from the backend pod, this test should succeed:
|
|
If successful, you should see the NGINX welcome page, confirming that traffic from the backend pod to the frontend pod is allowed and working as intended.
❌ Step 4: Test Unauthorized Access - Random Pod (Should Fail)
Now, let’s test an unauthorized connection using a temporary pod with no labels:
|
|
This command:
- Creates a one-off pod using the
nginximage - Tries to curl the frontend service
- Automatically deletes the pod afterward
Since the pod doesn’t match the allowed app=backend label, the request should fail with a timeout or connection refused error.
Why this matters:
This test proves that Cilium enforces traffic rules based on pod identity (labels) and that those rules are enforced at the kernel level using eBPF.
Step 5: Clean Up
Awesome work! 🎉
You’ve just enforced a secure, label-based access control policy using Cilium and eBPF in a live Kubernetes cluster.
If you’d like to free up system resources and remove the cluster, simply run:
|
|
You’ve Just Achieved:
- ✅ Installed Cilium as the CNI using Helm
- ✅ Deployed a sample frontend-backend app
- ✅ Created and applied a CiliumNetworkPolicy
- ✅ Validated that allowed traffic succeeds and unauthorized traffic fails
- ✅ Gained hands-on experience with eBPF-powered security at the pod level
Let’s wrap up with a quick recap of everything we’ve learned—and why this approach redefines Kubernetes networking.
Conclusion
🎉 You did it! Over the course of this guide, you didn’t just install a CNI — you levelled up your understanding of Kubernetes networking. From exploring Cilium’s eBPF-powered architecture to enforcing precise traffic controls with real-time observability, you’ve gained hands-on experience with tools used to secure and scale production-grade clusters.
You’ve now seen how to:
- Build a secure, kernel-level networking layer with Cilium
- Enforce granular, label-based policies using CiliumNetworkPolicy
- Simulate traffic flows and validate policy enforcement
- Understand the power of eBPF for visibility, security, and performance
These aren’t just technical checkboxes — they’re building blocks for resilient, cloud-native systems. The skills you’ve developed here will serve you well as you design, operate, and secure real Kubernetes workloads.
What’s next?
And we’re just getting started. In the next article, we’ll take things further by deploying Cilium on Azure Kubernetes Service (AKS). You’ll learn how to integrate Cilium with AKS’s managed environment, unlocking everything from transparent encryption to multi-cluster support — all backed by eBPF.
If you’re preparing for cloud scale or looking to tighten your production-grade security posture, this next step is essential.
See you there! 👋
Image credits: