Introduction
In our previous article, we explored how Kubernetes creates a flat network that allows pods to communicate freely—across nodes, across regions, even across clouds.
That seamless communication is powerful.
But it raises a crucial question: Who’s allowed to talk to whom?
By default, Kubernetes permits unrestricted communication between all pods in a cluster. Looking at the diagram below, you’ll see a frontend pod and a backend pod that can freely exchange traffic—and even receive requests from external sources. This makes setup easy, but it also opens the door to unintended access and lateral movement between workloads.
This is where Network Policies come in.
Think of them as Kubernetes-native firewalls:
They let you define rules about which pods can talk to which, on what ports, and under what conditions—enabling you to isolate services, enforce trust boundaries, and lock down your cluster’s internal traffic.
In this article, you’ll learn:
- How Network Policies control pod communication
- The core components that define a policy
- How to create and test your first policy
- How to implement Network Policies in a local Kind cluster
Let’s begin by seeing how Network Policies fit into Kubernetes networking—and why they’re a critical part of building secure, production-grade infrastructure.
Network Policy Fundamentals: How Kubernetes Controls Pod Traffic
In Kubernetes, every pod starts with complete freedom to talk to any other pod.
That’s great for development—but risky for production.
This is where Network Policies come in.
They flip the model from open by default to permission-based access—letting you explicitly control who can talk to whom, under what conditions, and on which ports.
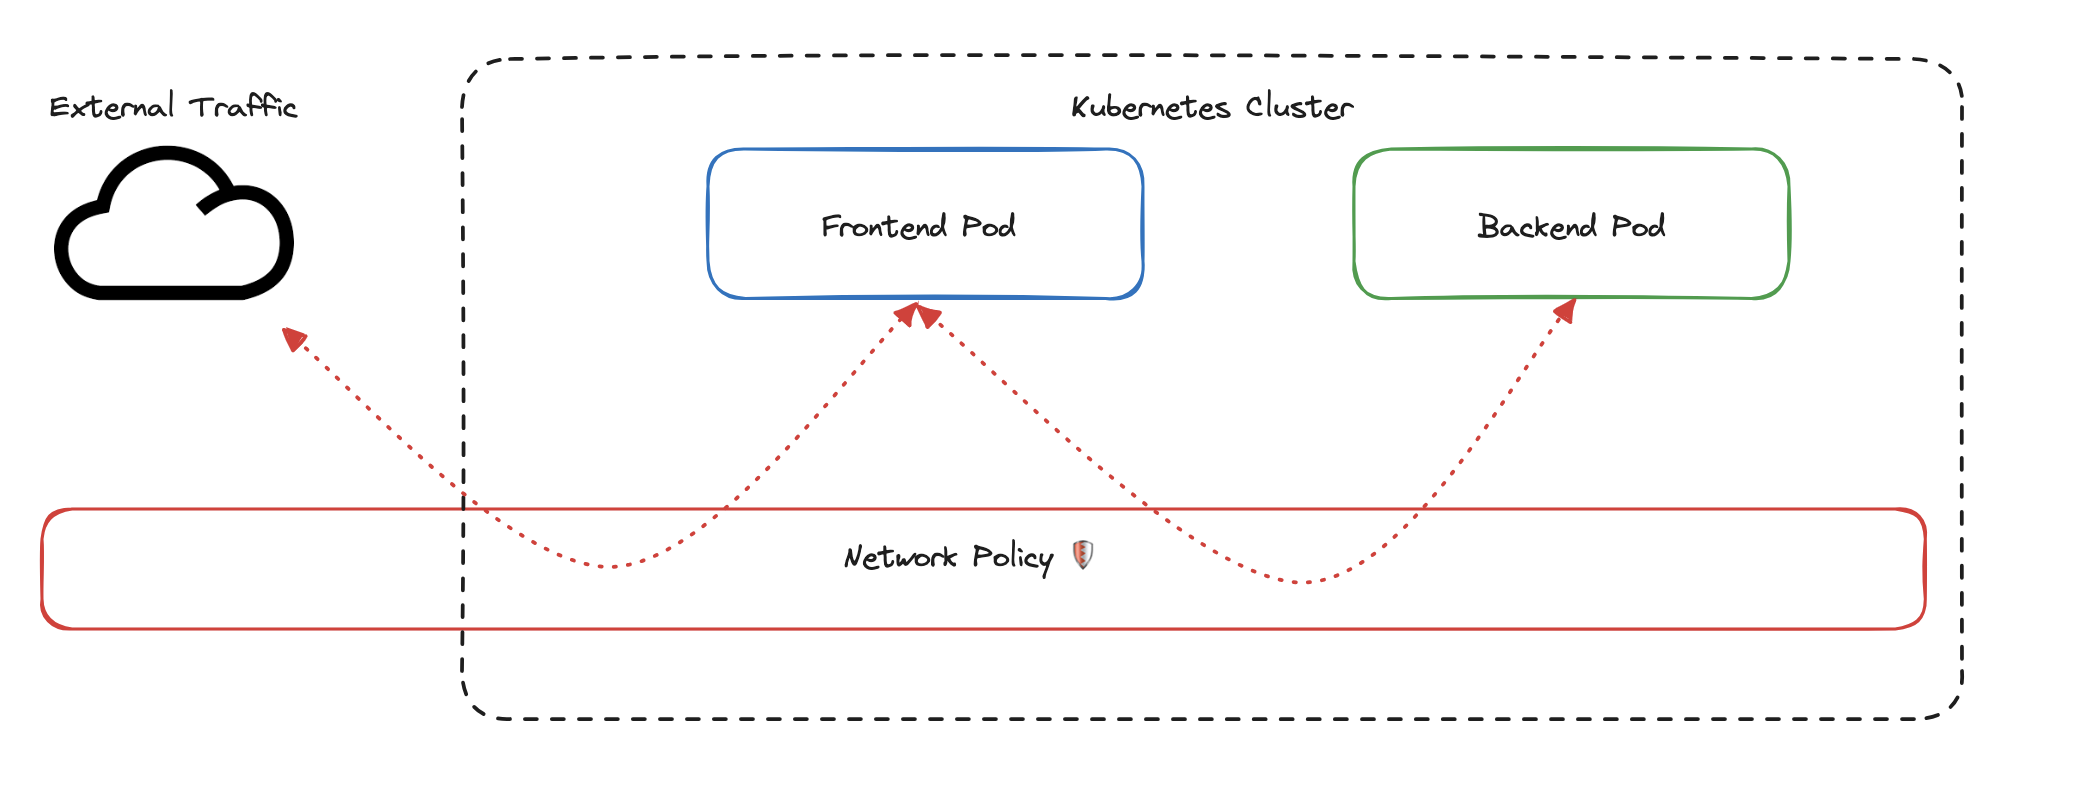
In the diagram above, external traffic reaches the frontend pod, which can then freely communicate with the backend pod. Nothing is stopping it.
The red rectangle labeled Network Policy represents a control point—currently passive, but soon to be active.
With the right policy in place, this layer can inspect, filter, and block unwanted traffic between pods and external sources.
Why Network Policies Matter
In a zero-trust environment, assuming everything can talk to everything is dangerous.
Network Policies help you:
- Enforce least-privilege access between pods
- Segment workloads based on purpose, team, or sensitivity
- Prevent lateral movement across workloads if a pod is compromised
This is how Kubernetes moves from connectivity to intentional communication.
How Kubernetes Identifies Pods
Every pod in Kubernetes can be tagged with labels—simple key-value pairs like:
|
|
These labels are used throughout Kubernetes—for deployments, service discovery, and network policies.
You can think of labels like stickers Kubernetes uses to group and target specific pods for various purposes.
Applying Network Policies
Network Policies use label selectors to determine which pods they apply to.
For example, let’s say you have:
- Frontend pods labeled
app: frontend - Backend pods labeled
app: backend - Database pods labeled
app: database
You could write a policy that targets all pods with app: frontend and restricts their communication so they can only talk to backend pods—on a specific port.
This lets you create trust boundaries and isolate sensitive services.
The Implicit Deny Rule
When you apply a Network Policy to a pod, something important happens: that pod’s networking behavior changes fundamentally. It no longer allows all traffic by default — instead, it only allows what your policy explicitly permits.
For example, if you create a policy for your frontend pods that allows communication from backend pods on port 8080:
- ✅ Frontend pods can receive traffic from backend pods on port 8080
- 🚫 All other incoming traffic is blocked
- ✅ Outgoing traffic remains unrestricted unless you define a separate egress rule
Note: We’ll explore traffic direction (ingress and egress) in the next section — including how to control both sides of the conversation with policies.
This implicit-deny model helps you design secure-by-default communication paths.
⚠️ CNI Plugins Enforce the Rules
Kubernetes defines Network Policies—but doesn’t enforce them by itself.
That job belongs to your CNI plugin.
To actually enforce policies, your cluster needs a CNI that supports them, such as:
- Calico – robust enforcement and security policies
- Cilium – high-performance networking with deep observability via eBPF
- Flannel (with Calico) – simpler setups with policy support
If your cluster is missing a compatible CNI, your Network Policies will silently do nothing.
What’s Next
Now that you understand the why behind Network Policies—labels, selectors, and the implicit deny model—it’s time to dig into their core components.
In the next section, we’ll break down how to structure a policy using:
- Pod selectors
- Ingress vs. Egress traffic direction
- Traffic rules (ports, protocols, sources, destinations)
Let’s go under the hood.
Key Components of a Kubernetes Network Policy
Now that we understand how Network Policies select pods, let’s take a look at how they’re actually constructed.
Think of a policy as a blueprint for controlling pod traffic.
It answers three key questions:
- Who does this policy apply to?
- What direction of traffic are we controlling — incoming or outgoing?
- What kind of traffic is allowed — from where, on which ports, using which protocols?
These three components — selectors, directions, and rules — form the foundation of every Network Policy.
Pod Selectors: Choosing Which Pods the Policy Affects
The first step is deciding which pods the policy applies to. You do this using a pod selector — a label-based query that targets specific pods.
Example: Select all frontend pods
|
|
What’s happening here:
kind: NetworkPolicydeclares the resource type.metadata.namenames the policy.spec.podSelector.matchLabelstargets all pods with the labelapp: frontend.
Important:
Only the selected pods are affected by this policy.
Pods that don’t match the selector continue with default unrestricted networking — even if they try to communicate with the selected pods.
This is a common beginner mistake: assuming a policy controls both ends of a connection.
Traffic Direction: Ingress and Egress
Network Policies control two directions of traffic:
- Ingress — traffic coming into the selected pods
- Egress — traffic going out from the selected pods
Think of it like a building:
- Ingress is the front door — who’s allowed to come in
- Egress is the back door — what’s allowed to go out
Example: Allow ingress from backend pods
|
|
This policy:
- Applies to all
frontendpods - Only allows incoming traffic from pods labeled
app: backend - Does not specify egress, so that direction stays as it was before
Does Applying a Network Policy Impose an Implicit Deny?
Not always — and this is an essential detail.
Kubernetes only restricts traffic in a direction if a policy explicitly defines that direction.
Here’s how it works:
| Situation | What Happens |
|---|---|
| No policy exists | All traffic (ingress & egress) is allowed |
| Ingress rules are defined | Only ingress is restricted (egress stays open) |
| Egress rules are defined | Only egress is restricted (ingress stays open) |
| Both are defined | Both directions are restricted as specified |
Tip:
Network Policies don’t act as a global firewall.
They only apply to the pods you select — and only for the traffic direction you define.
Traffic Rules: Who Can Talk, On What Ports, Using What Protocols
Now let’s get more granular. Inside ingress or egress, you can define rules to control:
- Who can send or receive traffic (using pod or namespace selectors)
- Which ports are allowed
- Which protocols are permitted
Example: Allow only TCP traffic from backend pods on port 80
|
|
Breakdown:
- Only pods with label
app: backendcan send traffic - Only traffic using TCP on port 80 is allowed
- All other traffic (different port, different pod, different protocol) is blocked
Summary: How Policies Are Built
A complete policy works like a stack of filters:
- Selector — choose the pods this policy applies to
- Direction — decide whether to control ingress, egress, or both
- Rules — define what’s allowed: who, where, how
Real-World Tip: Watch for One-Sided Policies
It’s easy to focus on ingress and forget about egress — or vice versa.
This can lead to unintended consequences:
- Define ingress but not egress? Your app might send data anywhere, unrestricted.
- Define egress but not ingress? Your pods could still be accessed by anyone.
Security isn’t just about who gets in — it’s also about what gets out.
Design policies with both directions in mind, especially in production environments.
What’s Next?
Now that you’ve seen the core building blocks — selectors, direction, and rules — it’s time to bring them together.
In the next section, we’ll assemble a complete Network Policy you can apply, test, and learn from directly inside your cluster.
Creating Your First Kubernetes Network Policy with Kind (Kubernetes in Docker)
Now that we understand the building blocks of a Network Policy, let’s put them into practice.
In this hands-on section, you’ll spin up a local Kubernetes cluster using Kind and apply a real Network Policy that restricts traffic to frontend pods. We’ll start by setting up a cluster with a compatible CNI plugin, deploy sample applications, and prepare for testing your policy in action.
What You’ll Build
You’ll deploy three pods (frontend, backend, and client) and two services. Once deployed, you’ll apply a policy that allows only specific traffic to the frontend pod and blocks everything else.
Here’s a quick view of the architecture:
|
|
The
client-podwill simulate unauthorized traffic to test our policy.
Prerequisites
Ensure these tools are installed on your local machine:
- Docker: Install Docker
- Kind: Install Kind
- kubectl: Install kubectl
Step 1: Create a Kind Cluster with Calico
Kubernetes defines Network Policies, but it relies on the CNI plugin to enforce them. We’ll use Calico because it supports full Network Policy enforcement. Most default Kind clusters don’t enable this out of the box.
Create a file named kind-config.yaml:
|
|
Then create the cluster and install Calico:
|
|
⏳ Heads up: Calico installation may take a minute or two.
Runkubectl get pods -n kube-systemand wait until all pods are in theRunningstate before moving on.
Step 2: Deploy Sample Applications
Create a file called sample-app.yaml with the following configuration:
|
|
Apply the configuration:
|
|
The
client-podis our “test intruder.” Later, you’ll use it to verify that unauthorized traffic is blocked by your policy.
What’s Next?
With your cluster and pods up and running, you’re now ready to create and apply a Network Policy that enforces real restrictions.
In the next section, we’ll write a complete Network Policy and put everything into action.
Creating and Applying the Network Policy
Now that your environment is ready, it’s time to define the actual Network Policy.
We’ll create a rule that allows only backend pods to send traffic to the frontend pod on port 80. All other pods—like our client-pod—will be blocked.
Create a new file called frontend-policy.yaml with the following contents:
|
|
Apply the policy:
|
|
This creates and enforces the policy immediately.
Only backend pods can now reach frontend on port 80.
All other incoming traffic—including requests from client-pod—is blocked by default.
Coming Up Next: Testing the Policy
Now that the policy is live, let’s verify it.
Will backend get through? Will client be denied?
Let’s test and see.
Verifying the Policy
With the network policy in place, it’s time for the moment of truth:
Can the backend pod connect to the frontend?
Will the client pod be blocked as expected?
Let’s find out.
Expected Results
Before we run the tests, here’s what we should see:
- ✅ Backend pod: Should succeed — it’s explicitly allowed in the policy
- ❌ Client pod: Should fail — it’s not listed in the allowed sources
Run the Connection Tests
|
|
These results confirm that your policy is working:
- ✅ Traffic from the backend pod is allowed.
- ❌ Traffic from the client pod is blocked.
Check the Cluster State
Let’s verify that all pods and services are up and healthy:
|
|
Tip: If Calico was just installed, it might take a minute for pods in the
kube-systemnamespace to reach theRunningstate. You can monitor with:
1kubectl get pods -n kube-system
Inspect the Policy
To confirm that your network policy is in effect and built as intended:
|
|
Look for:
PodSelector— confirms which pods are targetedIngress Rules— lists allowed sources and portsFrom— should reference pods with labelapp: backend
What’s Next?
With the test results in hand, you’ve just seen a Network Policy enforce real traffic control in Kubernetes.
In the next section, we’ll dive into best practices, potential pitfalls, and how to confidently secure your cluster traffic with policies that scale.
Best Practices and Common Challenges with Kubernetes Network Policies
Creating your first network policy is a big step. But designing policies that are secure, scalable, and maintainable — especially in production — requires discipline.
In this section, you’ll learn practical best practices and how to avoid common mistakes that trip up even experienced teams.
Start with a Default Deny Policy (Zero Trust)
The best way to build secure policies is to start from zero trust.
That means: deny all traffic by default, then explicitly allow what’s needed — nothing more.
Here’s a common starting point:
|
|
This policy blocks all traffic (in and out) for all pods in the namespace. From here, you can define focused policies that allow only approved traffic, enforcing the principle of least privilege.
Organising Your Network Policies
Keeping policies well-structured helps your team reason about what’s allowed and why. Use these two lenses: Clarity and Scalability.
Clarity
- Write one policy per function (e.g.
allow-frontend-ingress) - Use descriptive naming:
app-component-direction
Example:frontend-allow-backend - Use annotations to document purpose
1 2 3 4metadata: name: frontend-allow-backend annotations: description: "Allow frontend pods to receive traffic from backend services"
Scalability
- Organise policies by namespace
- Avoid overly broad selectors unless truly necessary
- Track ownership — annotate which team/service owns the policy
Well-structured policies are easier to audit, update, and extend.
Common Challenges and Pitfalls
1. CNI Plugin Compatibility
Not all networking plugins (CNI) enforce network policies the same way.
- Use a CNI like Calico, or Cilium for full policy support
- CNIs like default Flannel may ignore network policies entirely
- Always test your policies with the CNI you’re actually running
2. Troubleshooting Access Issues
Most policy issues show up as mysterious connection timeouts. Check for:
- ❌ Missing or incorrect pod labels
- ❌ Mismatched selectors in the policy
- ❌ Wrong port, protocol, or direction
Example:
If a frontend pod can’t reach a backend pod, check whether the backend pod has the correct
app: backendlabel and that the policy defines the correct ingress rule for port 80.
Use these commands to investigate:
|
|
3. Policy Overlap and Conflicts
Kubernetes policies are additive — not exclusive.
- If any policy allows the traffic, it goes through
- Multiple policies targeting the same pod all apply
- This is different from traditional firewalls, where rule order matters
Tip: Keep policies simple and focused. Overlapping rules often lead to unexpected results.
Performance Considerations
While Kubernetes network policies are efficient, they’re not free — especially in large clusters.
- Avoid dozens of ultra-specific policies; prefer broader selectors when possible
- Use labels to group pods logically instead of writing many one-off rules
- Benchmark performance before applying sweeping changes
- Use tools like Cilium Hubble or Calico’s flow logs for observability
Wrap-up
You’ve now gone from understanding Kubernetes networking to shaping it.
With best practices like default-deny, clear structure, and careful testing, you’re equipped to secure your workloads with confidence — not just in theory, but in real-world production clusters.
Let’s bring everything together in the final conclusion.
Conclusion: From Connectivity to Control
From wide-open communication to fine-grained security, you’ve now seen how Kubernetes Network Policies turn a flat, unrestricted network into a controlled and intentional system.
Where everything once talked to everything, you can now define exactly who can connect, from where, and on what terms. That’s not just configuration — that’s infrastructure design thinking.
Key Takeaways
- Network Policies use labels and selectors to define which pods are affected
- Once applied, a policy blocks all traffic by default — only explicitly allowed traffic is permitted
- Policies are only enforced if your cluster uses a compatible CNI plugin like Calico or Cilium
- Combining Services with Network Policies gives you stable networking and precise access control
What You Built
In this hands-on guide, you:
- Set up a test environment using Kind and Calico
- Created and applied a real Network Policy
- Verified that your policy allowed and blocked traffic as expected
- Used Kubernetes tooling to troubleshoot and inspect policy behavior
You didn’t just write YAML — you practiced designing trust boundaries in a distributed system.
What’s Next: Unlocking More with Cilium
But Network Policies are just the beginning.
In our next article, we’ll explore Cilium — a next-generation CNI plugin built on eBPF that brings deep observability, advanced policy enforcement, and performance you can feel. It doesn’t just enforce rules — it shows you what’s happening and why.
If you’re ready to level up from basic networking to security-aware, production-grade infrastructure, stay tuned.