
Introduction
In our first article, we explored why microservices can be both powerful and painful — and how Dapr (the Distributed Application Runtime) helps simplify service-to-service communication, state management, and other common challenges.
Now it’s time to put it all into practice. In this hands-on guide, you’ll build a real-world microservices application using Dapr. You’ll see how Dapr lets your services talk to each other and manage data — without needing to manually wire up service discovery, retries, or backend integrations.
We’ll create a simple e-commerce example with two services:
- Inventory Service (Python): manages product quantities using Dapr’s state store.
- Order Service (JavaScript): places orders by calling the inventory service using Dapr’s service invocation API.
Here’s a preview of what you’ll build:
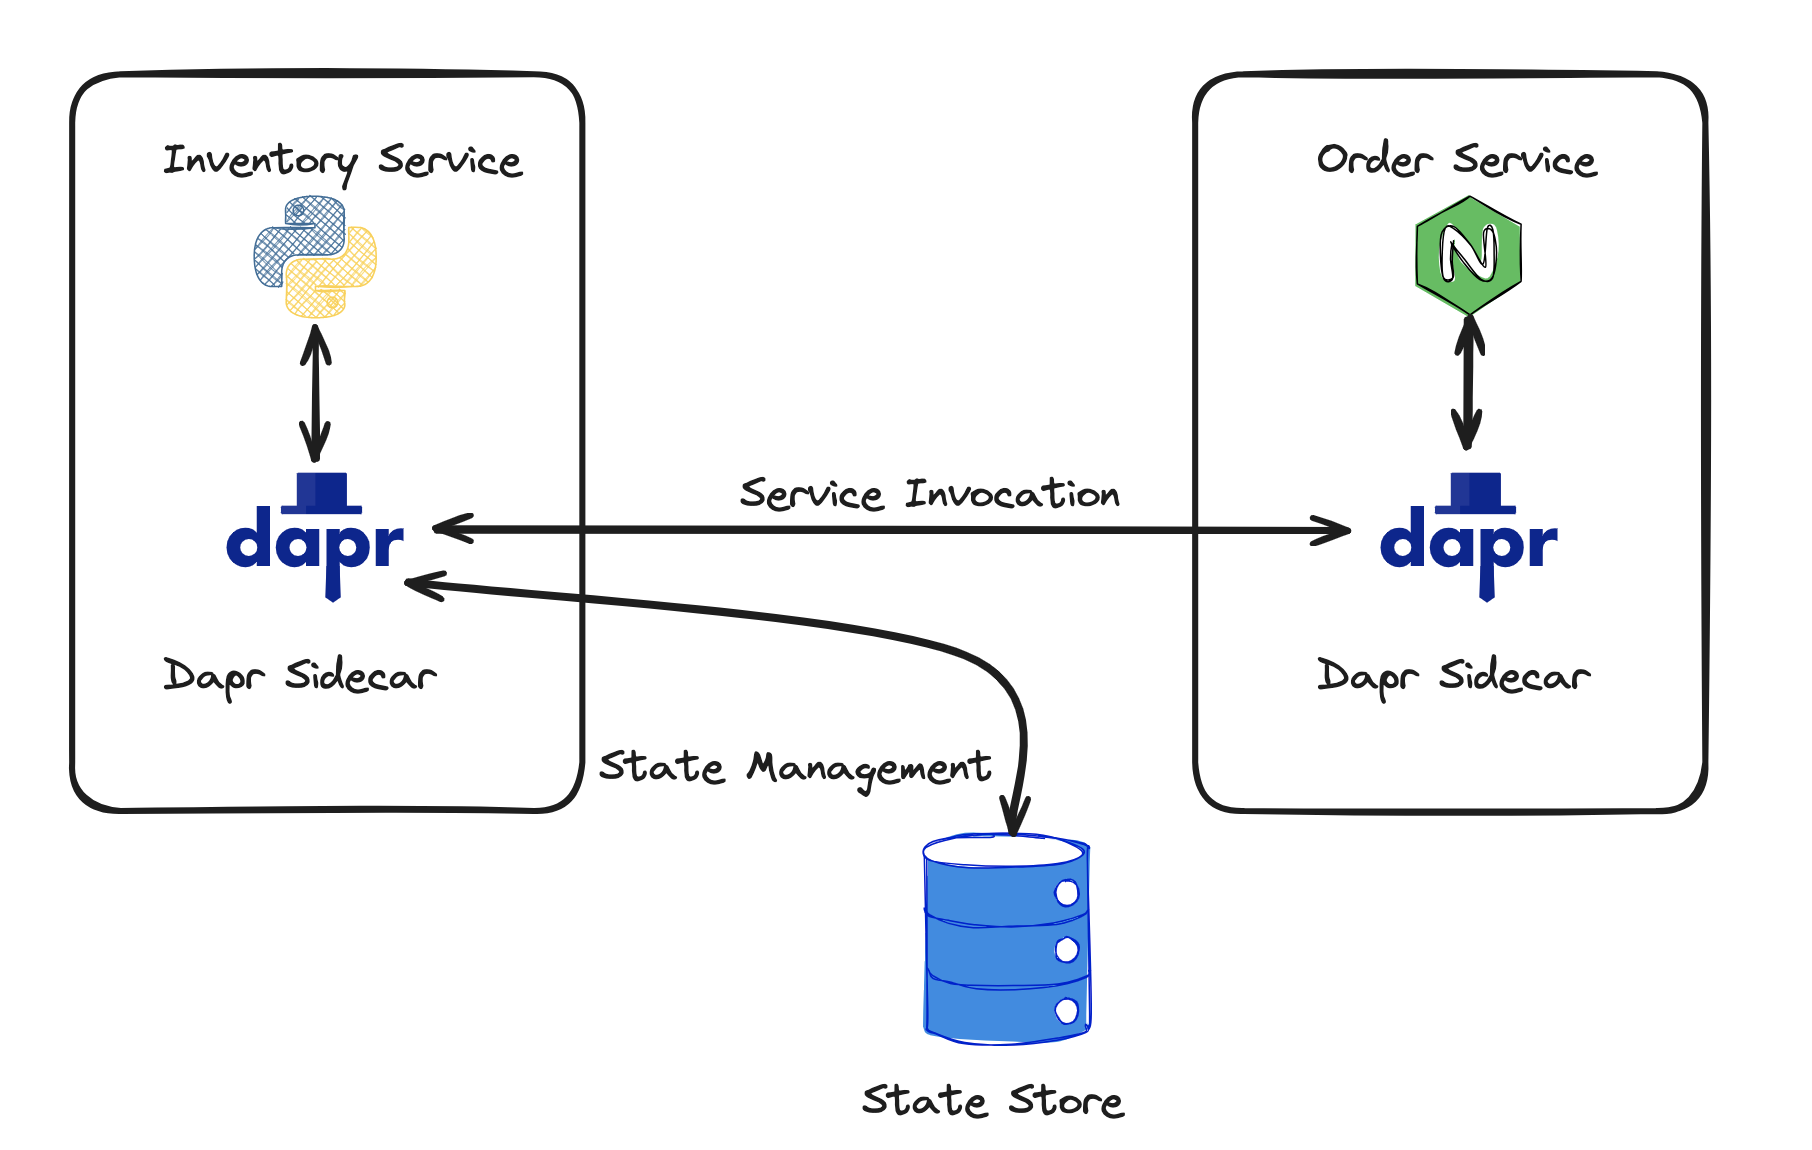
You’ll set up Dapr locally, use its CLI, learn how the sidecar pattern works, and watch your services interact — even though they’re written in different languages.
Let’s get started.
Understanding the Sidecar Pattern
Dapr gives your app distributed system capabilities — like service invocation and state management — without forcing you to write infrastructure code. It does this by using the sidecar pattern.
In practice, this means that for each service you run, Dapr launches a companion process (a “sidecar”) that listens for HTTP or gRPC calls. Your service talks to Dapr; Dapr handles the infrastructure.
Dapr’s sidecar communicates with your app, your app sends requests to the sidecar — for example, “save this order” or “call the inventory service” — and the sidecar handles the rest.
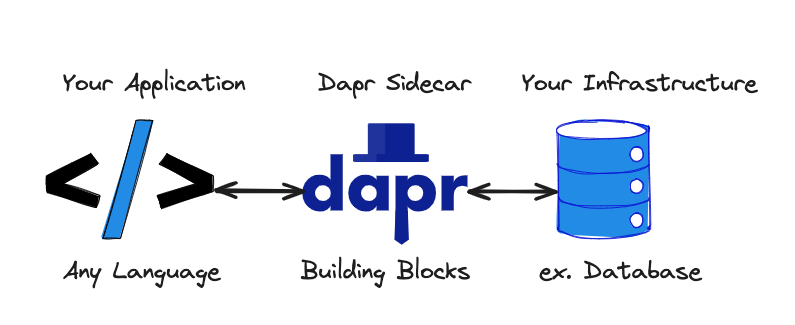
In our microservices app, both the Inventory Service (Python) and the Order Service (JavaScript) will run with their own sidecars. The services themselves don’t need to know where state is stored or how to reach each other—Dapr takes care of that, through simple API calls.
This pattern keeps your services clean and portable while simplifying the tricky parts of distributed systems. Next, we’ll look at what those services do — and how Dapr fits into the architecture.
What We’re Building: A Two-Service Dapr Microservices App
To see Dapr in action, we’re going to build a simple but realistic microservices application: a small e-commerce system composed of two independent services.
- 🧾 Order Service (JavaScript): Accepts customer orders and checks product availability.
- 📦 Inventory Service (Python): Manages available product stock using a state store.
Each service will run independently, written in its own language, and will communicate through Dapr using its standardised building blocks.
Here’s what you’ll build and run locally by the end of this article:
Two microservices, each with its own Dapr sidecar.
No hardcoded URLs. No direct database integration. Just clean, portable microservices powered by Dapr.
Why Dapr?
Dapr acts as the glue between your services and the underlying infrastructure. It gives you tools to build distributed systems without writing all the boilerplate that usually comes with it. Here’s how we’ll use it in this project:
Service Invocation
In a microservices setup, services often need to talk to each other — like the Order Service calling the Inventory Service to check stock levels.
Dapr handles this communication with a simple API:
- You call a local Dapr sidecar.
- Dapr discovers the target service by name, handles retries and encryption, and routes the request.
- Your code stays simple and infrastructure-agnostic.
We’ll see this in action when the JavaScript-based Order Service calls the Python-based Inventory Service.
State Management
The Inventory Service needs to store and retrieve stock levels. Instead of integrating directly with Redis or Cosmos DB, we’ll use Dapr’s state API.
- You send key/value data to your sidecar.
- Dapr persists it to the configured state store.
- Your application stays focused on business logic, not database wiring.
We’ll see this in action when storing inventory data in the Python service.
Next up, we’ll set up your local development environment with Dapr CLI, Docker, and the tools needed to run both services. Then we’ll walk step-by-step through building and running each microservice. Let’s get your system ready and start building.
Setting Up Your Development Environment
Before we build our Dapr-powered microservices, let’s set up the environment that lets a Python Inventory Service and a Node.js Order Service communicate and persist state seamlessly — using Dapr’s APIs instead of direct service wiring or manual database code.
By the end of this setup, you’ll be able to run both services independently, with Dapr handling service invocation, state storage, and observability — giving you a clean microservices architecture without boilerplate.
What You’ll Need
Make sure you have the following tools installed:
- Docker: Required for running Dapr’s dependencies (Redis, Zipkin, etc.)
- Python 3.12: Used for the Inventory Service
- Node.js 20.x: Used for the Order Service
Earlier versions of Python and Node may work, but these are the ones we’ve tested.
Optional: Set Up a Python Virtual Environment
This is not required but recommended to isolate dependencies:
|
|
Install and Initialize the Dapr CLI
The Dapr CLI is your main tool for running, managing, and inspecting Dapr applications locally. Let’s get it installed and bootstrapped in under 5 minutes.
Install Dapr CLI
Windows (PowerShell):
|
|
macOS (Homebrew):
|
|
Linux (Curl):
|
|
Initialize Dapr
Run this command to bootstrap your local Dapr environment:
|
|
This command:
- Pulls essential Docker containers
- Starts local services for state, pub/sub, and observability
- Prepares your machine to run Dapr-enabled apps
What Dapr Sets Up for You
Running dapr init spins up a few services behind the scenes:
| Container | Purpose |
|---|---|
dapr_redis |
Local state store and pub/sub broker |
dapr_zipkin |
Enables distributed tracing and observability |
dapr_placement |
Used for Dapr’s actor runtime (not used in this article yet) |
Think of this as spinning up a mini cloud-native runtime on your laptop — with zero config.
To confirm everything is up, run:
|
|
You should see those containers listed and running.
✅ You’re Ready to Build
You now have Dapr installed, containers running, and the building blocks of your microservices stack ready to go. Dapr will take care of the plumbing — state, discovery, and service calls — so you can focus on building clean, focused services.
Let’s begin by building our first service:
→ the Inventory API, powered by Dapr’s state management.
Building the Inventory Service (Python)
Let’s start by building the first part of our microservices application: the Inventory Service. This service is responsible for storing and retrieving product quantities using Dapr’s state management building block. By the end of this section, you’ll have a working Python service that reads and writes inventory data—without writing a single line of Redis or database code.
1. Set Up the Service Directory and Environment
Let’s create a folder for the service and set up a clean Python environment.
|
|
This sets up your service folder with Flask (for the HTTP API) and Requests (for talking to Dapr).
2. Create the Service Code
Now, create a file called inventory_service.py inside the inventory-service folder and paste in the following code:
|
|
What You Just Built
✅ A clean REST API that supports:
GET /inventory/<item_id>to fetch an item’s quantityPOST /inventory/<item_id>to update the quantity
✅ Inventory is stored using Dapr’s state management API:
- No direct Redis calls
- No database config
- Portable across local dev, Azure Cosmos DB, or cloud-native backends
✅ Fully decoupled from storage tech: change your state store later without touching this code.
✅ Inventory Service: Done. What’s Next?
You now have a clean, working Python microservice that stores product quantities using Dapr’s state management—without touching Redis, connection strings, or database logic. 🎉
Next, we’ll build the Order Service using JavaScript. It’ll place orders by invoking the Inventory Service through Dapr—no service discovery, no hard-coded URLs, no retries logic. Just clean, decoupled communication.
Let’s see how Dapr makes service-to-service calls just as seamless as state.
Building the Order Service (JavaScript)
Now that we have a working Inventory Service storing product quantities through Dapr’s state API, it’s time to build the Order Service. This service will let us place an order for a product, and it will:
- Check the available inventory by invoking the Inventory Service via Dapr.
- If enough stock exists, update the inventory.
- Respond with a success or failure message.
We’ll use Node.js with Express and Axios, and we’ll rely on Dapr’s service invocation API to talk to the Inventory Service—no hardcoded service URLs, no retry logic, no discovery mechanism. Dapr handles it all.
1. Set up the service
Create a new folder for the Order Service:
|
|
Initialize a new Node.js project and install the dependencies:
|
|
2. Create the service code
Create a file named order_service.js and add the following code:
|
|
3. Understanding What’s Happening
Let’s break it down:
Dapr Service Invocation
We don’t call the Inventory Service directly. Instead, we ask the Dapr sidecar running alongside the Order Service to invoke it on our behalf:
|
|
INVENTORY_SERVICEis the Dapr app ID of the target service.- Dapr handles service discovery, retries, timeouts, and even mTLS behind the scenes.
Logic Flow
- We send a GET request to the Inventory Service (via Dapr) to check available quantity.
- If the stock is sufficient, we send a POST request to decrement inventory.
- A success or error message is returned accordingly.
Clean, Minimal Boilerplate
Notice how we’re not handling service discovery, retries, timeouts, or authentication. That’s all baked into Dapr’s runtime. All we’re doing is business logic.
Next Step
Now that both services are built, let’s see them run side-by-side, with Dapr handling the communication.
We’ll:
- Launch both services with Dapr CLI.
- Send test requests (place orders, check stock).
- Watch Dapr abstract all the infrastructure pain away.
Let’s run this thing!
Running and Testing Your Dapr-Powered Microservices
You’ve built two microservices—one in Python, one in JavaScript—wired together only through Dapr. Now it’s time to bring them to life.
We’ll run each service with its own Dapr sidecar, then walk through an end-to-end flow: stocking inventory, placing an order, and watching the system respond—all without hardcoded URLs, manual retries, or direct database code.
Let’s do this.
Run Each Service with Dapr
We’ll use the Dapr CLI to launch each service alongside its sidecar. Open two terminal windows, one for each service.
Start the Inventory Service (Python)
In the first terminal:
|
|
Keep this terminal open to watch logs.
Start the Order Service (JavaScript)
In the second terminal:
|
|
Both services are now running with their Dapr sidecars. Now let’s see them in action.
Test the End-to-End Flow
Open a third terminal to run these tests.
Step 1 – Stock Inventory
Let’s add 100 units of item1 to the inventory:
|
|
✅ You should see:
|
|
Step 2 – Check Inventory
Let’s confirm it was stored correctly:
|
|
✅ You should see:
|
|
Step 3 – Place an Order
Now, let’s place an order for 10 units of item1:
|
|
✅ Response should be:
|
|
Step 4 – Confirm Inventory Update
Let’s check the inventory again—it should be down to 90:
|
|
✅ You should now see:
|
|
You’ve just executed a cross-service transaction powered entirely by Dapr. No service discovery. No Redis client setup. No retries code. Just clean, decoupled service logic.
What Just Happened (Behind the Scenes)
Let’s break down what Dapr handled for you behind the curtain:
-
Service discovery
You didn’t configure service URLs—Dapr routed the call based onapp-id. -
Reliable communication
Built-in retries and error handling ensured smooth invocation, even across service boundaries. -
State management
Inventory was stored and updated in Redis—without writing Redis code. -
Runtime abstraction
The Dapr sidecar handled HTTP calls, state persistence, and invocation logic for each service.
You didn’t write a single line of networking, retry, or infrastructure glue code. Dapr handled the hard parts—so your services could stay clean, testable, and focused.
🎉 You Did It
You’ve now built and tested a fully working microservices system using Dapr:
- ✅ Two services in different languages
- ✅ Connected through Dapr’s HTTP APIs
- ✅ Communicating via service invocation
- ✅ Storing state using Dapr’s key-value interface
And all of it without touching service registries, SDKs, or databases directly.
In short—you didn’t just run your app. You ran it the Dapr way—clean, decoupled, cloud-native by design.
Conclusion: What You Built, and Where You’re Headed
You just built and tested a fully functioning microservices application using Dapr—and not just any app.
You built:
- ✅ Two independent services in different languages—Python and JavaScript.
- ✅ A runtime-powered architecture where Dapr handled state, service discovery, and retries.
- ✅ Real service-to-service communication and state persistence—without writing any Redis or network boilerplate.
And you did it all with a consistent API surface, running locally through the Dapr CLI.
What’s more powerful is what you didn’t have to do.
You didn’t wire up a service registry.
You didn’t write custom retry logic.
You didn’t install a Redis client library.
You let Dapr handle the infrastructure concerns, so you could focus on business logic.
But we’re just getting started.
In the next article, we’ll evolve this architecture:
- 🔁 From direct service calls to event-driven messaging with Dapr’s Pub/Sub building block.
- ☁️ From local machines to cloud-native deployments using Azure Container Apps.
You’ll learn how Dapr makes evented systems and cloud hosting feel just as clean and accessible as what you’ve already built—because in Dapr’s world, distributed doesn’t mean difficult.
Get ready to build the next layer. It only gets better from here.