Introduction 🎉
Hey there, Everyone! 👋 Welcome back to our exciting journey into the world of Terraform on Azure! Last time, we dove deep into the heart of Terraform’s magic: the dependency graph. We explored how Terraform automatically detects dependencies between resources, plans the deployment order, and manages changes like a boss.
In this post, we’ll take our skills to the next level by creating a Windows Virtual Machine on Azure using Terraform. Along the way, we’ll learn how to manage resource dependencies effectively, making our infrastructure provisioning process smoother than ever. Get ready for a thrilling ride filled with hands-on learning and plenty of fun! 🎢
Resource Dependencies and Terraform 🧩
Creating a Windows VM on Azure involves more than just spinning up the virtual machine itself. We need to lay the groundwork by creating prerequisite resources such as a resource group, a Virtual Network, a Subnet, and a Network Interface card. Each of these resources depends on the previous one, forming a chain of dependencies.

Managing resource dependencies is crucial in infrastructure provisioning because it ensures that resources are created in the correct order and that all necessary components are in place before dependent resources are provisioned. Terraform excels at handling these dependencies, making our lives as infrastructure engineers much easier. 😌
Defining the Virtual Machine Resource and Dependencies 📝
To create our Windows VM and its dependencies, we need to define several components in our Terraform configuration file:
a. Resource group b. Virtual network and subnet c. Network interface card d. Windows image and size
For this example, we’ll use the Windows Server 2019 Datacenter image and the Standard_D2s_v3 VM size.
Creating the Terraform Configuration File 🛠️
Let’s dive in and create the main.tf Terraform configuration file – our blueprint for Azure infrastructure excellence:
|
|
💡 Quick Tip: The Terraform configuration file uses the HashiCorp Configuration Language (HCL), a declarative language for defining infrastructure as code. HCL has a straightforward syntax that’s easy to read and write, making your infrastructure code more maintainable and collaborative.
Understanding the Terraform Configuration File 🔍
Let’s take a behind-the-scenes look at how we’re orchestrating this Azure infrastructure symphony:
-
Resource Group: We’re creating a resource group
iaMachs_rg(the Terraform name), but Azure knows it asprod-iaMachs-rg. It’s located in theAustralia Eastregion and logically contains all our Azure resources. -
Virtual Network: Next, we’re creating a virtual network called
iaMachs-VNetwithin theprod-iaMachs-rgresource group. We reference the resource group usingresource_group_name = azurerm_resource_group.iaMachs_rg.nameand set the virtual network’s location based on the resource group’s location withlocation = azurerm_resource_group.iaMachs_rg.location. -
Subnet: We’re creating a subnet called
iaMachs-snwithin theiaMachs-VNetvirtual network. We reference the resource group and virtual network usingresource_group_name = azurerm_resource_group.iaMachs_rg.nameandvirtual_network_name = azurerm_virtual_network.iaMachs_VNet.name, respectively. -
Network Interface Card: Here’s where things get interesting! We’re creating a network interface called
iaMachs-VM-NICand associating it with ouriaMachs-snsubnet. We reference the resource group and subnet usingresource_group_name = azurerm_resource_group.iaMachs_rg.nameandsubnet_id = azurerm_subnet.iaMachs_sn.id, respectively. -
Windows Virtual Machine: Finally, the star of the show – our Windows VM called
iaMachs-VM! We associate it with ouriaMachs-VM-NICnetwork interface, referencing the resource group and network interface usingresource_group_name = azurerm_resource_group.iaMachs_rg.nameandnetwork_interface_ids = [azurerm_network_interface.iaMachs_VM_NIC.id], respectively.
By using these references, Terraform understands our resource dependencies and correctly sequences the creation, update, or deletion for a successful Azure Windows VM deployment. 🎉
Initializing and Applying the Terraform Configuration 🚀
Alright, folks, it’s showtime! We’ve got our configuration file ready, so let’s bring our Virtual Machine to life on Azure:
|
|
Terraform will give us a sneak peek of what it’s about to do before applying the configuration. You’ll see an output similar to this:
|
|
💡 Pro Tip: Always review the
terraform planoutput carefully before proceeding with theapplycommand. This helps you catch any unintended changes and ensures that your infrastructure will be provisioned as expected.
The resource order displayed doesn’t always reflect the actual creation sequence. Terraform smartly identifies dependencies from our configuration file to determine the creation order:
azurerm_resource_group.iaMachs_rgazurerm_virtual_network.iaMachs_VNetazurerm_subnet.iaMachs_snazurerm_network_interface.iaMachs_VM_NICazurerm_windows_virtual_machine.iaMachs_VM
Creating the Virtual Machine on Azure 🖥️
Now that we’ve reviewed the Terraform plan output, let’s bring our resources to life with the terraform apply command:
|
|
Terraform will ask you to confirm that you want to create the specified resources. Type yes and hit enter to proceed:
|
|
After confirming, Terraform will create the resources in the correct order based on their dependencies. Once the process is complete, you will see an output similar to the following:
|
|
Your Windows VM and its associated resources have now been successfully created on Azure using Terraform. 🎉
Verifying the Virtual Machine in the Azure Portal ✅
Let’s make sure our Virtual Machine is up and running by checking it out in the Azure Portal:
- Log in to the Azure Portal.
- Navigate to the “Virtual machines” section in the left-hand menu or search for it in the search bar at the top.
- You should see the newly created Virtual Machine
iaMachs-VMproudly displayed in the list of VMs. 🥳
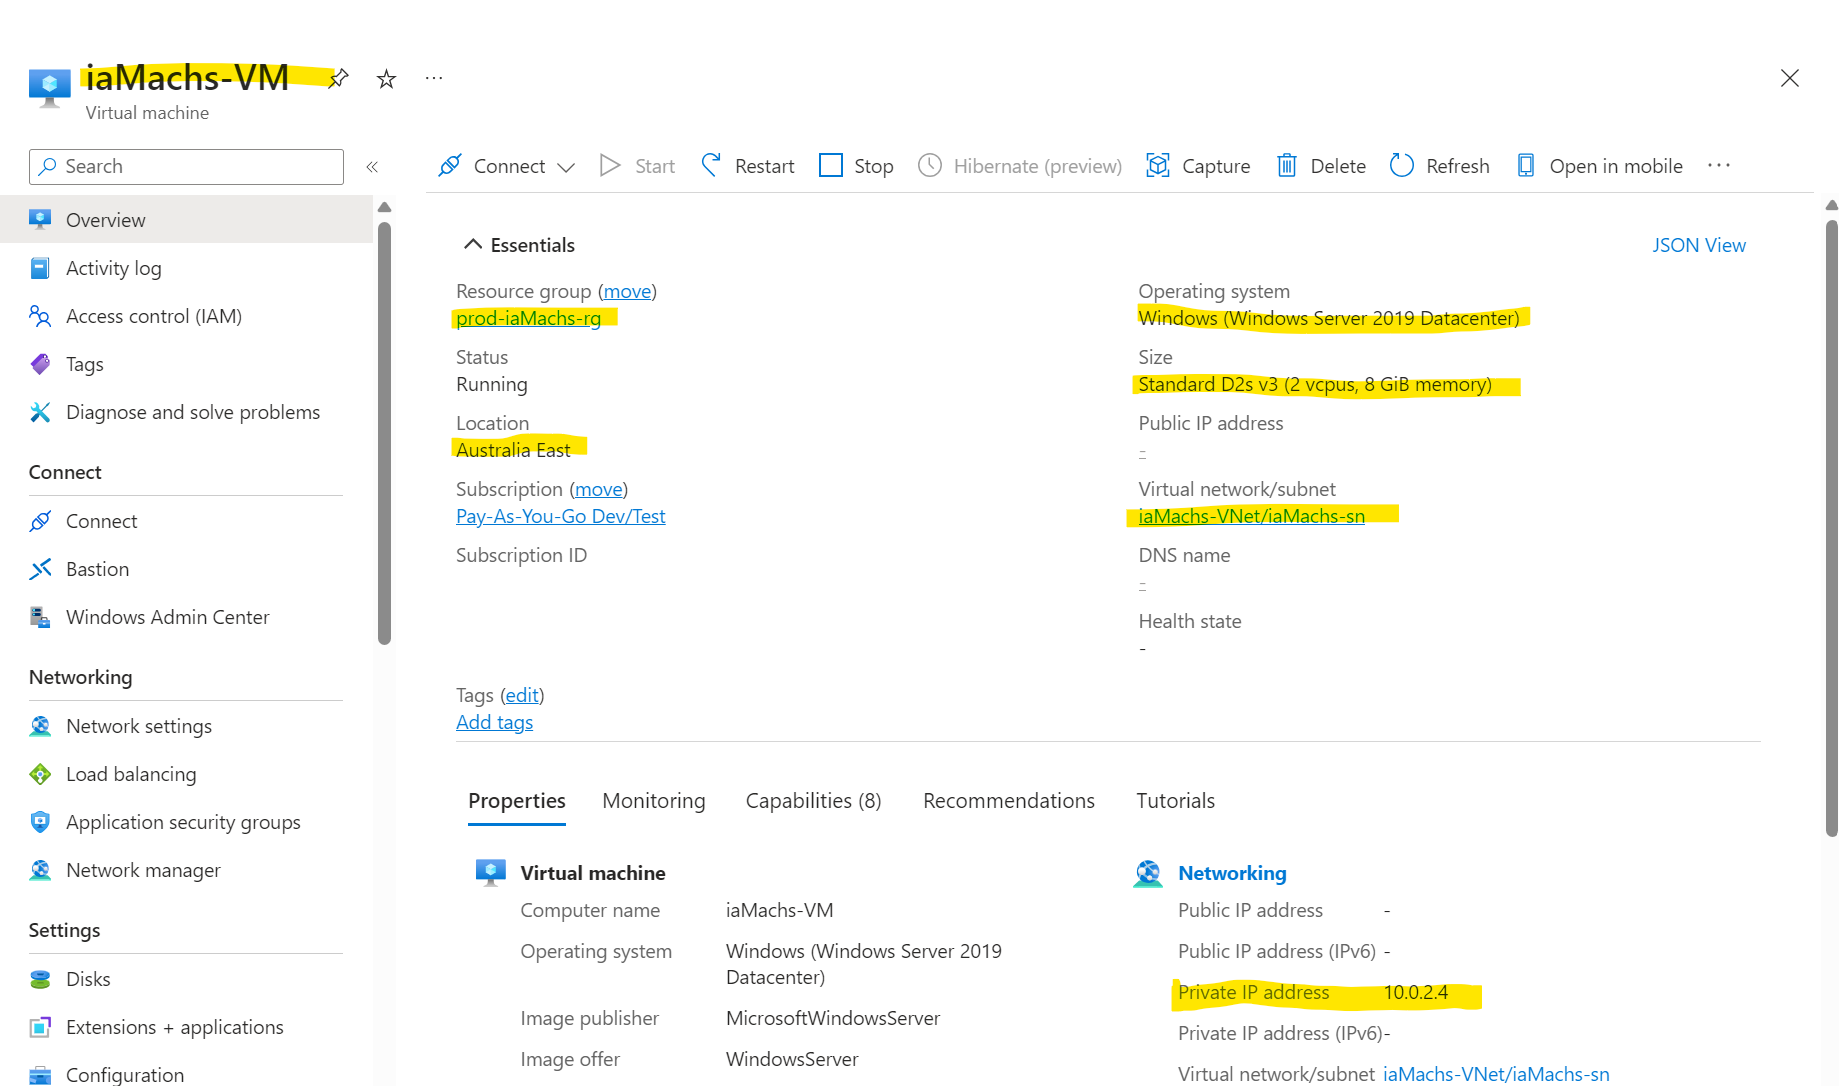
As you can see in the screenshot, our Virtual Machine iaMachs-VM is happily residing in the resource group prod-iaMachs-rg and connected to the Virtual Network and Subnet iaMachs-VNet/iaMachs-sn. This confirms that our Terraform configuration has been applied successfully, and all our resources have been created exactly as intended. 💪
Cleaning Up Resources 🧹
Alright, folks, the show’s over, and it’s time to clean up the resources created by Terraform. It’s a good practice to clean up unused resources to avoid unnecessary Azure costs. You can do this by using the terraform destroy command.
- Make sure you are in the same directory where you ran the
terraform applycommand. - Run the following command to destroy all the resources created by Terraform:
|
|
Terraform will ask you to confirm that you want to destroy the resources. Type yes and hit enter to proceed.
Once the process is complete, you will see an output similar to the following:
|
|
All the resources we created – the Virtual Machine, Virtual Network, Subnet, Network Interface, and Resource Group – have been successfully deleted from your Azure account, leaving you with a clean slate for your next Azure adventure. 😄
Conclusion 🎉
Wow, what a journey! In this article, we walked through the process of creating a Windows Virtual Machine on Azure using Terraform while managing resource dependencies like pros. We learned how to:
- Define resources and their dependencies in a Terraform configuration file 📝
- Initialize and apply Terraform configurations to create resources on Azure 🚀
- Verify the created resources in the Azure Portal ✅
- Clean up resources using the
terraform destroycommand 🧹
I hope you found this article helpful and informative. If you have any questions or want to share your own Terraform and Azure adventures, feel free to leave a comment below. 💬
Stay tuned for more exciting Terraform and Azure content! Until then, happy coding, and keep exploring the amazing world of infrastructure as code! 😊🌟